19
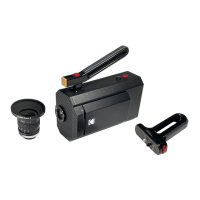
1. Based on the light meter display, adjust the exposure
with the aperture ring (A).
NOTE: The image in the LCD viewinder is not aected
by the exposure setting; it always displays an optimally
exposed image, for use in all lighting conditions.
2. Adjust focus with the focus ring.
TIP: For precise focus to the object, measure the
distance to the object from the ilm plane mark (B) on the
camera.
3. Shoot ilm: Press the run button to begin shooting.
Shooting will continue until you release the run button,
or press it again, depending on how you set the run
mode.
Each time you start and stop shooting, you create a scene,
starting with Scene1.
Scenes are numbered per cartridge.
See shooting tips at www.kodak.com/go/super8.
Adjust Exposure, Focus,
and Shoot
C 16
11
8
5.6
4
RUN
RUN
CART 3 50D 18 FPS0.0 ft
CART 3 50D 18 FPS0.0 ft
10dB
0dB
-
+
0
Getting Started
2
1
3
3
A
B
To unload the cartridge:
1. Open the ilm door.
2. Lift the cartridge and pull it out.
CAUTION: To avoid damaging the ilm gate, do NOT use
any tool to pry the ilm cartridge from the camera.
3. If you haven’t already labeled the cartridge with the
assigned cartridge number (e.g. Cartridge1), do it now.
(A permanent marker works well.)
Super 8 Film processing lab directory is available at:
www.kodak.com/go/super8
TIP: Be sure to note the cartridge number.
Unload and Process Film
1
3
2