16 17
SETUP
SETUP
Battery Warnings
Warning: Do not run the Patient Simulator for more than 1 minute
on a single battery.
Warning: If both batteries are removed while the simulation is
paused, the Patient Simulator will shut down and simulation data
will be lost.
Warning: Dispose of batteries in accordance with local regulations.
Warning: The external battery charger is for indoor use only.
Warning: The batteries should only be charged in temperatures
ranging from 0 °C - 40°C (32 °F - 104 °F).
Warning: Inserting and connecting batteries incorrectly, short
circuiting or exposure to fluids pose an explosion hazard.
Warning: Do not mistreat, disassemble or attempt to repair the
battery.
Warning: Do not use the batteries if they are visibly damaged,
malfunctioning or appear to leak electrolyte.
Warning: Take extreme care to avoid direct contact with electrolyte,
hot or smoking parts. In case of the above, disconnect and remove
the battery when it is judged safe to do so.
Using the Internal Compressor
The SimMan3G Patient Simulator’s chest movements, airway modes
and fluid systems are driven by compressed air. The right leg contains
a compressor and tank with separate reservoirs for clear and
simulated blood fluids.
For extended periods or stationary use, it is recommended to
connect to an external source of compressed air. This reduces wear
on the internal compressor and extends battery life of the Patient
Simulator.
For instructions on connecting an external compressor and adjusting
compressor default settings, see Air/CO
2
Panel section.
To avoid overheating and reduce wear
– If using the Patient Simulator in high temperatures, always allow
the simulator to cool down between training sessions.
Turning the Internal Compressor
OFF Using LLEAP
To switch OFF the internal compressor (to conserve the simulator
batteries and reduce wear), do the following.:
1 In LLEAP, select the <Tools> menu.
2 From <Simulator Setup>, click the Turn off internal compressor.
Changing Default Compressor
Settings Using LLEAP
Change default compressor settings via the Profile Editor.
1 Open the Profile Editor from the <Tools> menu in LLEAP.
2 Select the <General> tab in the Profile Editor.
3 From the compressor setup option, choose the Internal or
External compressor as default.
Air/CO
2
Panel
The Air/CO
2
panel is located on the left side of the torso. To access
the panel, lift up the simulator skin flap and remove the protective
covering. Connect external Air / CO
2
.
Air/CO
2
panel has 2 connection ports
Air / CO
2
Inlet
Blood
Outlet
Connecting External Air and CO
2
Supply
An internal compressor is located in the right leg of the Patient
Simulator. It is recommended to use an external source of
compressed air whenever the Patient Simulator is stationary over
extended periods of use.
If the Patient Simulator is required to exhale CO
2
, with each
ventilation, connect external CO
2
.
Connect CO
2
only if the Patient Simulator is required to exhale
CO
2
with each ventilation. Exhaled CO
2
can be detected with a real
capnographic device. The Patient Simulator will only exhale CO
2
when a capnograph is registered as being connected to the system.
1 Connect a suitable CO
2
source to a Laerdal external
compressor or regulator panel.
2 Connect a Laerdal double-lumen Air/CO
2
tube from the
external compressor or regulator panel to the Air/CO
2
inlet on
the panel.
For more information on external compressors and regulator panels
compatible with SimMan 3G, contact your local Laerdal representative.
Blood and Fluid System
The Patient Simulator has two internal reservoirs, one for blood and
one for fluids/secretions. Patient Simulator is also supplied with two fill
units - one Blood Fill Unit for blood and one Fluid Fill Unit for fluids/
secretions.
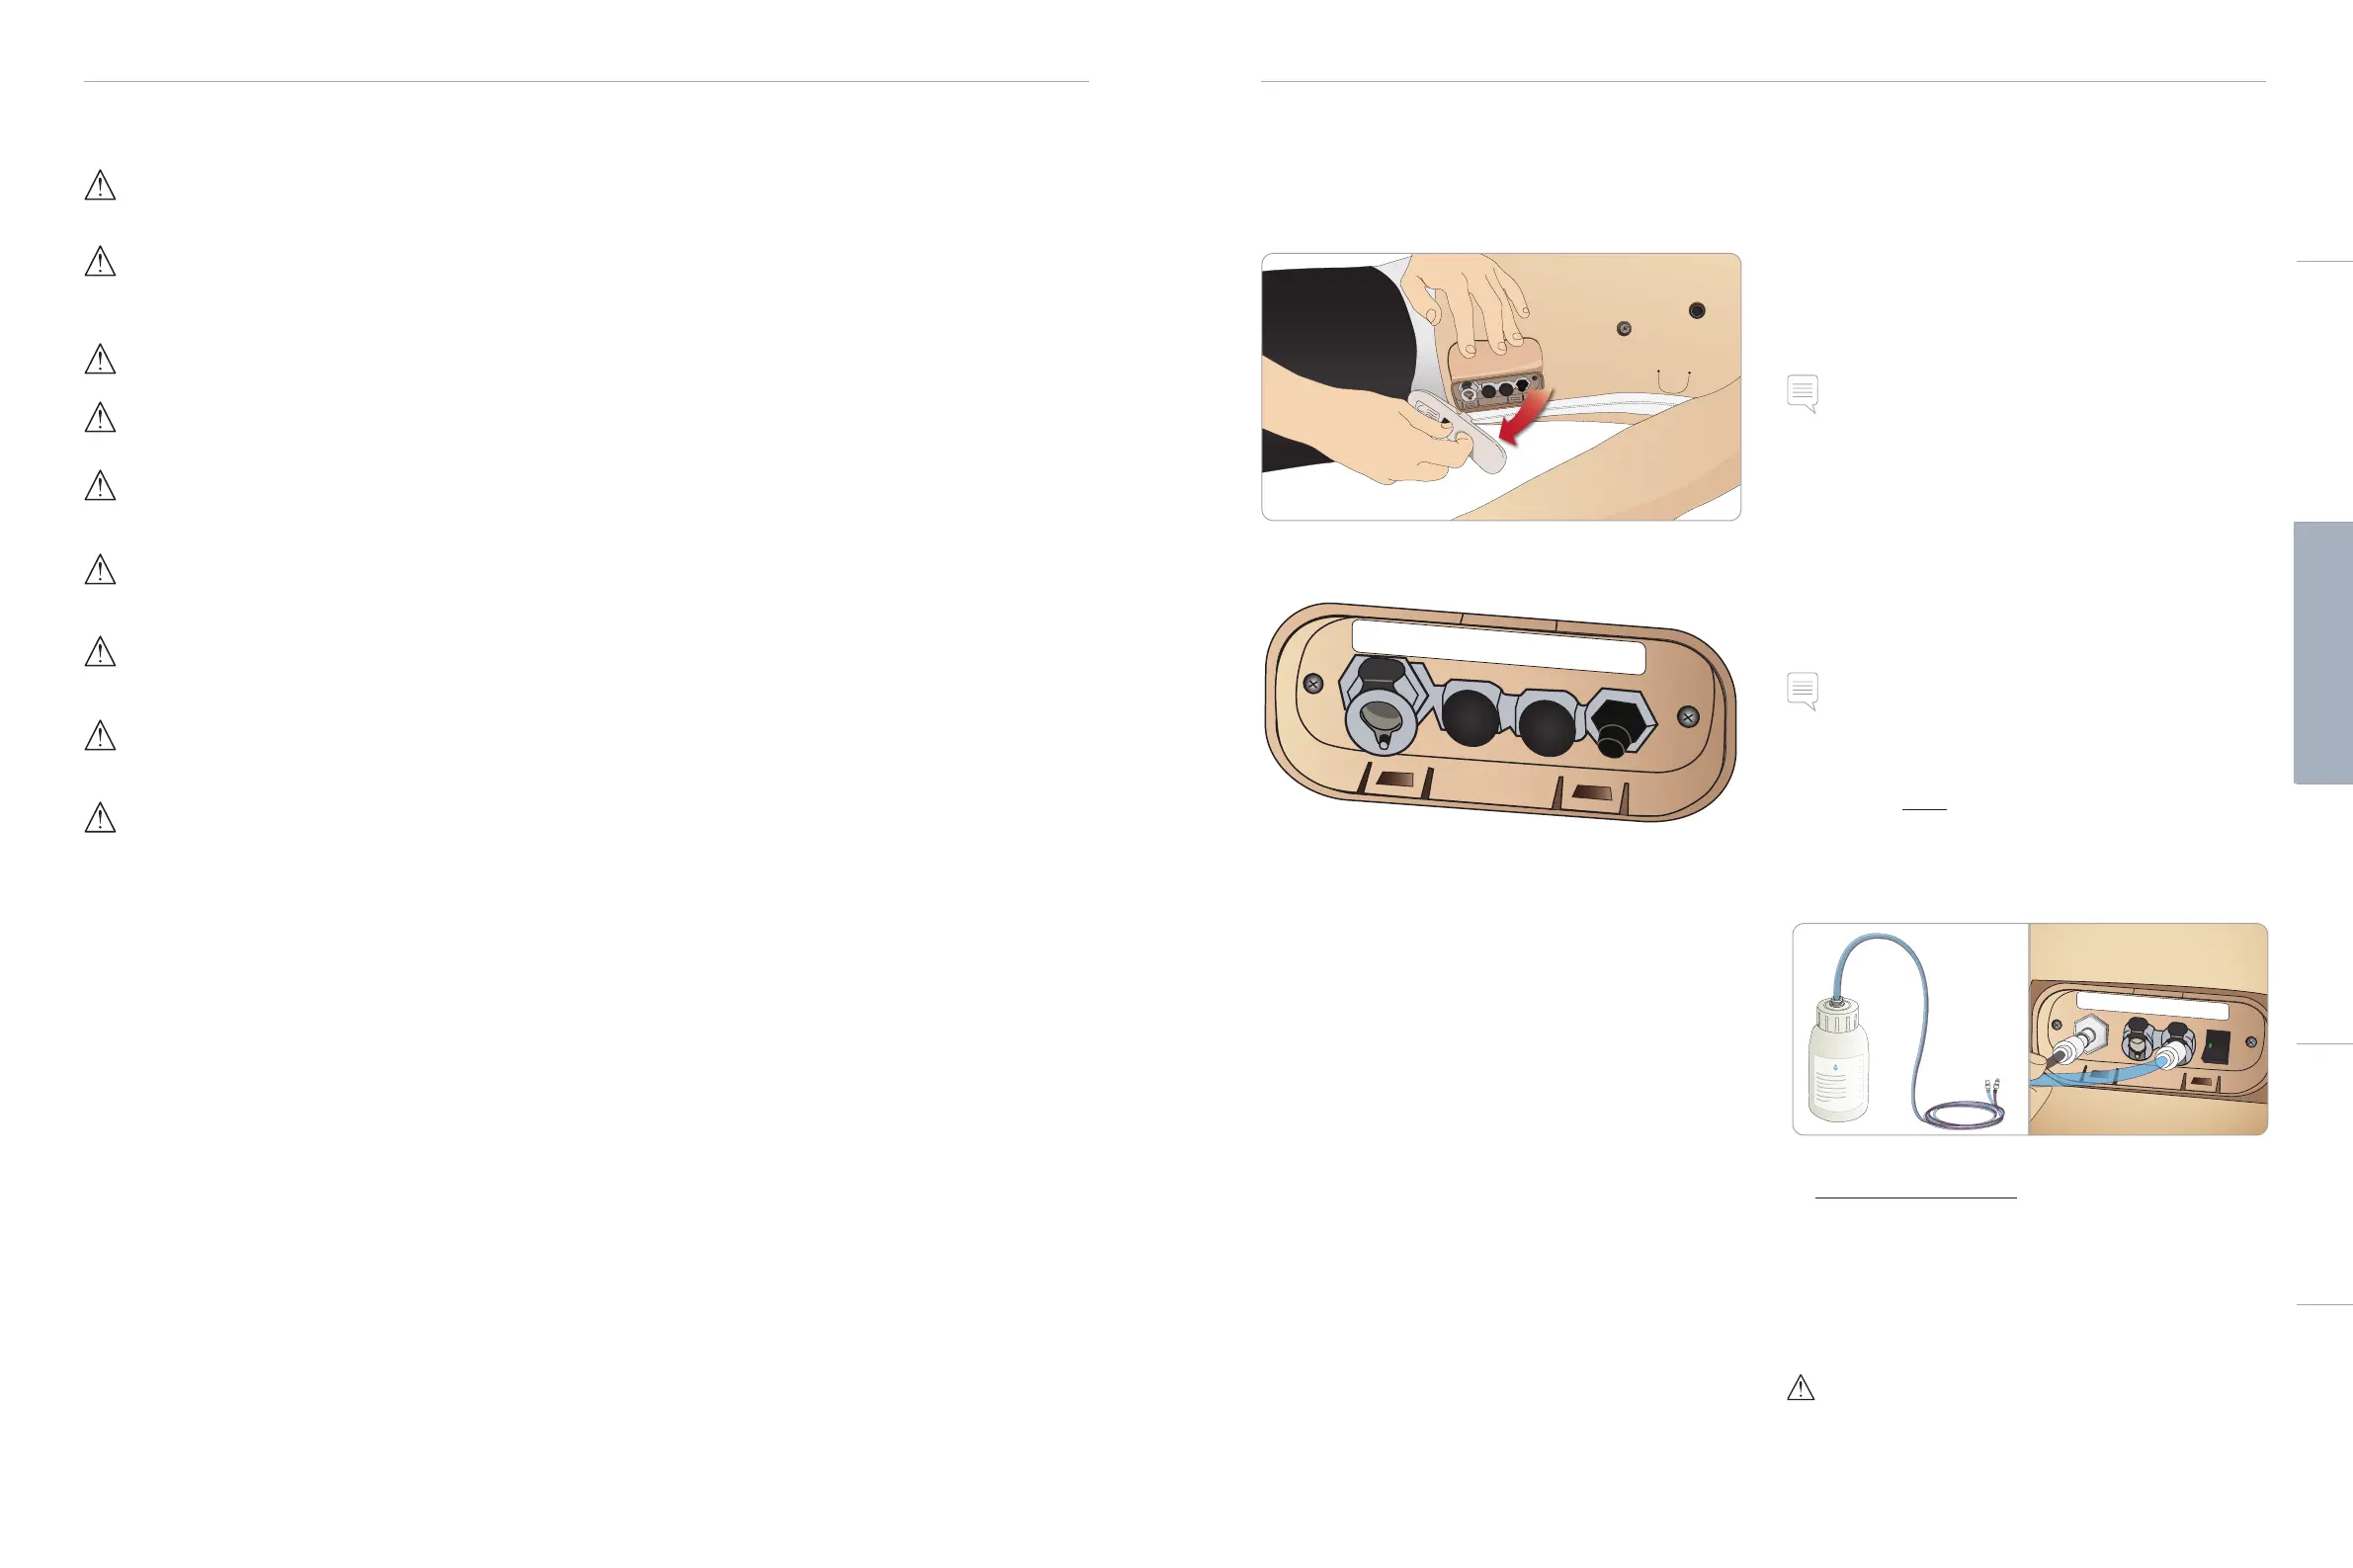
SimMan 3G Right Leg Fill Panel
The right leg fill panel is located at the top of the right leg near the
pelvis. The fill panel contains connectors for filling the blood and fluid
reservoirs.
Note: Make sure the Patient Simulator power is on.
Fill Internal Fluid Reservoir
1 Roll the right leg skin down to expose the fill panel.
2 Connect fluid fill unit tubes to the fluid and air connectors
in the right leg panel.
3 Push the fill button on the panel. The button will light up and
fluid will flow into the Patient Simulator.
4 When the flow stops, disconnect the fill unit.
5 Push the fill button on the panel. The light will go out.
Note: Disconnect tubes from the Patient Simulator before pushing
the fill button. Pushing the button before disconnecting the tubes
will initiate draining of the tank.
Empty Internal Fluid Reservoir
1 Connect an empty fluid fill unit to fluid connector in
the right leg panel.
2 Fluid from the internal reservoir will drain into the bottle.
3 When the flow stops, disconnect the fluid connector.
Run Patient Simulator with External Fluid
1 Drain the internal reservoir. Follow instructions for “Empty
Internal Fluid Reservoir”.
2 After draining the internal reservoir, fill the fluid fill unit and
connect to the Patient Simulator.
3 Push the fill button on the panel. The button will light and fluid
will flow into the Patient Simulator.
4 Charge the system for 60 seconds before starting simulation.
Warning: Connecting a full fluid fill unit to a Patient Simulator with a
full internal reservoir will result in system overflow. Fluid will drain
out of the right leg. Repeatedly overflowing the system may
damage the product.
Fluid
Inlet
Air Out
Blood
Inlet
Activate
Filling
Fluid
Inlet
Air Out
Blood
Inlet
Activate
Filling
Cautions and WarningsFeaturesSetupMaintenanceSpare Parts Troubleshooting