Do you have a question about the LifeSafety Power FlexPower Netlink NL2 and is the answer not in the manual?
Explains symbols used in the manual.
Lists standards the equipment has been tested against.
Lists safety warnings and precautions for installation and operation.
Explains positional references used in illustrations.
Describes the Netlink NL2, NL4, and NLX modules and their functions.
Lists technical specifications for Netlink modules like voltage, current, and input types.
Provides steps for mounting the Netlink module in an enclosure.
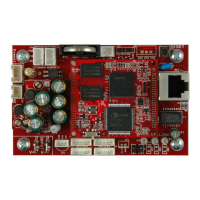
Details the connectors and features of Netlink NL2/NL4 boards (Gen 1 & Gen 2).
Instructions for connecting power, Ethernet, and devices to the Netlink.
Steps and requirements for initial Netlink configuration.
Details logging in, setting time, network, SNMP, email, and user parameters.
Describes how to view real-time parameters and device status on the Netlink Home page.
How to view and program parameters for connected devices via the Netlink interface.
Covers firmware upgrades and rebooting the Netlink board via the Tools page.
Explains the format and content of email reports sent by the Netlink.
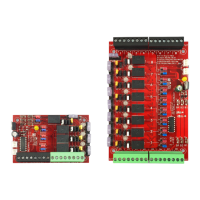
Steps for mounting the NS2 board in an enclosure.
Details the connectors and functionality of the NS2 module.
Wiring instructions for connecting the NS2 board to the Netlink and transformer.
| Communication | Ethernet |
|---|---|
| Remote Monitoring | Yes |
| Remote Control | Yes |
| Output Voltage | 24V DC |
| Output Current | Up to 10A |
| Protocols | SNMP, HTTP |
| Alarm Notification | Email, SNMP |
| Operating Temperature | 0°C to 49°C (32°F to 120°F) |
| Compatibility | Compatible with various access control systems |
| Product Type | Network Managed Power Supply |