73
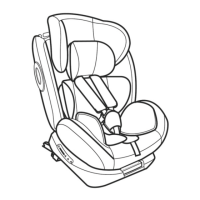
11 Adım. Çocuğunuzu koltuğa koyun. Omuz kemerlernn yükseklğn kontrol edn. Kemerlern herhang br
yere takılmış veya bükülmüş olmadığından emn olun. Çocuğun emnyet kemerlern yce yerleşmş
olduğundan emn olduktan sonra bandı koltuğun ortasına doğru sıkılması çn çekn. Güvenlk koltuğunun 5
noktalı tokasının sabitlendiğinden emin olun. 4;5;6;7;8;9Resm
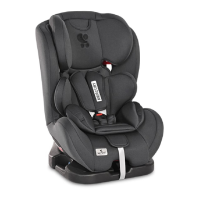
9 Adım. Koltuğun kancasını otomobln kancasına takın. Sabtlemek çn üç yer olableceğn kontrol edn ve
sze uygun olanı seçn. Resm 20
6 Adım. Otomobln sırt dayamalık yerne çocuk koltuğunu sıkıca bastırın. Resm 17. Bu transfer sırasında
ISOFIX çocuk koltuğunu otomobln koltuğunun sırt dayamalık yerne sıkılaştıracaktır ve tık ses duyacaksınız.
Çocuk koltuğu otomobln koltuğunun sırt dayamalık yerne sıkıca sabt olduğundan emn olun. ISOFIX serbest
bırakma düğümesini tekrar kontrol edin ve kilit göstergesinin YEŞİL görüntülendiğinden emin olun. Resm 17
7 Adım. Koltuğu tutun ve sağlam olduğunu veya sallandığını kontrol edn. Eğer koltuk sallanıyor se ve
sabtleyc ISOFIX chazları çıkık se üsttek adımları tekrar edn ve montajı yapın. Resm 18
8 Adım. Üstten sabtleme kancasını çekn, otomobln metal kancasına sabtlemek çn kemer yeternce
çekeblmenz çn serbest bırakma tuşuna basın. Resm 19 Üst ipi çocuk koltuğunun sırtlığının iki yanında ve
arabanın koltuk başlığının etrafında yönlendirin. Resim 20
10 Adım. Kancanın kemern sıkmak çn dğer taraftan çekn.
UYARI: Üstten sabtleme kancası doğru şeklde sıkıldı se serbest bırakma tuşunun dğer tarafında belrgn
yeşl renk ortaya çıkacaktır, Lütfen kontrol ednz! Resm. 21
Step 1. Group 0 + The child seat can be used only in the most backward inclined position. (Picture ) Pull 26 24
the positioning handle and place the child seat in the most backward inclined position (Picture 1;2; ) 3 23;24
This is the safest position for your child so it is advisable to use it as long as possible.
Step 3 . Place the child seat on the seat of the car, it must be oriented in the direction opposite to the
movement. If your car has an air bag on the passenger seat, the child seat should be used only (Picture 25)
in the rear of the car!
Step 4. . Pull out the entire car seat belt. Unlock the harness and lift up the inner cushion. Picture 26 Step 2
Picture 30 Kopirane ot grupa 9-18 27 Pass the lap part of the seat belt thought the guide holes at the both
sides of the safety seat (Picture A position ) and fasten the clip to the corresponding buckle till click is 23 24
heard. Check that the belt buckle is locked by pulling the belt. ( Picture ) 27 28
Please use 3-point safety belts of the car to secure the child seat!
Step 6. Make sure that the belt is not twisted and strongly tightened. Make sure the seat is fixed firmly on the
car seat. ( Picture 32)
Step 7. Place the child in the seat. Check the height of the shoulder belts. Make sure the straps are not
twisted or hanging somewhere. Fasten the seat belts on the child, making sure that they are well placed and
pull the strap in the center of the seat to tighten. ( Picture 4;5;6;7;8;9)
Step 2. Push and hold the release button for rotation of the child seat “5 “ and rotate the seat at 180 º
so that the marking of the seat to match with the blue position on the base. Picture 18;26 15;23;24
Step 5. Pass the upper diagonal part of the belt in the belt guide behind the seat back, and pull to fasten blue
the belt. Pass the upper diagonal part of the belt in the belt guide behind the seat back, and pull to fasten
the belt. Put the inner cushion back. (Picture 31) Picture 28 29;30
INSTALLATION OF SEAT "Group 0+" / newborn and weighing up to 13 kg. /
With 3-point seat belt
Tips: The user-ready tether anchorage usually permanently installed on the inner rear luggage shelf or on the
vehicle floor. For details you could read your vehicle guidelines or contact the vehicle manufacturer.
NOTE: When using the ISOFIX system, the ISOFIX guide sleeves can be inserted into the ISOFIX
anchorages on the vehicle. ( Picture 13) The ISOFIX anchorages on both ends are pushed inward along the
guide sleeves.
IMPORTANT: First please check if there are 2 ISO FIX anchorings in the perpendicular intersection of the
vehicle seat back and seat cushion, and the user-ready top tether anchoring behind the vehicle seat.
Please use 3-point safety belts of the car to secure the child seat!
Step 1. Group 0 The child seat can be used only in the most backward inclined position. (Picture ) + 24; I 3
Pull the positioning handle and place the child seat in the most backward inclined position (Picture 1;2;3
23;24 ) This is the safest position for your child so it is advisable to use it as long as possible.
Step 2. Press the Release button to release the ISO FIX connectors. Than you can hear an audible sound
“click” Picture 14 Slide the rails till the longest position .
Step 5. Push the ISO FIX connectors directly into the anchorages until you hear an audible sound "click".
Picture 16 Make surethat you have heared a “click ” and the ISOFIX latching indication shows GREEN
Picture 17.03
Step 10. Pull the Tether strap on another end back to tighten the Top tether.
Step Place the child in the seat. Check the height of the shoulder belts. Make sure the straps are not 11. 7.
twisted or hanging somewhere. Fasten the seat belts on the child, making sure that they are well placed and
pull the strap in the centre of the seat to tighten. Ensure five points buckle is locked ( Picture 4;5;6;7;8;9)
Step 8. Pull out the Top tether and press the Tether strap release button to extend the strap until it is long
enough to hook the User-ready tether anchorage behind. Picture 19 Guide the top tether through the one of
the belt guides on the top of the backrest of child seat . Picture 20 Guide the top tether through the headrest of
the car. Picture 21
WARNING ! DO NOT USE THE CHILD SAFETY SEAT ADJUSTED AT 90º OF THE SIDE OF MOVEMENT
OF THE CAR !!! THIS CHILD SEAT SHOULD BE USED ONLY AT FOREWARD OR REARWARD SIDE OF
THE MOVEMENT OF THE CAR !!!
CAUTION: If the Top tether is tightened favorably and correctly, a green mark will turn up on the other end of
the Strap release button, please do check it. Picture 23
Step . Place the child seat on the seat of the car, it must be oriented in the direction opposite to the 4 3.
movement. If your car has an air bag on the passenger seat, the child seat should be used only in the rear
of the car!
Step 6. Push firmly the child seat towards the car seat backrest. Picture 17 During this moving the ISOFIX
system will tighten the child seat to the car seat backrest and you will hear a "Click"sound . Ensure that the
child seat is firmly pressed to the car seat backrest. Check the ISOFIX release button again and ensure the
latching indication shows GREEN. Picture 17
Step 7. Grasp the seat body to check the seat if it is fastened tightly or shakes. If the seat shakes and the
ISOFIX connectors are pulled out, please repeat the above steps and install it again. Picture 18
Step 9. Hook the Tether strap hook onto the User-ready anchorages. Check there maybe are 3 anchorages
for the hook, please find one in your favor. Picture 22
Step . Pull and hold the release handle for rotation of the child seat “5 “ and rotate the seat at 180 º 3 2
so that the marking of the seat to match with position the blue position on the base. Picture 16 15;23;24
Release the handle and ensure that the child seat is fixed.
INSTALLATION OF SEAT "Group 0; I" / newborn and weighing up to 18 kg. /
Attaching of the car seat with ISOFIX and Top tether.
Step 7. Place the child in the seat. Check the height of the shoulder belts. Make sure the straps are not
twisted or hanging somewhere. Fasten the seat belts on the child, making sure that they are well placed and
pull the strap in the center of the seat to tighten. ( Picture 4;5;6;7;8;9)
Step 4. . Pull out the entire car seat belt. Unlock the harness and lift up the inner cushion. Picture 26 Step 2
Picture 30 Kopirane ot grupa 9-18 27 Pass the lap part of the seat belt thought the guide holes at the both
sides of the safety seat (Picture A position ) and fasten the clip to the corresponding buckle till click is 23 24
heard. Check that the belt buckle is locked by pulling the belt. ( Picture ) 27 28
Step 5. Pass the upper diagonal part of the belt in the belt guide behind the seat back, and pull to fasten blue
the belt. Pass the upper diagonal part of the belt in the belt guide behind the seat back, and pull to fasten
the belt. Put the inner cushion back. (Picture 31) Picture 28 29;30
Step 2. !!!! for rotation of the child seat “5 “ and rotate the seat at Push and hold the release button
180 º so that the marking of the seat to match with the blue position on the base. Picture 18;26 15;23;24
Step 1. Group 0 + The child seat can be used only in the most backward inclined position. (Picture ) Pull 26 24
the positioning handle and place the child seat in the most backward inclined position (Picture 1;2; ) 3 23;24
This is the safest position for your child so it is advisable to use it as long as possible.
Step 3 . Place the child seat on the seat of the car, it must be oriented in the direction opposite to the
movement. If your car has an air bag on the passenger seat, the child seat should be used only (Picture 25)
in the rear of the car!
Step 6. Make sure that the belt is not twisted and strongly tightened. Make sure the seat is fixed firmly on the
car seat. ( Picture 32)
Please use 3-point safety belts of the car to secure the child seat!
Step 2 . Place the child seat on the seat of the car, it must be oriented in the direction opposite to the
movement. If your car has an air bag on the passenger seat, the child seat should be used only in the rear
of the car!
Step 1. Group 0 + The child seat can be used only in the most backward inclined position. (Picture 5.1) Pull
the positioning handle and place the child seat in the most backward inclined position (Picture 1 ) This is the
safest position for your child so it is advisable to use it as long as possible.
Step 3. Pass the lap part of the seat belt thought the guide holes at the both sides of the safety seat (Picture A
position 9) and fasten the clip to the corresponding buckle till click is heard. Check that the belt buckle is
locked by pulling the belt. ( Picture 5.2)
Step 6. Place the child in the seat. Check the height of the shoulder belts. Make sure the straps are not
twisted or hanging somewhere. Fasten the seat belts on the child, making sure that they are well placed and
pull the strap in the centre of the seat to tighten. ( Picture )4.3;4.4;4.5 4;5;6;7;8;9)
Please use 3-point safety belts of the car to secure the child seat!
Step 4. Pass the upper diagonal part of the belt in the belt guide behind the seat back, and pull to fasten blue
the belt. Picture 5.3;5.4 29;30
Step 5. Make sure that the belt is not twisted and strongly tightened. Make sure the seat is fixed firmly on the
car seat.
Koltuğu arabaya yerleştirmeniz için ve çocuğunuzun emniyetini sağlamanız için arabanın 3 noktalı emniyet
kemerlerini lütfen kullanın!
2 Adım. Çocuk koltuğunun serbest bırakma kolunu çekin ve tutun „ 5 „ ve koltuğu 180 °döndürerek, koltuğun
işaretleri tabanın mavi işaretiyle eşleştirilir. Resim 15;23;24
Kolu bırakın ve koltuğun iyice yerleşmiş olduğundan emin olun. UYARI! OTOMOBİLİN HAREKET YÖNÜNDE
90 ° POZİSYONDA AYARLANMIŞ GÜVENLİK ÇOCUK KOLTUĞUNU KULLANMAYIN! BU ÇOCUK
KOLTUĞU SADECE OTOMOBİLİN HAREKET YÖNÜNDE VE HAREKET YÖNÜNE TERS YÖNDE
KULLANILMASI GEREKMEKTEDİR!!!
3 Adım. . Hareket doğrultusuna karşıt olması gereğince otomobilin koltuğuna koltuğu bırakın Eyer arabanın
arka yolcu koltuklarında hava yastığı varsa sadece arabanın arka koltuklarına koltuğun kullanılması gereklidir!
1 Adım. Geriye doğru SADECE en bükülmüş şekilde 0+ Grup . Için koltuk otomobilde kullanılabilir. (Resim
24). Temelde olan en bükülmüş şekilde pozisyona koltuğu koyun ve konumlandırma kolunu çekin. Resim
23;24 Mümkün olduğu kadar en uzun süre kullanılması çocuğunuz için en emniyetli pozisyon olduğu
için tavsiye edilir.
5 Adım. Kemerin bükülmemüş veya çekilmemiş olmadığından emin olun.
6 Adım. Çocuğunuzu koltuğa koyun. Omuz kemerlerinin yüksekliğini kontrol edin. Kemerlerin herhangi bir
yere takılmış veya bükülmüş olmadığından emin olun. Çocuğun emniyet kemerlerini iyice yerleşmiş
olduğundan emin olduktan sonra bandı koltuğun ortasına doğru sıkılması için çekin. Resim (4;5;6;7;8;9)
4 Adım. Kemeri sıkmak için çekin ve sırt dayamalık yerin arka kısmından iki mavi yönlendiriciden kemerin üst
diyagonal bölümünü geçirin. Resim 29;30
KOLTUĞUN MONTAJI
“Grup 0+” /13 kg kadar ve yeni doğan bebek için/
 Loading...