UNLOADING AND ASSEMBLY
Form 169018 37 Revision C
(continued next page)
L1 Cxxx
C
B DISPL
Y SETUP?
L2 Mxxx
NO / YES C
LIBR
TE SENSORS?
L1 Cxxx
DISPL
Y L
NGU
GE?
L2 Mxxx
ENGLISH
L2 Mxxx
ESP
NOL
L1 Cxxx
DISPL
Y UNITS?
L2 Mxxx
IMPERI
L
L2 Mxxx
METRIC
L1 Cxxx
CDM BUZZER
OLUME
L2 Mxxx
L1 Cxxx
CDM B
CKL I GHT I NG
L2 Mxxx
L1 Cxxx
CDM CONTR
ST
L2 Mxxx
L1 Cxxx
EX I T DI SPL
YSETUP?
L2 Mxxx
NO / YES D I SPL
YL
NGU
GE?
L1 Cxxx
C
LIBR
TE SENSORS?
L2 Mxxx
N O / Y E S D I
GNOST I C MODE?
L1 Cxxx
TO C
LIBR
TE SELECT
L2 Mxxx
HE
DER HE I GHT
L2 Mxxx
HE
DER T I LT
L2 Mxxx
HE
DER FLO
T
L2 Mxxx
EX I T C
L? NO/ YES
L1 Cxxx
HE IGHT SENSOR C
L
L2 Mxxx
R
ISE HDR TO ST
RT
L1 Cxxx
C
LIBR
TING HEIGHT
L2 Mxxx
R
ISE HE
DER HOLD
L2 Mxxx
HE
DER R
ISE DONE
L1 Cxxx
C
LIBR
TING HEIGHT
L2 Mxxx
LOWER HE
DER HOLD
L2 Mxxx
HT SENSOR COMPLETE
L1 Cxxx
TO C
LIBR
TE SELECT
L2 Mxxx
HE
DER HE I GHT
L2 Mxxx
HE
DER T I LT
L2 Mxxx
HE
DER FLO
T
L2 Mxxx
EX I T C
L? NO/ YES
L1 Cxxx
HDR T I LT SENSOR C
L
L2 Mxxx
EXTEND TLT TO ST
RT
L1 Cxxx
C
LIBR
TING TILT
L2 Mxxx
EXTEND T I LT HOLD
L2 Mxxx
EXTEND T I LT DONE
L1 Cxxx
C
LIBR
TING TILT
L2 Mxxx
RETR
CT T I LT HOLD
L2 Mxxx
HDR T I LT COMPLETE
L1 Cxxx
TO C
LIBR
TE SELECT
L2 Mxxx
HE
DER HE I GHT
L2 Mxxx
HE
DER T I LT
L2 Mxxx
HE
DER FLO
T
L2 Mxxx
EX I T C
L? NO/ YES
L1 Cxxx
C
LIBR
TING FLO
T
L2 Mxxx
PRESS FLT + TO ST
RT
L1 Cxxx
C
LIBR
TING FLO
T
L2 Mxxx
FLO
T
+
HOLD
L2 Mxxx
FLO
T
+
DONE
L1 Cxxx
C
LIBR
TING FLO
T
L2 Mxxx
FLO
T
-
HOLD
L2 Mxxx
HDR FLO
TCOMPLETE
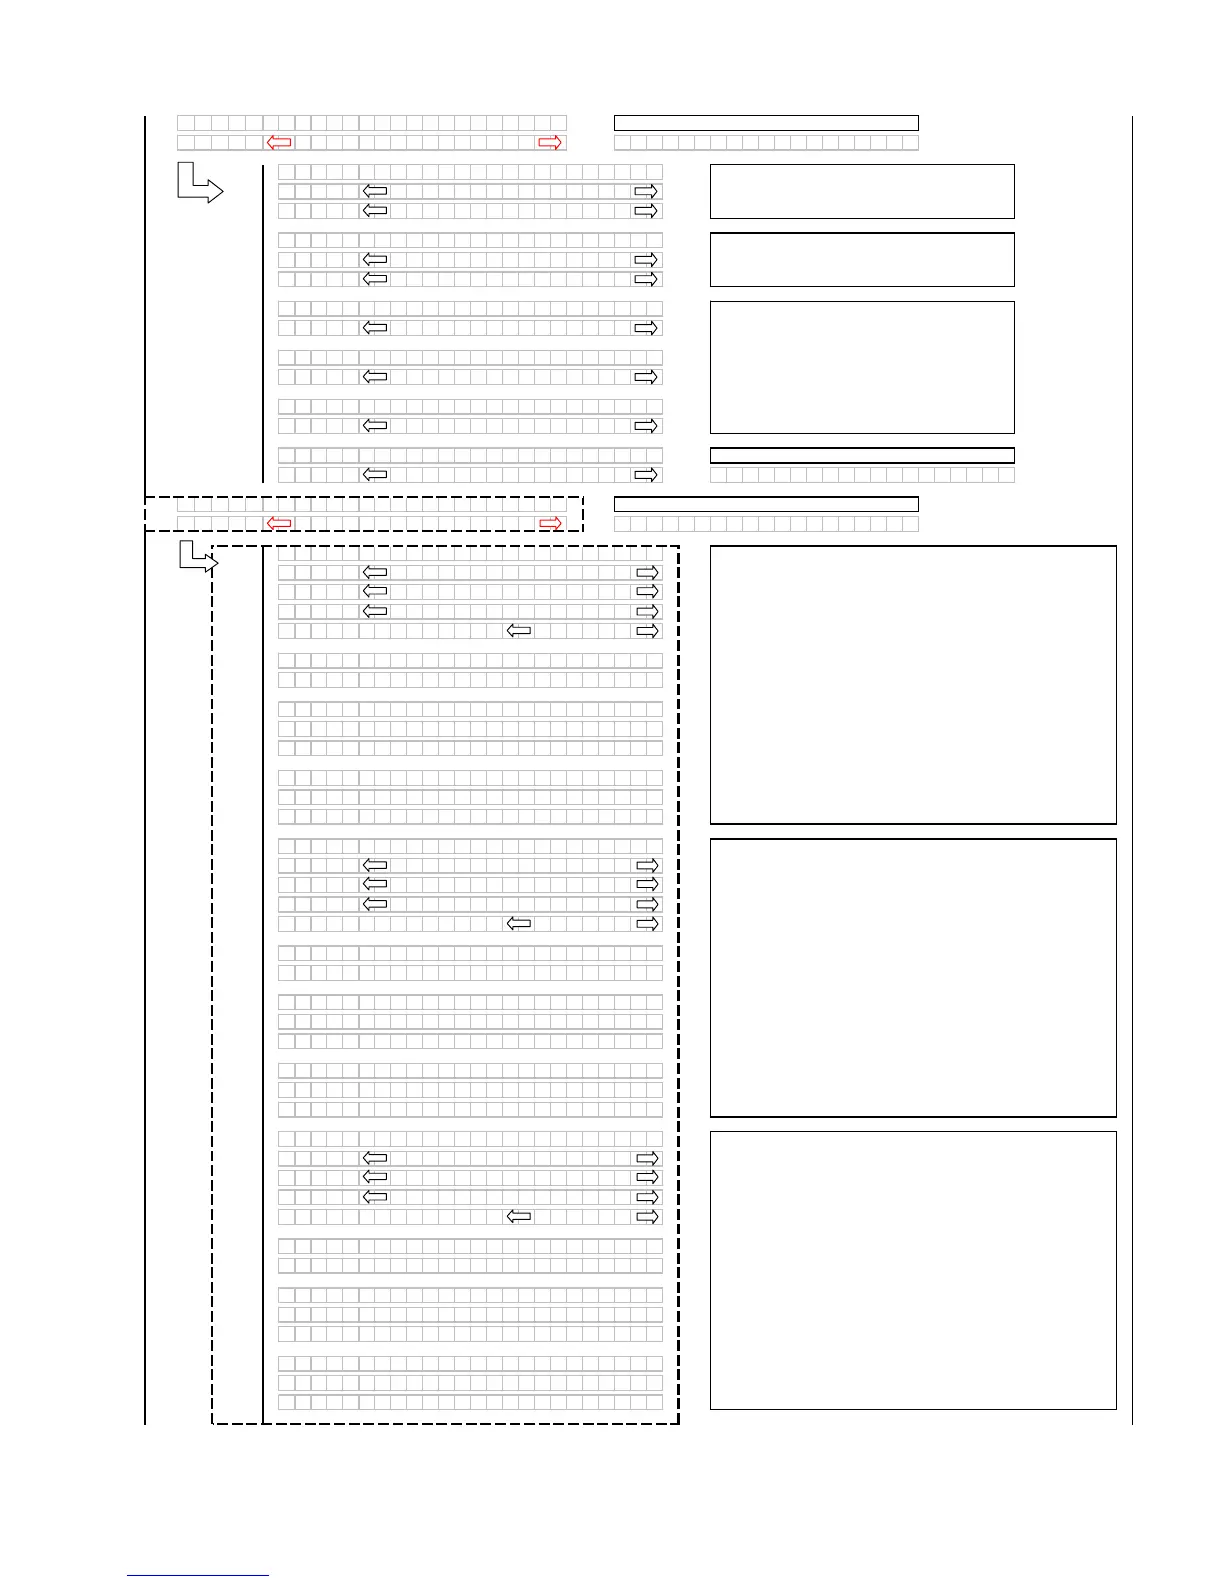
The display will indicate the sensor being calibrated. The
operator will be prompted to press the float (+) and HOLD will
flash until the system has completed reading in the signal with
the header float fully extended. HOLD will change to DONE (with
buzzer).
When the header float (+) is done, the CDM will prompt the user
to press the header float (-). COMPLETE (with buzzer) will flash
on the screen for 2 seconds when the calibration is finished.
When the header raise is done, the CDM will prompt the user to
lower the header. COMPLETE (with buzzer) will flash on the
screen for 2 seconds when the calibration is finished.
The operator can select any of the three items requiring
calibration (or exit the CAL menu) by using the turn signal
switches to cycle through the choices. Pressing SELECT will
take the operator to the calibration menu for that particular
sensor.
If "NO" then jump to:
The operator can select any of the three items requiring
calibration (or exit the CAL menu) by using the turn signal
switches to cycle through the choices. Pressing SELECT will
take the operator to the calibration menu for that particular
sensor.
The display will indicate the sensor being calibrated. The
operator will be prompted to raise the header and HOLD will
flash until the system has completed reading in the signal with
the header fully raised. HOLD will change to DONE (with
buzzer).
The "arrow" keys are used to select between
IMPERIAL or METRIC. The default value will be
displayed first.
Use the "arrow" keys to change the default
language. Pressing "SELECT" goes to the next
L1 menu selection.
The display will indicate the sensor being calibrated. The
operator will be prompted to extend the header tilt and HOLD will
flash until the system has completed reading in the signal with
the header tilt fully extended. HOLD will change to DONE (with
buzzer).
When the header tilt extend is done, the CDM will prompt the
user to press the header tilt retract. COMPLETE (with buzzer)
will flash on the screen for 2 seconds when the calibration is
finished.
The operator can select any of the three items requiring
calibration (or exit the CAL menu) by using the turn signal
switches to cycle through the choices. Pressing SELECT will
take the operator to the calibration menu for that particular
sensor.
If "NO" then jump to:
The "arrow" keys are used to change the CDM
buzzer volume, CDM backlighting or the CDM
contrast, with the bar graph indicating the
relative level for each item. When "SELECT" is
pressed the program goes to the EXIT
DISPLAY SETUP? menu selection.
If "NO" then jump to: