9
Connecting Components
The MP1100 has the ability to automatically switch
power On/Off from Components via the PWR CTRL
(Power Control) TRIGger connections. Follow the
connection instructions below, together with the
MP1100 Input/Output/Control Connection Diagram
located on a separate folded sheet “Mc1A” contained
in the Owner’s Manual Packet. The connections are
an example of a typical audio system. Your system
may vary from this, however the actual components
would be connected in a similar manner. For addition-
al information refer to “Connector and Cable Informa-
tion” on page 3.
Power Control (Trigger) Connections:
1. Connect a Control Cable from the MP1100 Power
Control TRIGger Out Jack to the Power Control In
on the Turntable 1.
2. Optionally, connect a Control Cable from the
Turntable 1 Power Control Out Jack to the Power
Control In on the Turntable 2.
3. Optionally, connect a Control Cable from the
Main Audio Preamplifier Power Control Out to
the MP1100 Power Control TRIGger IN.
Note: This optional Power Control Connection will
allow the MP1100 to automatically switch ON
and OFF when the Main Audio Preamplifier is
On or Off.
4. Connect any additional Components in a similar
manner, as outlined in steps 1 and 2.
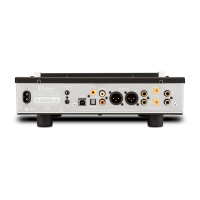
Audio Connections:
5. Connect Audio Cables from the MP1100 PHONO
1 INPUT Jacks (Left and Right) to Turntable 1
(Left and Right) Output Jacks.
Note: If Turntable 1 has Balanced XLR Output Con-
nectors and has a Phono Cartridge installed
(with Balanced Output Connections), connect
XLR Audio Cables to the MP1100 PHONO 3
INPUT BALanced Connectors.
6. Optionally, connect Audio Cables from the
MP1100 PHONO 2 INPUT Jacks (Left and Right)
to Turntable 2 (Left and Right) Output Jacks.
Note: If Turntable 2 has Balanced XLR Output Con-
nectors and has a Phono Cartridge installed
(with Balanced Output Connections), connect
XLR Audio Cables to the MP1100 PHONO 3
INPUT BALanced Connectors.
7. Connect an additional Turntable in a similar man-
ner, as outlined in steps 5 and 6.
8. Connect an Audio Cable from the MP1100 LINE
1 INPUT (Left and Right) Jacks to the Integrated
Amplifier REC Output Jacks.
Note: If the component has Balanced Output Con-
nections use the MP1100 LINE 2 BALanced
INPUT.
9. Connect any additional Components in a similar
manner, as outlined in step 8.
Optional USB Connection:
10. Connect a USB cable with (Type A to Type B)
connectors from the MP1100 USB DIGITAL
OUTPUT connector to an available USB connec-
tor on the computer.
Analog Output Connection:
11. Connect XLR audio cables from the MP1100
BALanced OUTPUT (Left and Right) to the Ana-
log only Preamplifier Balanced Input 5 (Left and
Right).
Note: If the Preamplifier has Unbalanced Inputs then
connect the MP1100 unbalanced Output Jacks
to the Preamplifier unbalanced Input Jacks.
Optional Digital Output Connection:
12. Connect a Digital Coaxial Cable from the MP1100
COAXial DIGITAL AUDIO OUTPUT Jack to
the Digital only Preamplifier Digital Audio Input
Coaxial 2 Jack.
Connecting Components
Note: If the Preamplifier has Optical Inputs then
connect the MP1100 Optical Output Connector
to the Preamplifier Optical Input Connector.
Ground Connections:
13. Connect the Ground Cable coming from the
Turntable(s) to the MP1100 TURNTABLE
GROUND Binding Post(s).
AC Power Cord Connections:
14. Connect the MP1100 to a live AC Outlet using the
supplied Power Supply Cord.