Rev 3.4
Mellanox Technologies
64
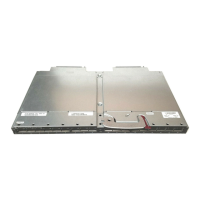
Figure 38: Caged Nut Spacing
5. Using two of the pan head screws and one washer, for each rail, install the rails to the other
end of the rack. Place the rail behind the holes in the rack and screw the screws through the
holes in the washer then through the rails. Tighten the pan head screws that hold the rails to
9.2 Nm or 81.5 pound inches.
Figure 39: Screwing in the Rails
6. Place the four bolts for the caged nuts within reach.
7. Slide the switch into the rails.
8. Put the switch into place and screw the bolts into the nuts from step 4. Tighten the bolts to 9.2
Nm or 81.5 pound inches.
9. Tighten all of the screws.
10.Plug in the power cables.
11. Check the Status LEDs and confirm that all of the LEDs show status lights consistent with
normal operation.
12.You can start connecting all of the cables to the switch.
Make sure that the Rail kit is compatible with your rack.
For short depth switches, rail kit # MIS00083 is to be used for racks from 50cm to 80cm deep,
and rail kit # MIS00079 is to be used for racks from 38cm to 50cm deep including the iDataPlex
rack.
For standard depth switches rail kit # MIS00085 is to be used for racks from 60cm to 80cm deep.
The caged nuts
are separated by
a single space
 Loading...