Do you have a question about the MES SQA-V Gold and is the answer not in the manual?
Details the specific version and model of the Sperm Quality Analyzer.
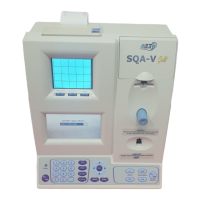
Describes the displays, controls, measurement compartment, keypad, and printer.
Lists operational and video control keys for system interaction.
Details the connectors and power input on the rear of the unit.
Steps to turn on the SQA-V unit and its initial status.
Describes the initial system stabilization and self-test procedures.
Explains setting system defaults via V-Sperm GOLD software.
Details how to configure control settings for quality control.
How to input patient and sample data prior to testing.
Details sample type, volume, WBC concentration, pH, appearance, viscosity.
Explains how to determine sufficient sample volume for testing.
Describes procedures for testing low volume samples.
Discusses the use of dilution media for sample preparation.
Provides instructions for preparing and testing normal volume samples.
Describes the testing process, duration, and low quality sample handling.
Describes how normal and low quality results are reported.
Explains how to print, save, and transfer test results to V-Sperm.
Details the procedure for performing and analyzing post-vasectomy tests.
General cautions regarding operator and environmental safety.
Troubleshooting steps for when stabilization fails.
Troubleshooting steps for when the self-test fails.
Troubleshooting steps for electronic noise errors.
Troubleshooting steps for concentration out of range errors.
Step-by-step instructions for logging into the V-Sperm software.
Managing user accounts, rights, passwords, and user types.
Configuring test report settings including parameters and ranges.
Selecting which test parameters to display on reports.
Setting normal value ranges for test results.
Entering details of the testing facility for reports.
Setting the display language for the V-Sperm system.
Configuring communication ports for PC connectivity.
Setting options for automatic data saving.
Configuring SQA-V defaults via V-Sperm software.
Installing the video capture device provided with V-Sperm.
Installing drivers for USB to RS232 connection.
Steps for installing the V-Sperm software from CD.
Installing Microsoft Data Access Components if not already present.
Steps for collecting system information during installation.
Finalizing the software installation process.
| Sample Type | Semen |
|---|---|
| Analysis Type | Sperm analysis |
| Type | Automated |
| Test Parameters | Concentration, Motility, Morphology |
| Display | Touchscreen |
| Connectivity | USB |
| Power Supply | 100-240V AC, 50/60Hz |