17
PAWKIT
4.1.2 VERIFY CALIBRATION
Use the following steps to verify the PAWKIT calibration.
NOTE: An error code of 9.99 at any time during the process indicates that the sensor has failed and that the
instrument needs to be serviced. Refer to Section4.4 for shipping instructions.
1. Using a vial of the 0.760 a
w
NaCl standard, empty the entire contents of the vial into a
sample cup.
2. Place the PAWKIT over the sample cup as described in the Section2.1.2.
3. Press the I button to take a reading.
If it is reading the correct water activity (±0.02), the PAWKIT needs no adjustment for this
standard. Skip to step7.
If the first reading was not the correct water activity (±0.02), clean the PAWKIT according
to the instructions in Section4.2 and take a second reading.
If the second reading is the correct water activity (±0.02), the PAWKIT needs no
adjustment at this time. Skip to step7. If the second reading is not correct, continue to
the next step.
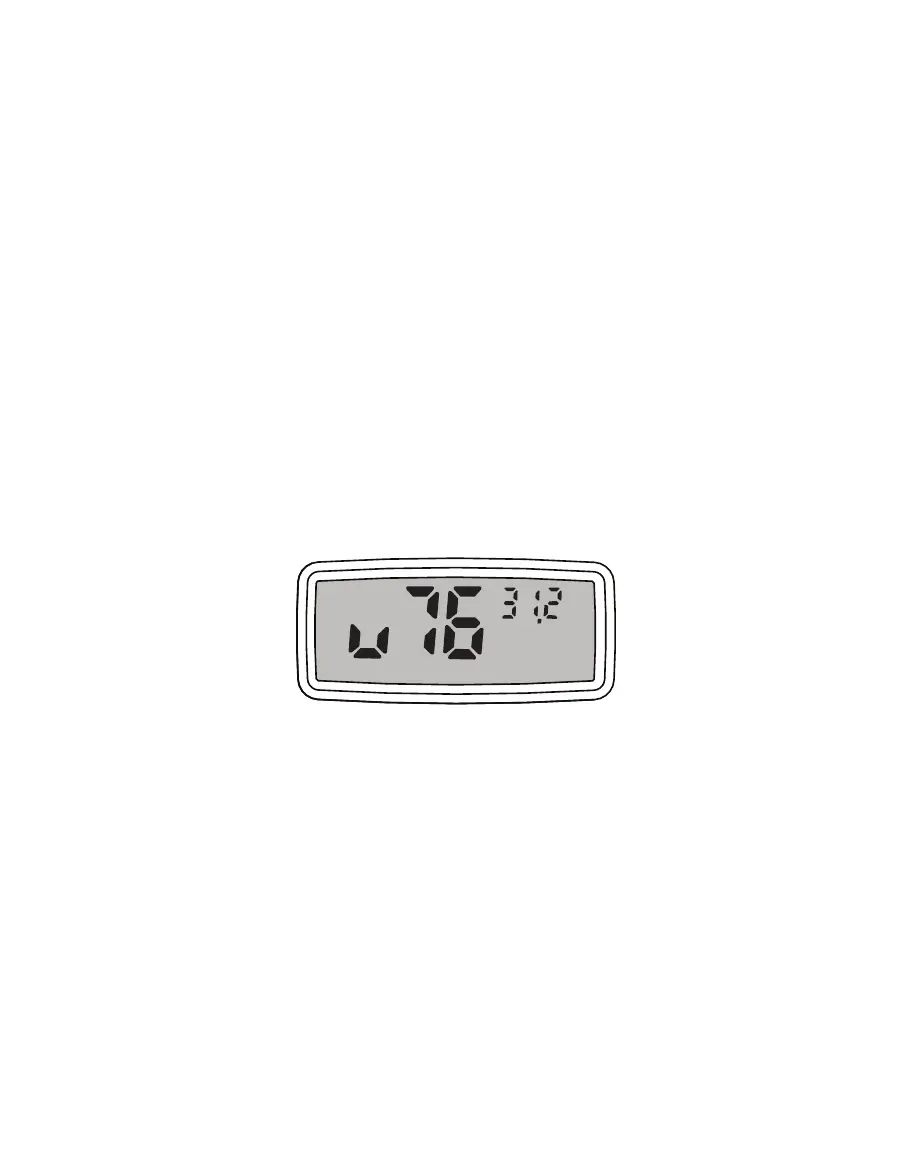
4. Press the II button (on the right) once to get the Calibration Mode screen (Figure13).
Once the reading is finished, the II button (on the right) activates. The II button is only
active until the PAWKIT shuts itself off.
Figure13 Calibration Mode screen
Figure13 shows that the PAWKIT is ready to have its calibration adjusted up for the
0.76 standard. The number in the upper right corner indicates the water activity
measurement that the PAWKIT just read. Press the II button to scroll through the other
selections. They are: u76, d76, u25, d25, Sto, u92, and d92. The u and d before each
number stand for up or down adjustment for each standard. The numbers (25, 76, and
92) correspond to the water activity of a verification standard (0.76, 0.25, and 0.92 a
w
)
.
The Sto position stores a reading.
EXAMPLE:
If the NaCl reading is lower than it should be, press the II button to scroll to
u76 (adjust up for 0.76 standard). If the reading is higher than it should be, scroll to
d76 (adjust down for 0.76 standard).
NOTE: Scroll feature is continuous, so if desired adjustment screen is passed, keep pressing the II button
until cycled back to the correct screen.