Viewing video images (continued)
D. Projecting images
Preparation:
• Removethelenscap.
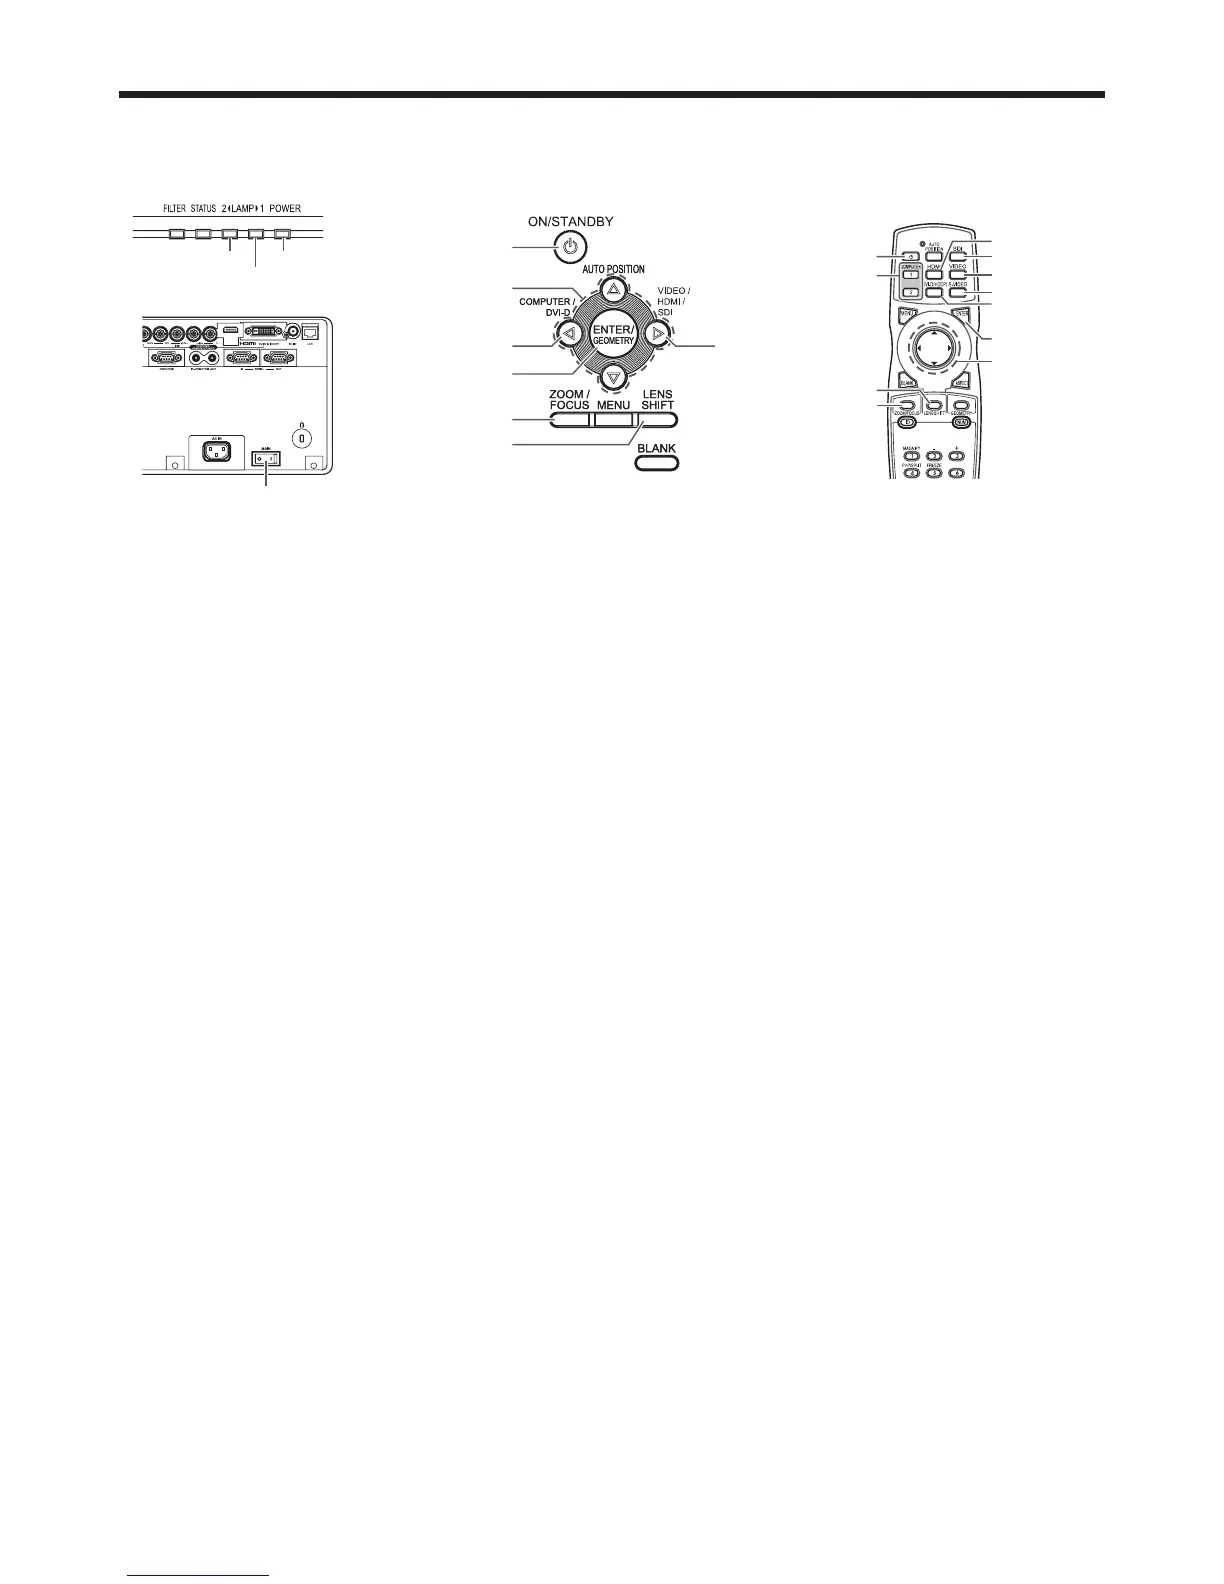
COMPUTER 1, 2 buttons
Main power switch
POWER indicator
LAMP 2 indicator
LAMP 1 indicator
DVI-D(HDCP) button
S-VIDEO button
VIDEO button
VIDEO/HDMI/SDI button
SDI button
HDMI button
ENTER button
, , ,
buttons
POWER button
(ON/STANDBY)
, , , buttons
COMPUTER/DVI-D button
ENTER button
ZOOM/FOCUS button
LENS SHIFT button
POWER button (ON/STANDBY)
LENS SHIFT button
ZOOM/FOCUS button
1. Put the projector into standby mode by pressing the main power switch. The POWER indicator lights up red.
• Iftheprojectorwasturnedoffbeforethelampwascooleddownsufcientlylasttime,thefanmaystartrotating
and the POWER button may not work after the main power switch is turned ON. (The LAMP indicator blinks
green.) After the fan stops rotating, press the POWER button to turn back on the POWER indicator.
2. Turn on the power of the connected video equipment.
3. Press the POWER button.
• Itmaytakeabout2minutesforthelamptolightup.
• Thelampfailstolightuponrareoccasions.Insuchacase,waitforafewminutesandthentryagain.
• Donotcoverthelenswiththelenscapwhilethelampison.Donotstripoffthealuminiumsheetinsidethe
lens cap.
• AfterthePOWERbuttonispressed,theimagemayickerbeforethelampbecomesstable.Thisisnota
product malfunction.
• Thelampoperationbecomesstablein1minuteafterthepoweristurnedonandthenthelampmodeselected
in the menu is activated. During the activation, displayed images may be disturbed.
• TheprojectorstartswarmingupwhenthePOWERbuttonispressed.Duringthewarm-upprocess,images
may appear dark and no commands are accepted.
• Byblinkingred,theLAMPindicatorindicatesthatthelampshouldbereplacedsoon.Replacethelampwhen
the LAMP indicator blinks red. (See page 71.)
4. Press the ZOOM/FOCUS button to display the ZOOM/FOCUS menu.
5. Adjust with the or button to get a fine picture.
• WhentheENTERbuttonispressedwhiletheZOOM/FOCUSmenuisdisplayed,theadjustmentmodeis
switched between FAST and STEP. When FAST is selected, the speed of focus controlled by the or button
becomes fast, and it becomes slow when STEP is selected.
6. Select an input source.
• ForUD8400UandUD8400LU:
Press the VIDEO/HDMI/SDI button on the projector or the VIDEO, S-VIDEO, HDMI or SDI button on the remote
control that is corresponding to the terminal in use. The input source is switched between VIDEO, S-VIDEO,
HDMI and SDI at every press of the VIDEO/HDMI/SDI button on the projector.
• ForUD8350UandUD8350LU:
Press the VIDEO/HDMI button on the projector or the VIDEO, S-VIDEO or HDMI button on the remote control
that is corresponding to the terminal in use. The input source is switched between VIDEO, S-VIDEO and HDMI
at every press of the VIDEO/HDMI button on the projector.
• Youcannotchangetheinputsourcewhilethemenuisbeingdisplayed.
• Thoughitmaytakesometimebeforeanimageisdisplayedonthescreendependingonthetypeoftheinput
signal, such symptom is not a malfunction.
• Someimagesbecomeeasiertoviewwhenthesettingofaspectratioischanged.(Seepage25.)
• WhenprojectingimagesfromaDVDplayerthatisconnectedtotheCOMPUTER/COMPONENTVIDEODVI-D
IN (HDCP) terminal, press the COMPUTER/DVI-D button on the projector to select DVI or press the DVI-D
(HDCP) button on the remote control.
• WhenprojectingimagesfromaDVDplayerthatisconnectedtotheCOMPUTER/COMPONENTVIDEOIN-1or
COMPUTER/COMPONENT VIDEO IN-2 terminal, press the COMPUTER/DVI-D button on the projector or the
COMPUTER 1 or COMPUTER 2 button on the remote control.

 Loading...