Disassembly, Inspection, and Cleaning Chapter Four: Maintenance
18
Disassembly, Inspection, and Cleaning
Note
The guide below is provided for reference purposes only. Disassembly of
the valve will void its warranty. For maintenance, please contact MKS
Instruments, Inc. and obtain an RMA (Return Materials Authorization.
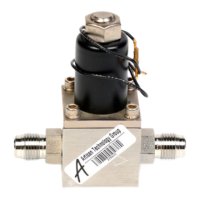
Disassemble the 248 valve as follows with the valve held vertically, base down. Refer to Figure
Error! Bookmark not defined., page Error! Bookmark not defined., as needed.
1. Carefully remove the hex nut coil cover; do not allow the cover to rotate relative to the
Body.
2. Remove the cover and coil as an assembly.
Note the position at removal. Replace the parts if the cover is damaged or the coil is an
open circuit.
3. Remove the four 8-32 screws holding the Collar to the Body.
4. Remove the Collar and Center Shaft Assembly and carefully withdraw the
Armature/Plug Assembly.
Replace the Armature/Plug Assembly if either spring is broken or bent or if the valve
seat appears marked or fails to seal during the orifice adjustment.
5. Remove and inspect the Orifice Assembly.
Inspect for orifice plugging/damage, and replace as necessary. Ultrasonic cleaning with
suitable non-reactive solvents is recommended. Store in a clean plastic bag.
6. Inspect the cavity of the 316 stainless steel Body and Center Shaft Assembly for damage
and deposits.
Clean or replace as required. Similarly inspect, clean, or replace all tubing, fittings, and
seals.