Chapter Four: Maintenance Assembly
19
Assembly
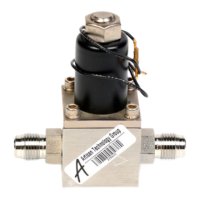
Reassemble the 248 valve as follows. Refer to Figure Error! Bookmark not defined., page
Error! Bookmark not defined., as needed.
1. Screw the Orifice Assembly into the Body until it is just flush with the base.
2. Carefully install the tubing fittings with new O-rings.
Tighten firmly, being careful not to pinch the O-rings.
Caution
Handle the Armature/Plug Assembly with care. Avoid touching the
main spring and centering spring which have been factory adjusted.
Do not attempt to loosen or remove the seat as this will destroy the
assembly.
3. Lower the Armature/Plug Assembly carefully into the Body, making sure the main spring
fits freely on the shoulder of the Body.
4. Install a new O-ring (furnished with the replacement Armature/Plug Assembly) on the
Center Shaft Assembly and install this assembly into the Body and onto the main spring.
5. Install the collar and the four 8-32 screws carefully as follows:
a. Hand tighten the 4 screws evenly in a criss-cross pattern making sure the collar
remains parallel to the top of the Body.
b. Continue to maintain the collar parallel to the Body while gradually tightening the
screws in a criss-cross pattern to a final torque of 16 in-lbs.
Caution
Failure to follow step 5 may damage the Armature/Plug Assembly or
result in poor valve operation.
7. Install the Coil and Cover Assembly in the original position.
Install and tighten the
7
/
16
- 14 hex nut to 60 in-lbs. to lock the cover from rotation.
Caution
Do not overtighten the hex nut as coil damage may occur.
7. Adjust the Orifice as described in Orifice Adjustment and Replacement, page 15.