September 9, 2011 68009482001
5-6 Maintenance: Assembly and Disassembly Procedures
5.2.4.2 Replacing the Mobile Radio
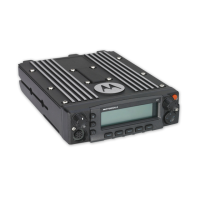
1. Place radio bracket over replacement mobile radio oriented as shown in Figure 5-4 and install
four screws using a T25 TORX™ driver. Place thermal pad on bottom of mobile radio.
2. Before attaching the Mobile Radio Assembly to the Chassis, reattach all cables to the Mobile
Radio.
3. With the Mobile Radio Assembly in hand locate two slots on the Chassis and match up those
slots with the tabs on the Assembly bracket.
4. Place the bracket tabs into the chassis slots which will then line up the mounting holes on the
bracket with the holes on the chassis.
5. Install the four screws (A) on the main board assembly as shown in Figure 5-4 using a T25
TORX™ driver with an extension.
6. Tighten the four screws to 1.5 N-m.
5.2.5 Fan Assembly
5.2.5.1 Removing the Fan
1. Unplug the fan cable from the mating connector on the main board assembly.
2. Detach the Fan assembly by removing the two screws (A) as shown in Figure 5-5 using a T25
TORX™ driver.
3. Carefully lift the Fan Assembly straight up from the chassis.
Figure 5-5. Removing and Replacing the Fan
Screw (A)

 Loading...