68009328001-A December, 2009
Limited Keypad Model Disassembly and Re-assembly: Disassembling and Re-assembling the Radio — General 7-5
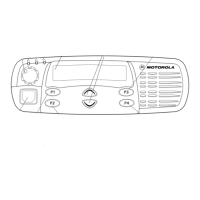
7. Rotate the bottom of the chassis up about 20° to access the keyboard flex connector. Push down
2 end tabs to release flex connector at the bottom of the chassis.
8. Rotate the chassis counterclockwise out of the housing and position next to the housing. Take
care not to damage the speaker and microphone wires that are still connected to the chassis
(Figure 7-5).
9. Unplug the speaker wire assembly from the 2-pin connector on the chassis.
10. Unplug the microphone wire assembly from the socket on the chassis.
11. Move the chassis away from the housing and place on a clean work surface.
Note:
The speaker wire assembly microphone wire assembly and keypad flex cable connecting
the front housing assembly and the chassis prevent the two units from being completely
separated.
Figure 7-4. Keyboard Flex Connection
Figure 7-5. Microphone and Speaker Connections
Radio Chassis
Flex Connector
Speaker Connector
Microphone
Connector
 Loading...