Bench Setup 3-5
SG 2000 Installation and Operation Manual
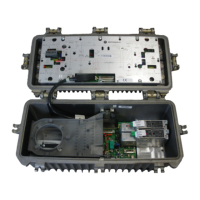
Figure 3-4 illustrates the RF chassis cover and lid showing the location of the fuses:
Figure 3-4
Fuse locations
-20dB
REFER TO
MA NUA L F OR
FUSE VA LUES
H
RCVR
INPUT
FTEC
H
-20dB
ON
ASSEMBLED IN MEX ICO
SG 2000
-20dB
CAUTION:
CONTAINS PARTS
ANDASSEMBLIES
DA MAG E B Y
ELECTROSTATIC
DISCHARGE ( ESD)
SUSCEPTIBLETO
JXP ADU
H
H
L
-20dB
L
-20dB
-20dB
-20dB
-20dB
L
L
PORT 1 PORT 2
PORT 3
PORT 4
JXP 1
JXP 1
JXP 2
JXP 2
JXP 4
JXP 4
MDR
ADU
ADU
ADU
IS
IS
TCU
MAN
FRB
RPM/*
STATUS MO NITOR
OFF
ON
SG2-
VARI LOSSE R
JXP 3
JXP 3
FWDEQ
FWDEQ
FWDEQ
FWDEQ
+24 V D C
IS
IS
Optical Node
F1 F4
F3
F5
F7
F6F2
F8 F9
The dc power supply 24 V circuit includes fuse (F9) rated at 10 A; the 5 V circuit includes (F8)
which is rated at 5 A.
Power Supply Settings
You can power the SG 2000 from either 60 Vac or 90 Vac system supplies. The unit is shipped from
the factory set for 60 Vac (
LO). If your system uses 90 Vac powering, reposition the suitcase jumper
(Figure 3-5) on the dc power supply to the 90 Vac (
HI) position to optimize the supply turn-on
voltage for the higher input range. This applies to the SG2-PS2 or the optional SG2-PS.
 Loading...