EasyManua.ls Logo

mycom 1612LSC series - User Manual

Default Icon
145 pages
Print Icon
To Next Page IconTo Next Page
Loading...
2202L5JE-DA-C5-N_2015.05.
Compound 2-stage Screw Compressor
1612LSC Speed Increaser Type
Instruction Manual
1612LSC-52 1612LSC-62
1612LSC-53 1612LSC-63
1612LSC-54
CAUTION
Before operating, servicing, or inspecting this product, read this manual thoroughly to
fully understand the contents.
Keep this Instruction Manual in a safe, designated place for future reference whenever
the manual is needed.
Specifications of this product and contents of this manual are subject to change
without prior notice due to technical improvements, and the like.

Table of Contents

Questions and Answers

  • T
    Todd PearsonAug 1, 2025
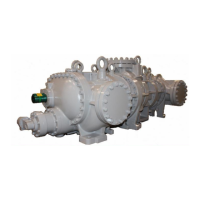
    How to fix a mycom 1612LSC Air Compressor that does not start up?
    • J
      Jason PearsonAug 1, 2025
      If your mycom Air Compressor isn't starting, several issues could be the cause. First, ensure the power source is on, using a check sheet for post-inspection actions. If the power is on, the main motor, micro-switch, or oil pressure protection device might have failed, requiring replacement or further investigation. Also, check for clogging or leaks in the piping, readjust the oil flow control valve if it's improperly adjusted, and ensure the circulation route is clear. Consider aging degradation or a poor installation environment as potential causes, addressing them with replacements or improvements to ventilation, temperature, and humidity. If the micro-switch or cam set screw is loose, adjust the position of the cam and switch, and tighten them, using a thread locking agent if needed.
  • C
    Cathy GravesAug 7, 2025
    Why is the pressure unusually high in my mycom Air Compressor?
    • N
      Nathan StanleyAug 7, 2025
      An unusually high pressure in your mycom Air Compressor can stem from several causes. Check if heat transmission tubes or fins are contaminated or blocked, requiring cleaning, possibly with chemicals. Investigate the fan motor, thermo switch, water spraying pipes, and cooling water pumps for failures. Ensure cooling water/brine is correctly adjusted, readjusting manually adjusted valves or investigating automatic control valves. Also, inspect filters and circulation routes for clogs or leaks. If the heat exchanger performance is deficient due to operating or environmental changes, consider adding more or larger heat exchangers. Check for leaks on the low-pressure side and properly adjust the refrigerant charge if it's been repeatedly added due to misdiagnosed insufficient cooling.
  • K
    Kristen CarneyAug 11, 2025
    What to do if my mycom 1612LSC Air Compressor generates abnormal vibration and/or sound?
    • C
      Charles CastroAug 11, 2025
      If your mycom Air Compressor is generating abnormal vibration or sound, several factors could be responsible. High shaft vibration may necessitate conducting shaft alignment again, with hot alignment for monocoque units. Unevenly tightened lock nuts or thrust bearing glands should be evenly tightened, provided the parts are free of defects. Inspect the thrust bearing for worn rolling elements and replace if necessary, reassembling after adjusting end clearance and checking shaft runout. Oil compression from continuous low-load operation (less than 30%) can also be a cause, so avoid such operation. Liquid flow-back during startup may also cause this issue. Set control parameters to prevent rapid changes from no-load to full-load operation.
  • D
    Dr. Courtney PerezAug 27, 2025
    What to do if my mycom 1612LSC Air Compressor stops immediately after startup?
    • J
      Justin BerryAug 27, 2025
      If your mycom Air Compressor stops immediately after starting, it could be due to insufficient refrigerant flow. Check for leaks, stop them, and add refrigerant, while also being mindful of moisture entering the system. It could also be caused by insufficient liquid supply, so inspect the expansion valve and liquid supply strainer, taking necessary actions. Also, inspect devices and parameters of the expansion valve aperture adjusting mechanism, and take necessary actions. Heat exchange failure in the heat exchanger may also be the cause, so investigate any issues such as defrosting malfunctions. Finally, failure of the low-pressure protection device, pressure sensor, or relay could be the problem, so identify and replace any defective devices.
  • J
    Jennifer HillNov 16, 2025
    Why is the oil pressure low in my mycom Air Compressor?
    • R
      Raymond WilsonNov 16, 2025
      Low oil pressure in your mycom Air Compressor can result from several issues. Start by checking for lubricating oil contamination and addressing any clogging. Internal compressor defects could also be responsible, so check for oil contamination and conduct vibration/noise diagnostics, overhauling the compressor if needed. A malfunctioning oil heater or related circuits can cause refrigerant to dissolve excessively when stopped, leading to oil loss at startup, so inspect and replace parts as necessary. Insufficient oil return due to insufficient refrigerant circulation or clogs in the oil return passage can also cause low oil pressure. Inspect for extensive oil leaks and address any found. Also, check if the pressure pipe is clogged. Finally, failure of the oil pressure protection device, p...
  • D
    daniel59Nov 20, 2025
    How to address a leak from the mechanical seal in my mycom 1612LSC?
    • P
      pgrahamNov 20, 2025
      A leak from the mechanical seal in your mycom Air Compressor can arise from several causes. If it's an initial leak after replacement, monitor it, as it might decrease gradually, but ensure it doesn't increase continuously. A roughened sliding surface due to overheating may require reviewing operating conditions to reduce start/stop frequency. Excessive refrigerant in the lubricating oil, reducing its viscosity, can also cause leaks. For liquid flow-back, eliminate the cause and replace any defective parts in the oil heater circuit. If the machine is stopped for over a week, manually operate the oil pump and turn the rotor shaft, or attach an oil pot for supplying oil to the seal cover. If the seal is deteriorated over time, replace it. Also, ensure the selected lubricating oil is suitable...

Summary

Preface

Revision History

Details of manual revisions and issue dates.

Warranty and Disclaimer

Warranty Clauses

Defines what Mayekawa warrants and warranty limitations.

Disclaimer of Warranty

Lists conditions exempted from warranty coverage.

Important Information

Intended Use of Product

Specifies the intended applications and purpose of the compressor.

Safety Information for Product Use

Provides critical safety guidelines for operating the product.

Manual Information and Structure

Details about the manual's content, modifications, and organization.

Safety

Strict Requirements and Prohibitions

Lists essential do's and don'ts for safe operation and maintenance.

Warnings and Cautionary Symbols

Explains warning symbols and potential hazards.

Residual Risks and Countermeasures

Identifies potential hazards and their countermeasures during operation.

Safety Devices Overview

Describes essential safety devices and their functions.

Compressor Specifications and Structure

Overview of MYCOM Compound Screw Compressor

General introduction to the 1612LSC Speed Increaser Type compressor.

Model Designation Explained

Details the meaning of the compressor model designation.

Standard Compressor Specifications

Provides key technical specifications like mass, frequency, and dimensions.

Operation Limits

Defines the operational boundaries for discharge, suction, and temperatures.

Outer Dimensions and Lifting Position

Illustrates physical dimensions and lifting points.

Structure of the Compressor

Explains the main components and their functions.

Compressor Mechanisms Explained

Details the basic principles of screw compressor operation.

Gas and Oil Flow Diagrams

Illustrates the flow paths of gas and lubricating oil.

Installation Guide

General Precautions for Installation

Essential safety and procedural guidelines before installation.

Installation Works Procedures

Step-by-step instructions for unpacking, storage, and transportation.

Preparation for Installation

Covers workspace, illumination, ventilation, and piping requirements.

Compressor Installation and Shaft Alignment

Details the physical installation and alignment procedures.

Piping Connection and Protection Devices

Guidelines for refrigerant piping and compressor protection equipment.

Airtightness Test and Lubricating Oil Charge

Procedures for testing system integrity and filling lubricating oil.

Refrigerant Charging and Post-Installation Checks

Instructions for refrigerant filling and final confirmation checks.

Compressor Operation Guidelines

Lubricating Oil Management

Precautions for selecting, using, and managing lubricating oil.

Precautions for Safe Operation

Key safety measures to prevent liquid flow-back and manage non-condensable gases.

Stopping the Compressor for Extended Periods

Procedures for safely stopping and preparing the compressor for long-term storage.

Maintenance and Inspection

Precautions for Maintenance and Inspection

Critical safety instructions for performing maintenance tasks.

Maintenance and Inspection Schedule

Lists daily and periodic inspection items and their intervals.

Guidelines for Compressor Overhaul Timing

Recommended intervals for compressor overhaul based on usage.

Compressor Disassembly Preparation

Disassembly Tools and Workplace Requirements

Lists necessary tools, materials, and workplace conditions for disassembly.

Replacement Parts for Overhauling

Identifies essential parts recommended for replacement during overhaul.

Refrigerant Gas Recovery Procedure

Safe procedures for recovering refrigerant before disassembly.

Removing Connected Parts and Compressor Lifting

Instructions for disconnecting external components and lifting the compressor.

Removing Oil from Compressor Internals

Procedure for draining oil from internal compressor parts.

Disassembly and Inspection Procedures

Shaft Seal Block Disassembly and Inspection

Detailed steps for disassembling and inspecting the shaft seal.

Unloader Indicator Disassembly and Inspection

Steps for removing, inspecting, and reassembling the unloader indicator.

Unloader Cover Disassembly and Inspection

Procedure for disassembling and inspecting the unloader cover.

Unloader Piston and Cylinder Disassembly;Inspection

Steps for disassembling and inspecting the unloader piston and cylinder.

Speed Increaser Gear Casing Cover Removal

Instructions for removing the speed increaser gear casing cover.

Speed Increaser Gear Casing Block Disassembly

Procedure for disassembling the speed increaser gear casing block.

Separating High-stage and Low-stage Blocks

Steps for separating the high-stage and low-stage compressor sections.

Gear Coupling Disassembly and Inspection

Detailed procedure for disassembling and inspecting the gear coupling.

Balance Piston Cover and Piston Disassembly

Steps for removing the balance piston cover and piston.

High-stage Suction Cover and Side Bearings

Procedure for disassembling and inspecting the high-stage suction cover.

Low-stage Suction Cover and Side Bearings

Procedure for disassembling and inspecting the low-stage suction cover.

Thrust Bearing Block Disassembly and Inspection

Detailed steps for disassembling and inspecting thrust bearing blocks.

High-stage Rotor and Main Rotor Casing Disassembly;Inspection

Procedure for disassembling and inspecting high-stage rotors and casing.

Low-stage Rotor and Main Rotor Casing Inspection

Inspection of low-stage rotors and main rotor casing.

High-stage Bearing Head and Main Bearings

Disassembly and inspection of high-stage bearing head and main bearings.

Low-stage Bearing Head and Main Bearings

Disassembly and inspection of low-stage bearing head and main bearings.

Low-stage Unloader Slide Valve and Guide Block

Disassembly and inspection of the low-stage unloader slide valve.

Reassembly Procedures

Low-stage Unloader Slide Valve and Guide Block Reassembly

Steps for reassembling the low-stage unloader slide valve and guide block.

Bearing Head and Main Rotor Casing Reassembly

Procedure for reassembling bearing heads and main rotor casings.

Bearing Head and Main Bearings Reassembly

Steps for installing main bearings into the bearing head.

Rotor Assembly Steps

Detailed instructions for assembling the M and F rotors.

Suction Cover and Side Bearings Reassembly

Procedure for fitting suction covers and side bearings.

Thrust Bearing Block Reassembly and Adjustment

Steps for reassembling thrust bearings and adjusting end clearance.

Combining High-stage and Low-stage Blocks

Instructions for joining the high-stage and low-stage compressor sections.

Balance Piston Cover Reassembly

Procedure for attaching the balance piston cover.

Speed Increaser Gear Block Reassembly

Steps for reassembling the speed increaser gear block.

Installing Speed Increaser Gear Casing

Procedure for installing the speed increaser gear casing to the bearing head.

Unloader Cylinder and Piston Reassembly

Steps for reassembling the unloader cylinder and piston assembly.

Unloader Cover Reassembly

Procedure for reassembling the unloader cover.

Shaft Seal Block Reassembly

Detailed steps for reassembling the shaft seal block.

Unloader Indicator Reassembly and Adjustment

Procedure for reassembling and adjusting the unloader indicator.

Troubleshooting Guide

Compressor Does Not Start Up

Diagnoses and actions for a compressor that fails to start.

Compressor Stops Immediately After Startup

Troubleshooting steps for immediate post-startup shutdown.

Unusually Low Suction Pressure Issues

Addresses low suction pressure causes and solutions.

Low Oil Pressure Issues

Diagnoses and actions for low lubricating oil supply pressure.

High Intermediate Pressure Issues

Troubleshooting steps for abnormally high intermediate pressure.

High Discharge Pressure Issues

Addresses causes and solutions for unusually high discharge pressure.

High Discharge Temperature Issues

Troubleshooting for abnormally high discharge temperatures.

Mechanical Seal Leakage Issues

Diagnoses and actions for leaks from the mechanical seal.

Mechanical Seal Squeaking Issues

Addresses squeaking noises from the mechanical seal.

Incorrect Capacity Control Indication

Troubleshooting for inaccurate capacity control readings.

Capacity Control Malfunction Issues

Diagnoses and actions for capacity control system failures.

Abnormal Vibration and Sound Issues

Troubleshooting for abnormal vibration and noise generation.

Related Documents

Development Views and Sectional Views

Provides visual documentation of compressor parts and assemblies.

Parts Configuration Table

Lists all parts with their P/N, part code, and quantity for different models.

Tightening Torques for Bolts and Nuts

Specifies torques for various fasteners used in assembly and disassembly.

O-rings for Use and Materials

Lists O-rings by location and specifies compatible materials for operation fluids.

Disassembly Tools List

Catalog of standard tools required for disassembly procedures.

Contact Information

Sales Offices and Service Centers in Japan

Contact details for Mayekawa's Japanese sales and service network.

Manufacturing Bases in Japan

Location information for Mayekawa's manufacturing facilities in Japan.

Global Network of Mayekawa

Contact information for Mayekawa's international offices and branches.

mycom 1612LSC series Specifications

General IconGeneral
Brandmycom
Model1612LSC series
CategoryAir Compressor
LanguageEnglish

Related product manuals