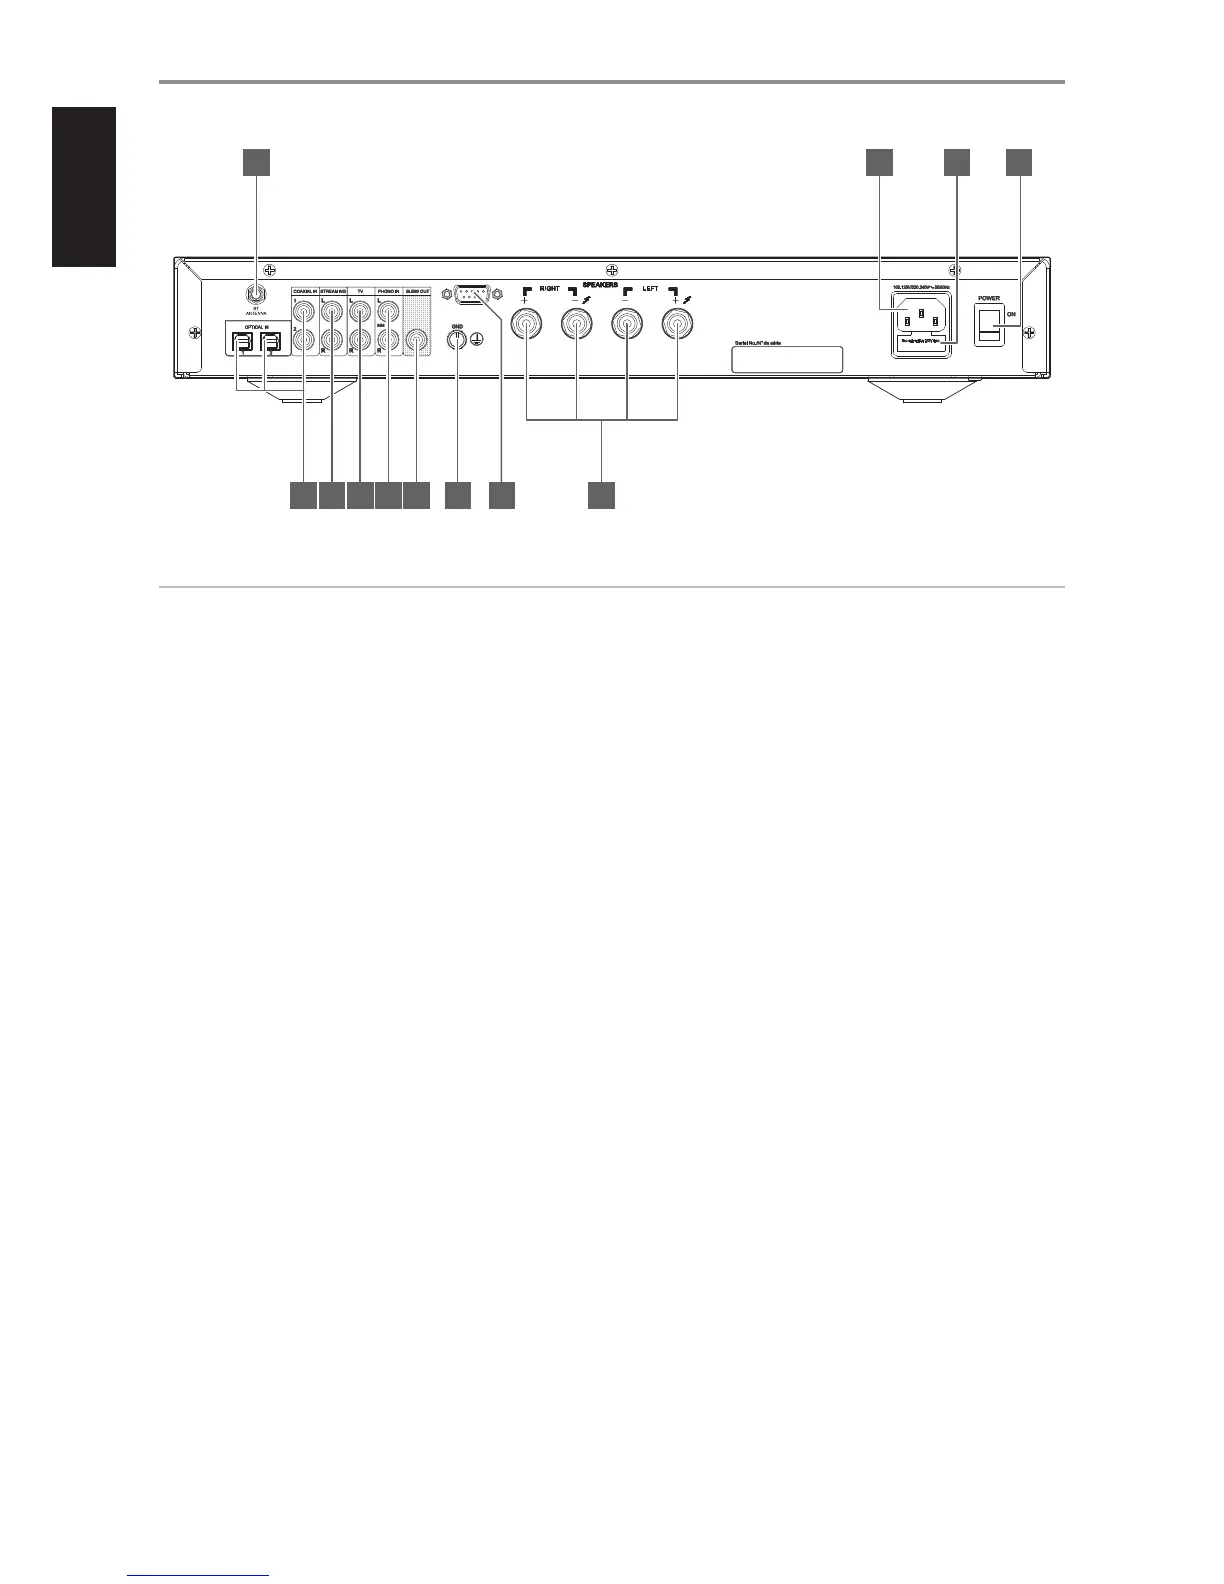
1 BT ANTENNA
• Connect supplied Bluetooth antenna to the BT antenna terminal.
2 AC MAINS INPUT
• The C 328 comes supplied with two separate mains power cords.
Select the mains power cord appropriate for your region.
• Before connecting the plug to the mains power source, ensure that
it is rmly connected to the C 328’s AC Mains input socket.
• Always disconnect the mains power plug from the mains power
source before disconnecting the cable from the C 328’s AC Mains
input socket.
3 FUSE HOLDER
• Only qualied NAD service technicians can have access to this fuse
holder. Opening this fuse holder may cause damage thus voiding
the warranty of your C 328.
4 POWER
• The POWER switch supplies the master AC mains power for the
C 328.
• When the POWER switch is set to ON position, the C 328 goes to
standby mode as shown by the amber status condition of the front
panel Power indicator.
• If you do not intend to use the C 328 for long periods of time (such
as when on vacation), switch o the POWER switch.
• With POWER switched o, neither the front panel Standby button
nor AMP 3 remote control’s [ON] button can activate the C 328.
5 COAX 1-2, OPT 1-2
• Connect to the corresponding optical or coaxial digital output of
sources such as CD or BD/DVD players, digital cable box, digital
tuners and other applicable components.
6 STREAMING
• Input for line level streaming devices. Use a twin RCA-to-RCA lead
to connect the source device’s left and right “Audio Output” to this
input.
7 TV
• Input for analog audio output of a TV. Use a twin RCA-to-RCA lead
to connect the source device’s left and right “Audio Output” to this
input.
8 PHONO
• Input for a Moving Magnet (MM) phono cartridge only. Connect the
twin RCA lead from your turntable to this input if you are using a
Moving Magnet cartridge.
9 SUBW OUT
• Use RCA cable to connect SUBW OUT to the low level input of a
powered subwoofer.
• Low frequency information up to 100Hz is sent to the connected
subwoofer.
10 GROUND TERMINAL
• Ensure that the C 328 is plugged-in to a grounded AC wall outlet.
• If a separate earth ground is necessary, use this terminal to ground
your C 328. The C 328 can be connected to ground by connecting
a ground lead wire or similar to this terminal. After insertion, tighten
the terminal to secure the lead.
11 RS232
• NAD is a certied partner of AMX and Crestron and fully supports
these external devices. Check out the NAD website for information
about AMX and Crestron compatibility with NAD. See your NAD
audio specialist for more information.
• Connect this interface using RS-232 serial cable (not supplied) to
any Windows compatible PC to allow remote control of the C 328
via compatible external controllers.
• Refer to the NAD website for information about RS232 Protocol
documents and PC interface program.
• Use this port also for rmware upgrade. Instructions on how to use
this port for rmware upgrade is included in the C 328 rmware
upgrade (if any) procedure available from the NAD website.
IDENTIFICATION OF CONTROLS
REAR PANEL
© NAD C328
SERVICE
1 2 3 4
121165 7 8 9 10
ATTENTION!
Please ensure that the C 328 is powered o or unplugged from the main power source before making any connections. It is also advisable to power down
or unplug all associated components while making or breaking any signal or AC power connections.
6