ENGLISH
SOURCE SETUP
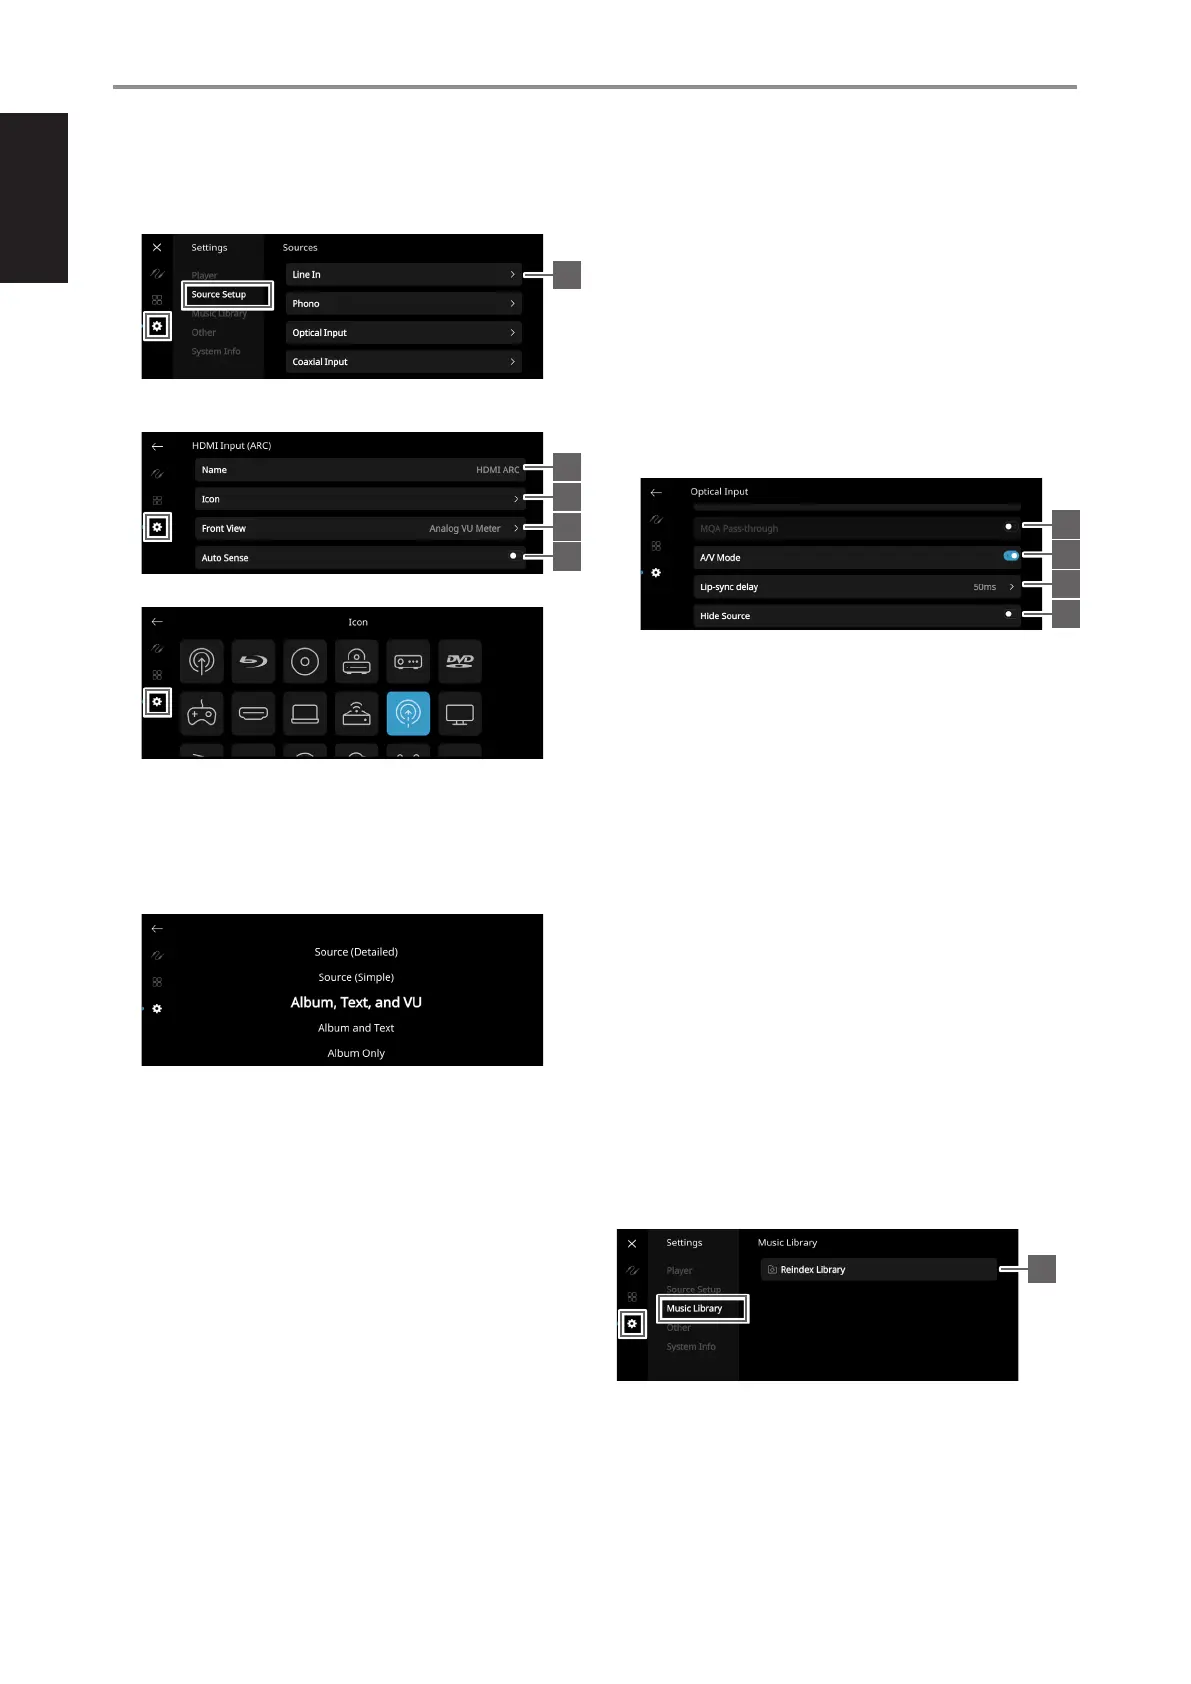
Select and configure Source
1 Source: Select Source to configure
2 Name: Customize the Source’s Name using the pop-up keyboard
3 Icon: Select and assign icon for the selected Source
4 Front View: Front display layout and contents can be configured by
selecting the following options
• Album Only, Album and Text, Album, Text and VU, Text Only
• Source (Simple), Source (Detailed)
• Analog VU meter, Digital VU.
A combination of above options is available depending upon the
Source selected.
Text Only
- Display album name, song title, artist name, broadcast/radio
station, name, title of the show, etc.
Album Only
- Display album/title art, station ID symbol or icon only
Album and Text
- Display album/title art, station ID symbol, icon and other
information like album name, song title, artist name, broadcast/
radio station name, title of the show, etc.
Album, Text and VU
- Display all the information indicated above for Cover Art and Meta
Data plus VU meter
Source (Simple)
- Display Source name only which is “BluOS” or name of Cloud or
Radio Service
Source (Detailed)
- Display Source name or name of Cloud or Radio Service plus other
information like volume level
Analog VU Meter
Digital VU Meter
- VU Meter monitors or reflects audio input level of current BluOS
source. If “Mute” is enabled, the VU meter will not turn off or go to
minimum level as it is the audio output that is muted.
5 Auto Sense (applicable only for Optical Input, Coaxial Input and
HDMI Sources): Wake up from standby mode when triggered by an
active Optical Input, Coaxial Input or HDMI Source
6 MQA Pass-through (applies only to Coaxial and Optical Sources):
Enable MQA Pass-through for the M10 V3 to act as MQA decoder or
renderer when MQA certified CD player or other MQA certified devices
are connected to coaxial or optical input ports.
7 A/V Mode: By connecting your TV or other video sources to your
M10 V3 through analog, coaxial, optical or HDMI input ports, you can
listen to your favorite shows or movies through your BluOS system.
Grouping multiple BluOS devices from one of these inputs can require
an abundance of network traffic. A/V mode creates a short and
unobtrusive buffer to your audio to ensure your BluOS system stays in
sync with your video even with slower or cluttered networks.
Enabled: With A/V Mode enabled on your input source, audio delay
will be automatically adjusted to keep your grouped BluOS devices
in sync with the video source connected. Use the Lip-sync delay
slider below the A/V Mode setting to manually adjust the lower end
of this delay to better suit the speed of your network.
Disabled: When your M10 V3 is connected to an audio source
without video, such as a turntable or CD player, the A/V Mode
setting should be disabled.
8 Lip-sync delay: With A/V Mode enabled, “Lip-sync delay” can be
adjusted to ensure your audio is staying in sync over your network
with the original video source. By varying “Lip-sync delay” from 50ms to
150ms, one can delay the audio output to synchronize it with the video
image of the corresponding source.
9 Hide Source: Activate or deactivate selected Source
MUSIC LIBRARY
1 Reindex Library: Music library will be scanned for any newly added,
deleted, or updated files, ensuring that these changes are incorporated
into the BluOS app.
12
1
2
3
4
5
6
7
8
9
1
IDENTIFICATION OF CONTROLS
TOP AND FRONT VIEW


 To Next Page