Qty Part Number Description
1 HDW1397 Shackle, Stainless Steel, 1/4" diam.
* MSC0360 Cable Tie, Harsh Env, 8”
*Quantity depends on cable length. 1 tie wrap around
seismometer cable and wire rope every 5 m.
Table 1-2 - List of Contents for Lifting Cable Kit (Continued)
1.4 Technical Support and Maintenance
If you need technical support, please submit your request by email. Include a full explanation
of the problem and any supporting information (such as a screen capture of the observed
problem, mass position readings, photographs of the site, operating input voltage and
current) to help us direct your request to the most knowledgeable person for reply. Before
returning a unit for repair, contact Nanometrics Technical Support to obtain an RMA (Return
Merchandise Authorization) number. Email us at techsupport@nanometrics.ca or see "Contact
Technical Support " on page103.
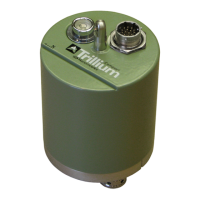
The mechanical and electronic elements of the Trillium Compact seismometers have been
designed to be robust and reliable, to ensure there is no need to open units for on-site
maintenance. The internal reverse-voltage protection and over-current protection
automatically resets when the fault is removed, so there are no fuses to replace.
Contents may be under pressure, please contact Nanometrics technical support
before servicing. See "Contact Technical Support " on page103.
When servicing the Trillium Compact, be aware that if the unit has failed in a buried or
underwater environment there is a small possibility that water may have leaked in
under pressure, compressing the air inside. If the unit has been submerged beyond its
rated depth of 10 m there is some risk of hazardous trapped pressure.
For safety, air pressure must be relieved before opening the unit. To do this, undo the
top connector jam nut and push the connector down to break the seal and relieve any
pressure trapped inside.
Chapter 1 - Getting Started
16889R10 • 2020-11-12 Page 16