19
IOM
W415-2288 / 08.29.2019
H68.3.5
8. When installed, the Wall Sleeve must protrude
1/2” MIN. to 1” MAX. beyond the exterior nished wall
to allow proper water evacuation through the drain holes
in the bottom panel. See FIG. 8.
INSTALLATION CREW MUST ADHERE TO ALL LOCAL/NATIONAL SAFE WORK PRACTICES
INCLUDING EMPLOYING APPROPRIATE FALL ARREST EQUIPMENT
WARNING
! !
Flashing
Finished Wall
Wall Sleeve
Flashing
PROTRUDE
1/2” MIN.-1” MAX.
PROTRUDE
1/2” MIN.-1” MAX.
OUTSIDE
INSIDE
8
9. Wall sleeve can be installed from inside or outside the
building (FIG. 9). The side and top brackets’ position need
to be adjusted to suit the method and building material.
9
Install the wall
sleeve into the
wall until the
support brackets
are set on wall
edge.
H68.3.5
1.5”
5
4
16
“
10”
10”
Position B
Position A
10
7
7
7
2
2
3
3
3
4
4
4
4
11
6
1
1
1
7
7
10
5
4
16
“
5
4
16
“
11
5
5
11
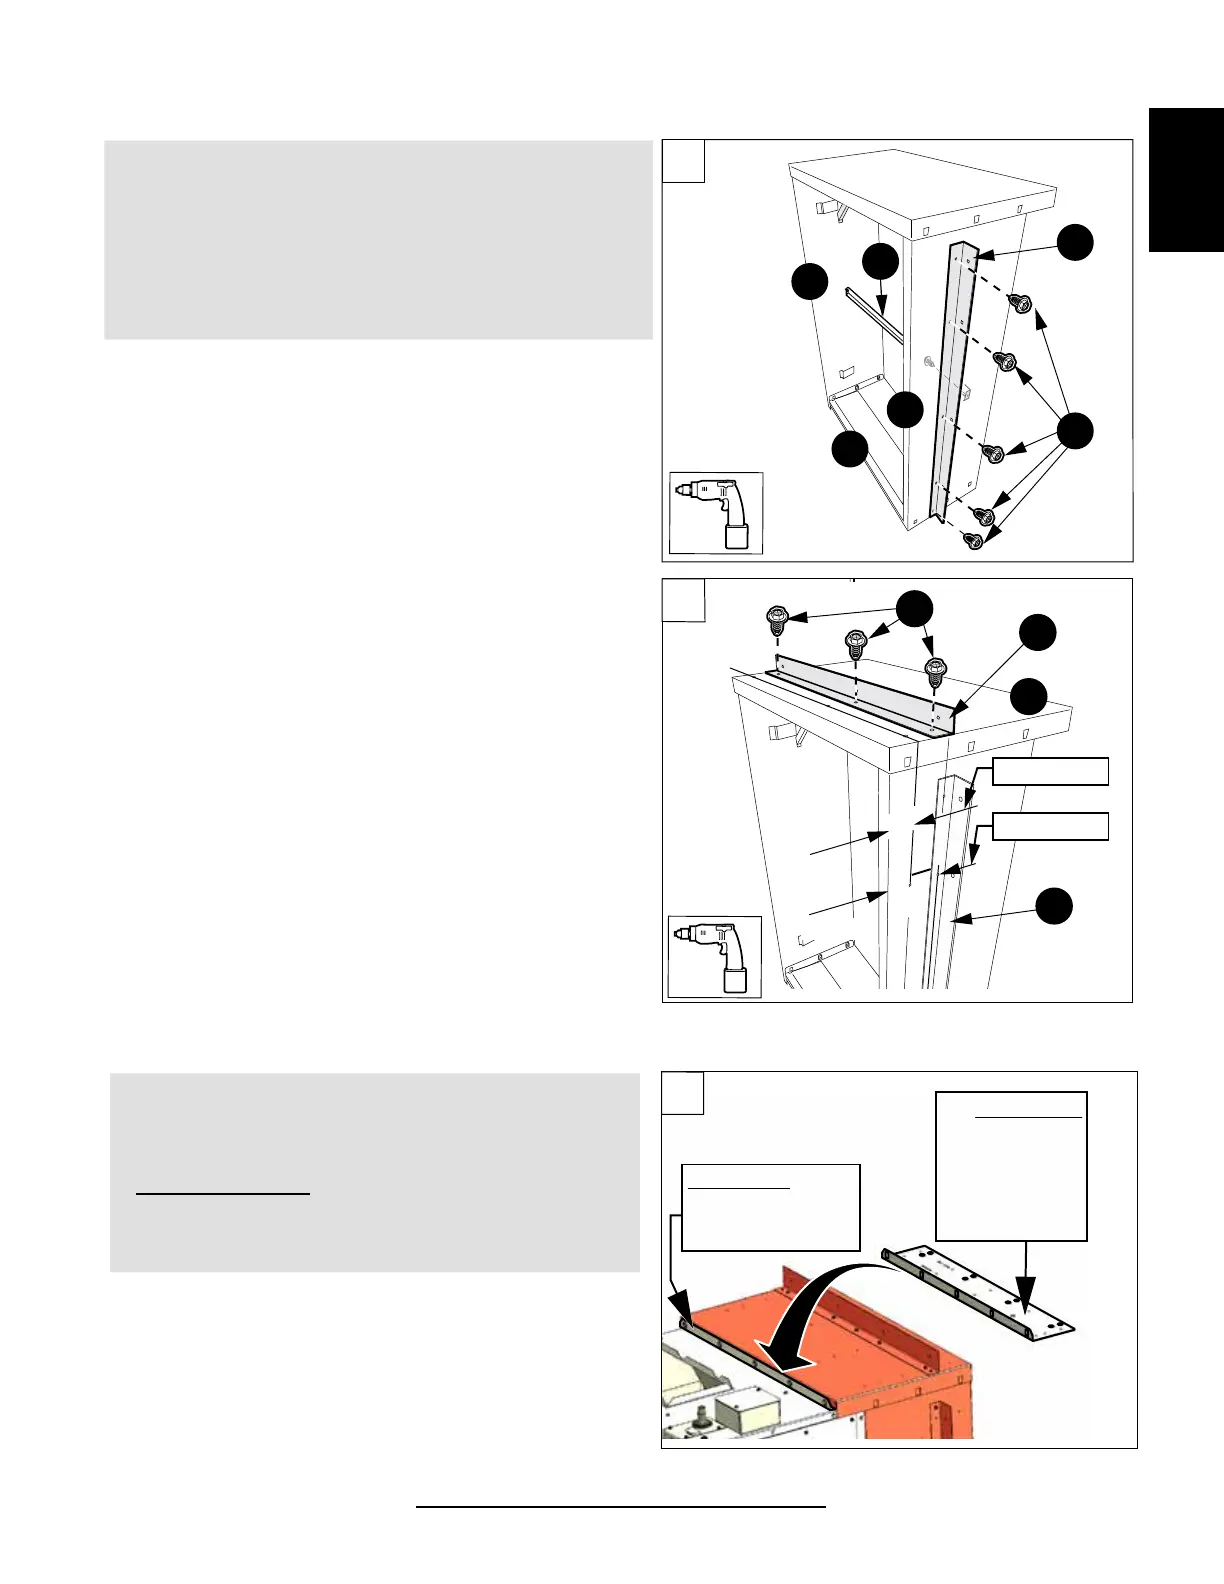
10. Attach the Side Support Brackets (5) to the Side
Panels (3) & (4) and to Base Panel with ve screws
(7) through the shorter ange (FIG. 10).
1.5”
5
4
16
“
10”
10”
Position B
Position A
10
7
7
7
2
2
3
3
3
4
4
4
4
11
6
1
1
1
7
7
10
5
4
16
“
5
4
16
“
11
5
5
10
11. Select the set of mounting holes based on type of
construction wall face application (brick, stucco,
siding, etc.):
a. For Side Support Brackets (5), use pre-drilled
mounting Position A or Position B shown in FIG. 11,
depending on the type of wall construction.
b. Attach Top Support Bracket (6) to the Top Panel
(1) using minimum three screws (7) provided, (FIG.
11). For this bracket (6), use mounting Position A or
Position B shown in FIG. 11.
NOTE: The following support bracket locations are for
installations where the wall sleeve is installed from the
OUTSIDE of the building.
For installations where the wall sleeve is installed from the
INSIDE of the building, the Side Support Brackets (5) need
to be mounted on INTERIOR wall, so they will need to be
relocated on the wall sleeve (new screw positions may need
to be created depending of the type of wall construction).
NOTE: When using wall sleeve size CWSMUA19
(not standard CWSMUA size), make sure to replace
the standard Top Panel bracket (W080-1384) with the
specially designed top panel bracket (W080-1721)
in order to properly secure the cabinet to the wall sleeve
(FIG. 12).
W080-1721:
To be used with
CWSMUA19.
To be eld
installed to
REPLACE factory
installed bracket.
W080 -1384:
STANDARD BRACKET
is factory installed
on cabinet.
12