© 2021 Nordson Corporation
7446567-02
10-3
Disassembly and Assembly
Smart Gun Assembly
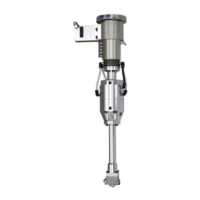
See Figure 10-1.
1. Install valve cartridge assemblies (10), spring side rst, into the smart gun base (12)
valve ports.
CAUTION:
• Ensure the springs are properly inserted and seated.
• Installing the valve cartridge assemblies (10) should be completed with the smart gun
base (12) mounting plate facing down and the valve ports facing up.
• Ensure the O-rings and seals are properly installed into each valve cartridge assembly
(10) before attempting assembly.
2. Install ow tube assemblies (9) properly into each material ow port in the smart gun
base (12).
CAUTION: Ensure all ow tube (9) O-rings are properly installed before attempting
assembly.
3. Align all the valve and material ports between the smart gun base (12) and valve
manifold assembly (15).
CAUTION: Ensure all dowel pins and through mounting holes are aligned and install the
valve manifold assembly (15) onto the smart gun base (12).
4. Install socket head cap screws (7) through the valve manifold assembly (15) and into
the threaded holes of the smart gun base (12). Tighten each socket head cap screw
(7) to 20.3 N●m (179.7 in-lbs).
5. Install three ow tube assemblies (16) properly into each material port of the valve
manifold assembly (15).
CAUTION: Ensure each O-ring is properly installed and seated onto the ow tube (16)
before attempting assembly.
6. Align the material ports of the extension tube (6) with the material ports and ow tube
assemblies (16) of the valve manifold assembly (15).
CAUTION: Ensure the mounting through holes are properly aligned as well.
7. Install the extension tube (6) onto the valve manifold assembly (15). Install socket
head cap screws (17) through the extension tube (6) mounting holes and into the
threaded valve manifold assembly (15) holes. Tighten each socket head cap screw
(17) to 12.0 N●m (106.1 in-lbs).
8. Install check valve assemblies (18), spring end rst into the material ports of the
extension tube (6).
CAUTION: Ensure the check valve assemblies (18) are properly seated within the
extension tube (6).
9. Install ow tubes assemblies (19) into each of the material ports in the extension tube
(6), on top of the previously installed check valve assemblies (18).
CAUTION: Ensure the ow tube assembly (19) O-rings are properly installed and the
ow tube assemblies (19) are seated onto each check valve assembly (18).
10. Align the material ports of the nozzle block (20) with the material ports of the
extension tube (6). Also align the threaded mounting holes of the nozzle block (20)
with the through holes of the extension tube (6).
11. Install socket head cap screws (5) through the extension tube (6) through holes and
into the threaded mounting holes of the nozzle block (20). Tighten each socket head
cap screw (5) to 5.9 N●m (51.8 in-lbs).
 Loading...
