5.4Menu3 Programming the radio hand-held transmitter to 1/2
door opening
1. Briefly actuate the button. The LED now flashes blue. The programming mode
is activated for 30seconds.
2. Actuate the button of the hand-held transmitter that is to be programmed.
ð The blue LED flashes fast to indicate that the hand-held transmitter has been
successfully taught.
3. To program any additional hand-held transmitters, repeat the procedure from
menu item1 or exit the configuration by briefly pressing the button until the
red LED flashes quickly.
4. Press the button.
5.5Menu4 Force setting opening, Menu5 Closing
1. Briefly press the button in menu item4 or 5. The LED flashes blue. The num-
ber of times the LED flashes indicates the currently selected parameter.
2. Select the desired parameter with the or buttons.
3. Confirm the selected parameter by briefly pressing the button.
ð You then return to the selection menu via menu item4 (LED flashes red 4times).
4. Navigate to menu item5. For fine adjustment of the closing force monitoring,
please proceed as described for menu item4.
5.6Menu6 Selection of closing edge safety device
1. Briefly actuate the button. The LED flashes blue. The number of times the
LED flashes indicates the currently selected parameter.
2. Select the desired parameter with the or buttons.
3. Confirm the selected parameter by briefly pressing the button.
ð You then return to the selection menu via menu item6 (LED flashes red 6times).
Automatic selection of closing edge safety device (menu item6)
1. Press and hold the button for 5seconds.
2. The automatic identification is started. The LED flashes blue. The number of
times the LED flashes indicates the determined parameter.
3. Confirm the selected parameter by briefly pressing the button.
ð You then return to the selection menu via menu item6 (LED flashes red 6times).
5.7Menu7 Selection of the photoelectric sensor
You can select and activate a connected photoelectric sensor in this menu item. An
auto detection can be started as with menu item6 by pressing the button for a
long time (press for 5seconds).
If a photoelectric sensor "mounted in frame" option is selected, the control pro-
ceeds with a position learning cycle after leaving the menu. This is indicated by a
permanently illuminated red LED.
5.8Menu8 Selection of the roll-up protection mechanism
You can select and activate a connected roll-up protection mechanism in this menu
item. An auto detection can be started as with menu item6 by pressing the but-
ton for a long time (press for 5seconds).
5.9Menu9 Selection of the door profile
Select the door profile in this menu item. Three different closing speeds are avail-
able for each door profile. If a new learning cycle is required due to the profile
change, the DCC will initiate it automatically.
5.10Menu10 Default settings
You can reset the drive to the default settings in this menu item. To do so, press and
hold the button for least 5seconds. The setup wizard is then started automatic-
ally.
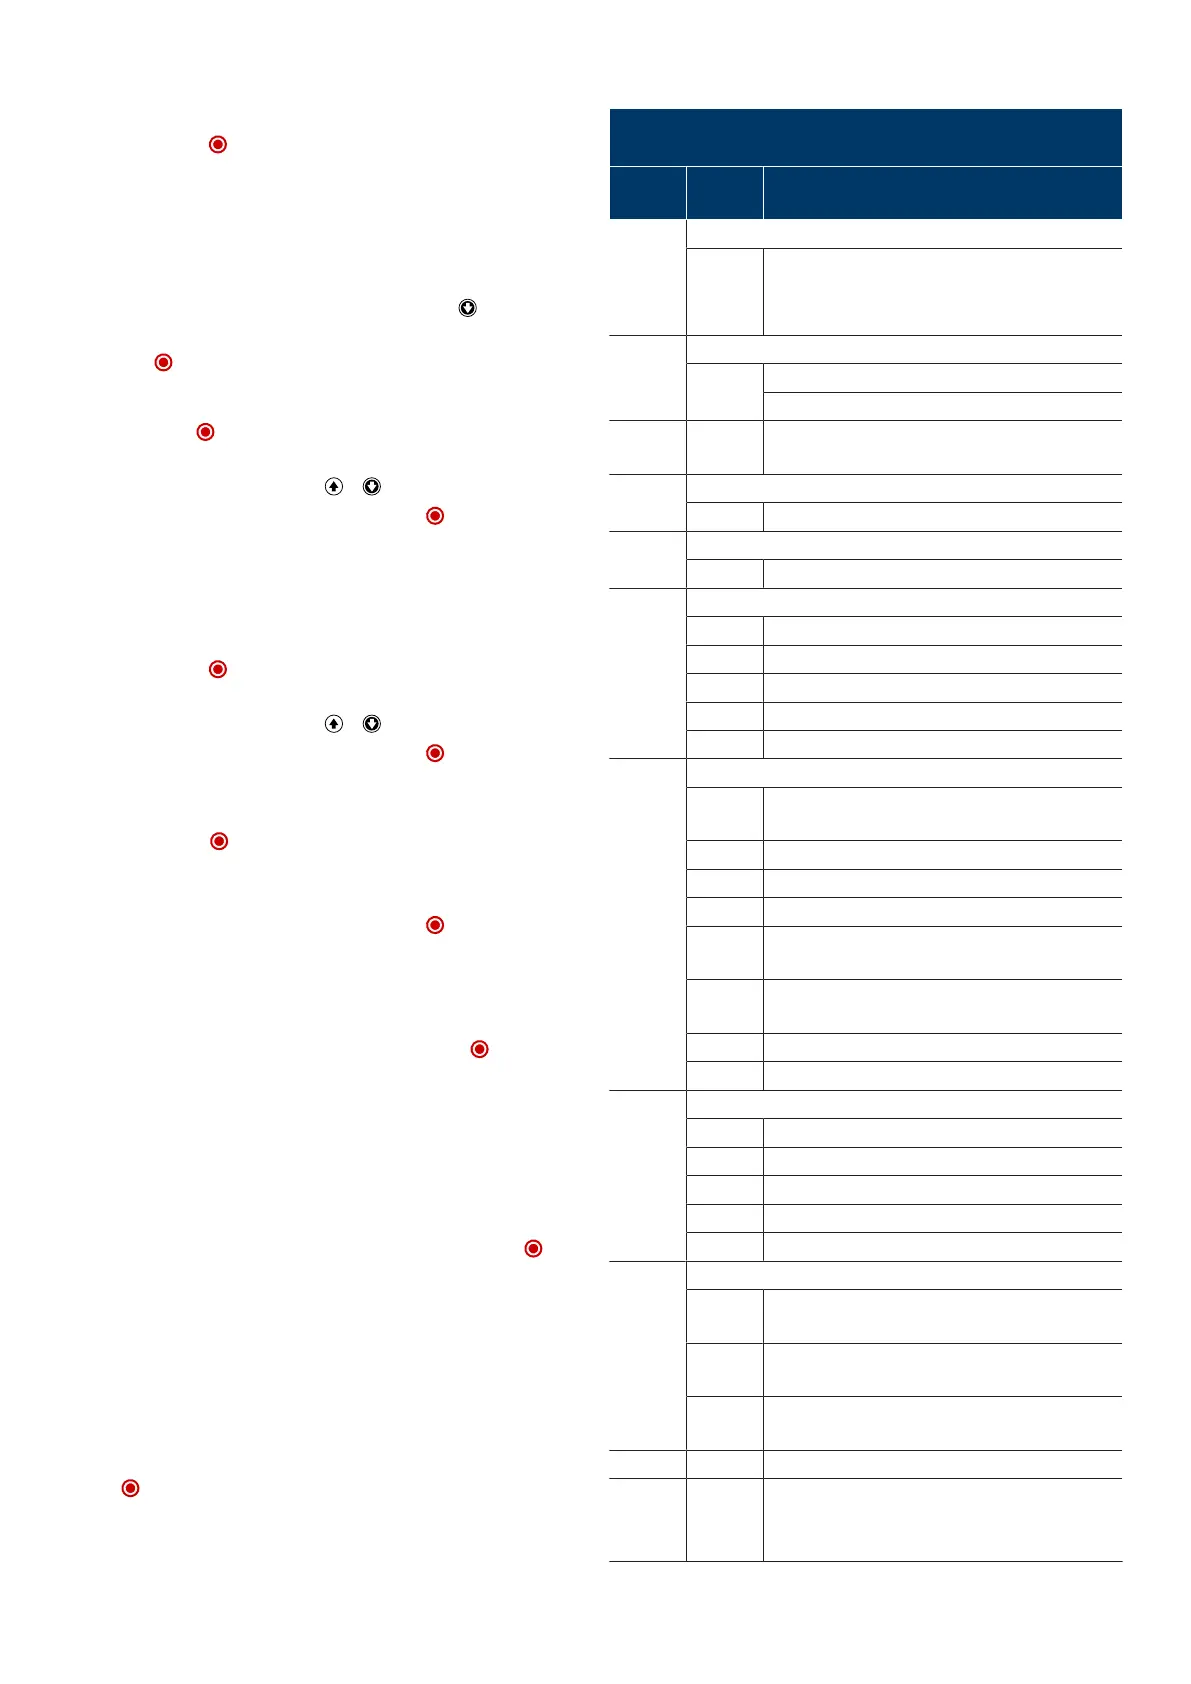
5.11Program overview Basic programming IPD-E
Menu item flashes red
Setting parameter flashes blue
Menu
(red)
Input
(blue)
Selection
1x Door setting end positions OPEN/CLOSED
OPEN+
STOP+
CLOSE
Change of direction
2x Programming/deleting radio hand-held transmitters
STOP Programming hand-held transmitter
Deleting hand-held transmitter (5seconds)
3x STOP Programming the radio hand-held transmitter to 1/2
door opening
4x Force setting opening
1-10 (5*)
5x Force setting closing
1-10 (4*)
6x Selection of closing edge safety device
STOP Auto detection (5seconds)
1* none
2 Optical closing edge safety device OSE
3 Electrical safety edge8k2
4 Pressure wave switch 8k2 with testing
7x Selection of photoelectric sensor
STOP Auto detection photoelectric sensor on DCC (press for
5seconds)
1* none
2 2-wire photoelectric sensor on DCC
3 2-wire photoelectric sensor on DCC in the frame
4 4-wire photoelectric sensor, reflective photoelectric
sensor
5 4-wire photoelectric sensor, reflective photoelectric
sensor on DCC or IPD-S in the frame
6 2-wire photoelectric sensor on IPD-S
7 2-wire photoelectric sensor on IPD-S in the frame
8x Selection of the roll-up protection mechanism
STOP Auto detection (5seconds)
1* none
2 Stop roll-up protection mechanism at J4.2
3 Stop roll-up protection mechanism at J4.3
4 Stop roll-up protection mechanism at J4.2 and J4.3
9x Selection of the door profile
1-3 Standard fittings (cylindrical drum) 1:fast, 2:medium,
3:slow
4-6 Raised fittings (semi-conical drum) 4:fast, 5:medium,
6:slow
7-9 Vertical runner (full conical drum) 7:fast, 8:medium,
9:slow
10x STOP Default setting (5seconds)
fast
continu-
ous
STOP Exit menu
* Default setting
10|Novoferm