8
8
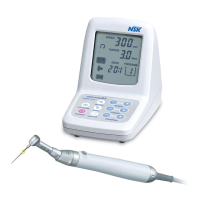
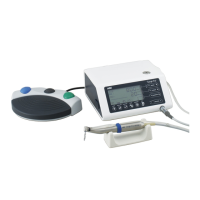
Operation Procedures
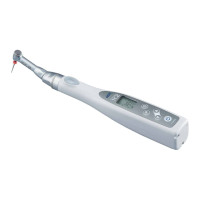
8-1 Attaching Handpiece
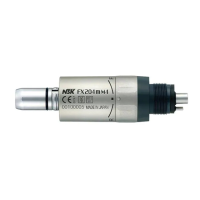
Air Turbine
When connecting a Midwest 4 Hole air turbine (According to ISO 9168)
1) Remove the bur from the handpiece.
2) Open the iCare Door, insert the air turbine to the shape of the air turbine joint, and tighten the nut securely (Fig. 11).
To 4)
When connecting another type of air turbine
1) Remove the bur from the handpiece.
2) Open the iCare Door, insert the adaptor (option) to the shape of the air turbine joint, and tighten the nut securely (Fig. 12).
3) Insert the air turbine into the adaptor (Fig. 13).
* Refer to "16. Option Parts List" for the correct adaptor.
To 4)
4) Push and pull the handpiece to be sure that it is securely attached.
5) Point the bur insertion hole toward the door and close the door securely (Fig. 14).
7
Check before use
Before use, check the product by referring to the check points below. If you find something abnormal such as looseness, when checking or
using, stop use and contact your Authorized NSK Dealer.
•Check that the turbine joint part is securely fastened and the Nut screw is free of wear, seizure or adherence of dirt.
•Check that the E-type joint part is secure and free of flaws or adherence of dirt.
Fig. 12Fig. 11
CAUTION
*C3 Type *C2 Type
•Do not lubricate air scalers and Phatelus air motors by using iCare. iCare lubricating method is improper to those structure.
Maintain individual handpieces according to the procedure described in the operation manual of each handpiece.
•If blood infiltrates inside a handpiece, iCare may not totally clean the internal handpiece components, and internal blood
coagulation may cause product failure. In this case, NSK recommends to immediately lubricate those handpieces with PANA
SPRAY Plus / PANA SPRAY.
•Maintain individual handpiece according to the procedure described in the operation manual of handpiece.
Air Turbine Joint
Nut
Adaptor
Nut
Tighten
Tighten
(CS5) iCare-EN_140507.indd 8 2014/05/22 9:02:58