
P
Paul SimsAug 14, 2025
What to do if OHAUS AP110 show system errors?
- SStephanie MorenoAug 14, 2025
Turn the power off, then turn it back on. If the error persists, have the balance serviced.
What to do if OHAUS AP110 show system errors?
Turn the power off, then turn it back on. If the error persists, have the balance serviced.
What to do if OHAUS Scales show error 8.3, hardware error caused by an internal weight signal which is too high?
Check the load on the platform which may be excessive. If the error persists, the balance must be serviced.
What does error 4.4 mean on OHAUS AP110?
Error 4.4, RS232 buffer is full, may occur if no printer or computer is connected to the interface. To clear the buffer, turn the balance off or enter the Print menu and select END.
What to do if OHAUS Scales show error 8.2, internal power on error?
Turn the power off, then turn it back on.
How to store menu settings on OHAUS AP110?
To save menu settings, you MUST use End to exit menus.
What does error 9.7 mean on OHAUS AP110 Scales?
Error 9.7, Invalid setup data checksum. Check Setup, User, and Print menus settings. If possible, try to enter menus and exit using END to restore menu settings. It may be caused by a faulty component, or in rare cases, a severe static charge. If the error persists, the balance must be serviced.
What does error 2.0 mean on OHAUS AP110?
Error 2.0, Illegal tare operation or balance is unable to stabilize within time limit after taring, may happen because the environment is too hostile or the balance needs recalibration. Recalibrate the balance.
What does error 3.0 mean on OHAUS Scales?
Error 3.0, Incorrect or no calibration weight used for User calibration. Recalibrate with correct weights.
What does error 5.0 mean on OHAUS AP110?
Error 5.0, Auto calibration failed, may happen because the environment is too hostile. Recalibrate the balance.
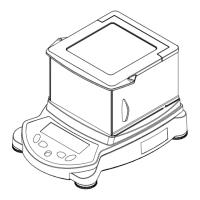
Details the design, construction, and display features of the Ohaus Analytical Plus Series balances.
Outlines the four main display menus (Calibration, User, Setup, Print) for configuring balance operations.
Lists the items included with the ANALYTICAL Plus balance and instructions for checking contents.
Specifies ideal environmental conditions and locations to avoid for optimal balance performance.
Instructions on how to access and install the weigh below hook located under the bottom cover.
Describes how to use the level indicator and adjustable feet to ensure the balance is level.
Step-by-step guide for assembling the pan, ring, and shield onto the balance weighing chamber.
Instructions for fitting the in-service cover snugly over the display unit.
Explains the bi-directional RS232 interface for communication with printers and computers.
Details the 9-pin 'D' connector pinout and handshake requirements for RS232 communication.
Describes the three methods for initiating data output via the RS232 interface.
Lists and explains the ASCII commands used for balance communication and control.
A detailed table of RS232 commands, their characters, descriptions, and parameters.
Procedure for safely connecting the balance to an AC power outlet, including voltage switch check.
Details the type and rating of the spare fuse provided for the balance.
Describes the self-test sequence that occurs when power is applied and the post-test stabilization period.
Explains the operation of the PRINT, MODE, OFF, and ON/TARE buttons for balance control.
Illustrates symbols used in the manual to represent pushbutton actions and display changes.
Guides users on how to access and move through the balance's menu system using buttons.
Procedure for powering on the balance after installation and completing initial checks.
Provides a table detailing the meaning of various indicators shown on the balance display.
Recommends a warm-up period for the balance to adjust to its environment for accurate readings.
Explains the dual range capability (fine and coarse) available on AP250D and E models.
Step-by-step instructions for placing an item on the pan and obtaining a stable weight reading.
Details how to tare the balance to subtract the weight of a container before measuring contents.
Guide on using the percent weighing mode to display loads as a percentage of a reference load.
Instructions for using the parts counting mode, including sample selection and accuracy settings.
Explains how to set limits and use check weighing to determine if items are within acceptable weight ranges.
Describes the Animal Weighing mode designed to minimize fluctuations from subject movement.
Details the Fill Guide feature, which uses a bar graph to indicate progress towards a target value.
Instructions on setting a reference number for the Fill Guide feature to establish target values.
Explains the High Point feature for identifying the highest sample weight from a series of measurements.
Overview of how to print data, including settings for communication and print options.
Describes how time and date settings affect printouts when enabled in the Print Options.
Explains how to print a list of current menu settings for user, setup, and print configurations.
Details the format and content of automatic, user, and calibration test printouts.
Instructions on obtaining statistical printouts for various weighing functions like sampling.
Step-by-step guide for performing sampling to collect data for statistical analysis and printouts.
Describes statistical printouts for percent weighing, showing loads as percentages of a reference.
Explains statistical recording of parts counted, based on sample weight and defined error levels.
Details statistical printouts for check weighing, indicating under, accept, or over weight status.
Describes how to print FillGuide data, showing sample status relative to target capacity.
Identifies the main menus (CAL, SETUP, USER, PRINT) and their default settings for customization.
Details the Calibration menu for Auto, User, and Test calibration methods.
Covers the User menu for adapting the balance to environmental conditions and setting parameters.
Explains the Setup menu for customizing balance operations, units, and functions.
Covers the Print menu for configuring communication, print options, and GLP data.
Instructions on how to lock or unlock menus to prevent unauthorized setting changes.
Describes how to lock the calibration menu to prevent unauthorized calibration changes.
Step-by-step guide for performing automatic calibration using the balance's internal masses.
Detailed instructions for calibrating the balance using an external mass of known value.
Procedure for testing the balance's calibration against the last stored calibration information.
Steps to properly exit the calibration menu and return to normal weighing mode.
Explains how to lock the User menu to prevent unauthorized modification of settings.
Guide to reset all User menu selections to their original factory default settings.
Details how to set the averaging level to compensate for vibration or air currents.
Explains how to set the stability range for determining when the stability indicator turns ON.
Describes the Auto-Zero function for minimizing effects of temperature changes on the zero reading.
Enables dual range operation specifically for the AP250D model.
Procedure for exiting the User menu and saving any selected settings.
Explains how to lock the Setup menu to prevent unauthorized changes to balance settings.
Guide to reset all Setup menu selections to their factory default settings.
Configuration for Type Approved requirements, allowing LFT to be set ON or OFF.
Allows selection of various weighing units (grams, carats, ounces, etc.) for display.
Enables selection of one primary weighing function like Percent, Parts Counting, or Check Weighing.
Enables and configures statistical data display (Mean, Sum, High, Low, Difference).
Enables the display of Gross/Net indicators and defines net and gross weight calculations.
Allows creation of custom weighing units by entering conversion factors and exponents.
Configures printing of identification number, project number, calibration, and name data.
Sets the acceptable error level for parts counting results, affecting accuracy.
Configures reference weight and display types (normal, none, sign) for check weighing.
Illustrates how different display settings (normal, none, sign) appear during check weighing.
Adjusts filtering strength and sampling duration for animal weighing to improve accuracy.
Sets up the Fill Guide feature, including reference weight, target value, and fill direction.
Allows setting the balance's internal clock to either U.S. (12-hour) or European (24-hour) format.
Provides a feature to correct the balance's internal clock by adding or subtracting seconds daily.
Enables setting the balance's date in either U.S. (month/day/year) or European (day.month.year) format.
Enables individual locking of menu selections (Calibration, User, Setup, Print) via a switch.
Outputs a listing of current menu settings for User, Setup, and Print menus via RS232.
Procedure to exit the Setup menu and save any modified parameters.
Resets all Print menu selections to their factory default settings.
Configures baud rate, data bits, parity, and stop bits for RS232 communication.
Allows selection of the desired baud rate (300, 1200, 2400, 4800, 9600) for communication.
Sets the number of data bits for RS232 communication to either 7 or 8.
Allows setting the parity bit to Odd, Even, or None for data transmission.
Sets the number of stop bits for RS232 communication to either 1 or 2.
Enables storage of ID and project numbers for GLP compliance during printing.
Enables/disables features like Auto Print, Stable Data, Numeric Data, Time, Date, Reference, Difference.
Configures automatic data output methods: continuous, interval-based, or upon stability.
Sets time intervals for automatic output and defines ranges for non-printing values.
Enables or disables the feature to output only stable display data.
Selects output of numeric data only or full display data for RS232 output.
Enables or disables the output of the current time to the printer.
Enables or disables the output of the current date to the printer.
Enables or disables printing of the reference weight used in various weighing modes.
Enables printing of the difference value, applicable in Check Weighing or Fill Guide modes.
Outputs a list of current menu settings for User, Setup, and Print menus via RS232.
Provides instructions for keeping the balance clean and maintaining its housing and platform.
Lists common symptoms, their probable causes, and recommended remedies for balance problems.
Details various error codes that may appear on the display and their suggested solutions.
Provides contact details for Ohaus support and authorized service agents for assistance.
Lists part numbers for common replacement items such as power cords, pans, and fuses.
Lists optional accessories that can be purchased for the Ohaus balance.
Provides detailed technical specifications including capacity, readability, and dimensions for various models.