A - 55
Appendices
NX-series EtherNet/IP Coupler Unit User’s Manual (W536)
A-6 Connecting to Masters from Other Manufacturers
A
A-6-2 Application Procedure
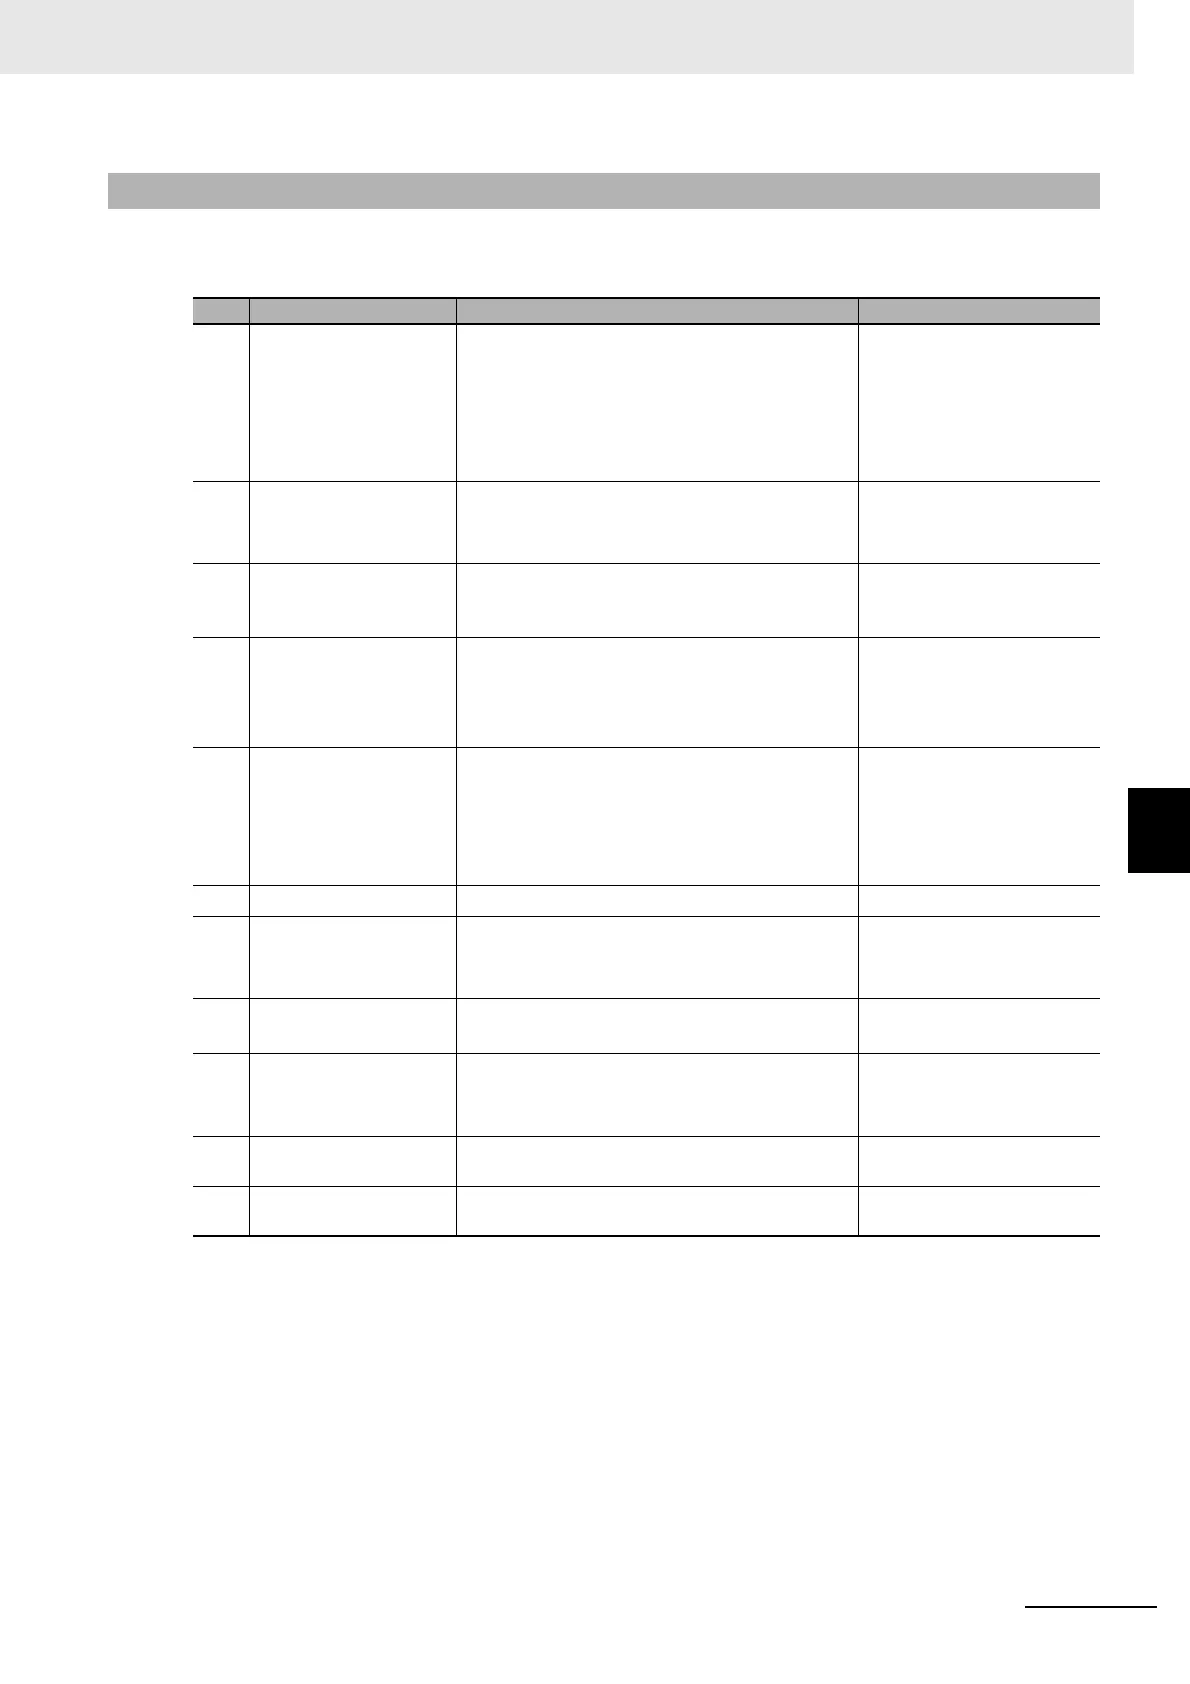
The following table gives the application procedure and support software.
A-6-2 Application Procedure
Step Item Description Support Software
1 Preparing for Work • Selecting NX Units
• Checking the Specifications of the EtherNet/IP
Coupler Unit and NX Units
• Checking the Mounting Direction
• Designing the Power Supplies for the Ether-
Net/IP Slave Terminal
---
2 Making Hardware Set-
tings and Wiring the
Slave Terminal
• Switch Settings
• Installing NX Units
• Wiring
---
3 Setting the IP Address
and Clock of the Ether-
Net/IP Coupler Unit
• Setting IP Address
• Setting NTP Server
Support software from other
company
4 Setting Slave Terminal
Configuration and
Operation Settings
*1
*1. For details on the settings, refer to 9-2 Setting Slave Terminal Parameters on page 9-7.
• Creating the Unit Configuration Information
• Setting the I/O Allocation Information
• Unit Operation Settings
• Setting Unit Application Data
NX-IO Configurator
*2*3
*2. The NX-IO Configurator can be used with NX-EIC202 version 1.2 or later. Otherwise, the Sysmac Studio must
be connected to the peripheral USB port on the EtherNet/IP Coupler Unit.
*3. If a Safety Control Unit is connected, the Sysmac Studio Standard Edition must be connected to the peripheral
USB port on the EtherNet/IP Coupler Unit.
5 Transferring and Com-
paring EtherNet/IP Cou-
pler Unit Parameter
Settings
*4
*4. For details on the settings, refer to 9-3 Transferring and Comparing Settings on page 9-28.
• Transferring the Unit Configuration Information
• Transferring the I/O Allocation Information
• Transferring the Unit Operation Settings
• Transferring Unit Application Data
• Verifying Settings
NX-IO Configurator
*2*3
6
IO-Link Settings
*5
*5. This setting is required only when an IO-Link Master Unit is connected.
• IO-Link Device Settings
CX-ConfiguratorFDT
*6
*6. The CX-ConfiguratorFDT can be connected via Ethernet if NX-EIC202 version 1.2 or later is connected. Oth-
erwise, it must be connected to the peripheral USB port on the EtherNet/IP Coupler Unit.
7 Setting Tag Data Links • Creating Tag Data Links
• Determining RPIs and Timout Values
• Adjusting Network Load
Support software from other
company
8 Assigning Network Vari-
ables
*7
*7. For details on the settings, refer to 9-6 Assigning Network Variables on page 9-71.
• Creating the I/O Mapping
NX-IO Configurator
*2*3
9
Checking Indicators
*8
*8. For details on the specifications, refer to 4-2 Indicators on page 4-5.
• Checking EtherNet/IP Coupler Unit Indicators
• Checking NX Units Indicators
• Troubleshooting
• NX-IO Configurator
*2*3
• Support software from
other company
10 Confirming Operation
by Checking the Wiring
• Checking Wiring with Input Monitoring and
Forced Outputs
Support software from other
company
11 Programming • Creating the User Program Support software from other
company
 Loading...