LD Cart Transporter User's Guide, 14766-000 Rev B
Page 165 of 190
Chapter 10: Maintenance
2.
Slide the guard back enough to free it, and remove it from the assembly.
CAUTION: Take care not to scratch the laser lens when removing the
laser guard.
3.
Remove the two M4 screws holding the laser to the mounting flange.
This will free the laser from the mounting flange.
Retain the two screws, flat washers, and lock washers for reassembly.
4.
Detach the cable from the old laser.
Do not let the cable slip into the flange or support tube, where you can’t reach it.
5.
Attach the cable to the replacement laser.
6.
Mount the laser to the mounting flange, using the M4 screws and washers you
removed from the old laser assembly.
7.
Mount the laser guard to the mounting flange, sliding its tabs under the M4 screws that
you previously loosened.
Take care not to scratch the laser lens during this step.
Ensure that the laser guard opening faces the front of the transporter.
Tighten the screws to hold the guard in place.
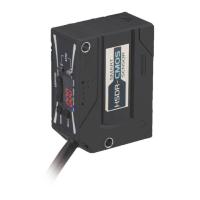
Rear-facing Laser
A rear laser assembly includes the laser, guard, and mounting bracket. The bracket mounts to
the HMIPost between the horizontal support tubes.
Replacing this laser requires accessing wires and a connector inside the left horizontal support
tube, which is attached to the HMI post.
1.
Remove the two M6 screws, lock washers, and flat washers holding the left laser sup-
port tube to the HMI post.
Save the screws and washers for reassembly.
2.
Loosen, but do not remove, the two M5 screws securing the support tube to the HMI
base.
3.
Loosen the two M4 screws holding the rear-facing laser guard to the bracket.
The screws go through two slots in the guard, so the guard can slide off after the screws
are loosened.
4.
Slide the guard back enough to free it, and remove it from the assembly.
CAUTION: Take care not to scratch the laser lens when removing the
laser guard.
5.
Remove the two M4 screws, lock washers, and flat washers holding the laser to the