HOW TO SET DEPTH GAUGES
NOTE:
• On-saw depth-gauge setting requires proper chain tension, as
shown
on pages 13-14,prior to filing.
• Pages 26 through 48 show the correct depth-gauge setting and the
part number of the correct depth-gauge tool for each of the different
OREGON
®
chain types.
• Find the page (26-48), which gives the correct filing specifications for
your OREGON
®
chain type. To do so, use the Chain identification
chart on pages 5, 6 and 7.
• If unsure of your OREGON
®
chain’s type, or part number, ask your
OREGON
®
saw chain dealer.
• Most OREGON
®
chains have a number stamped on each depth
gauge indicating the correct depth-gauge setting.
EXAMPLE: .025" (0.64mm)
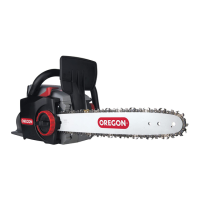
.025" (0.64mm) Depth-gauge Setting
➊
Use a depth-gauge tool with the correct built-in setting for your
chain and check your depth gauges every 3 or 4 sharpenings.
➋
Place the tool on top of your chain so one depth gauge protrudes
through the slot in the tool.
➌
If the depth gauge extends above the slot, file the depth gauge
down level with the top of the tool using a flat file.
Never file the depth gauge down enough to exceed the depth-gauge
setting specified in this manual for your OREGON
®
chain.
Read the warnings on page 12.