CAUTION
FIG. 3-8 (ProMax)
Attachments at
power head.
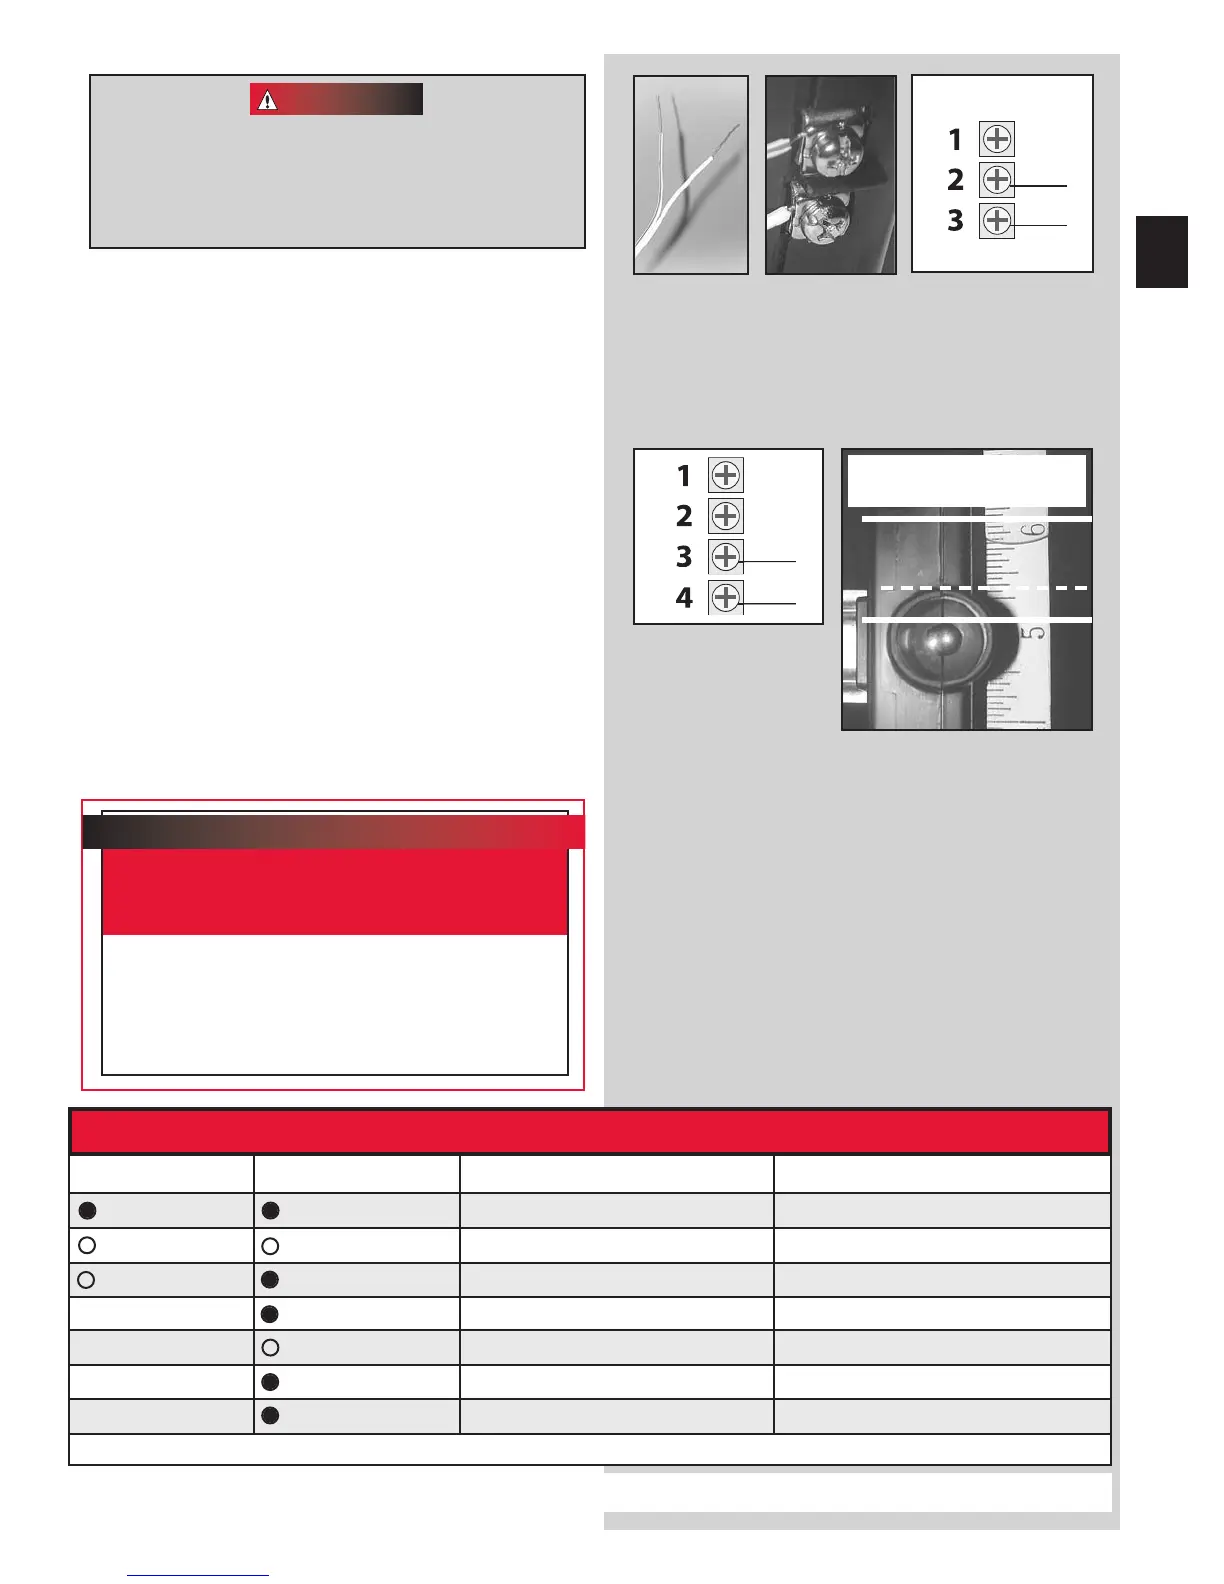
• Make wire attachments at STB’s.
– Splitting and stripping wire ends to be
c
onnected as shown (Fig. 3-6).
– Loosen terminal screws.
– Insert wire under flat plate and tighten screw. It
do
es not matter which wire, white or striped,
goes on which terminal (Fig. 3-7).
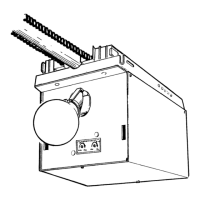
• Make wire attachments at power head.
– For ProMax. STB’s are connected to terminals
#2 and #3 on p
ower head (Fig. 3-8).
– For Stealth. STB’s are connected to
t
erminals #3 and #4 on power head (Fig. 3-8).
4. Check the following.
• Insure that no part of door or its hard
ware is in
path between lenses of source and sensor.
• Insure that tops of lenses are between 5”-6”
above the floor (Fig. 3-9). The brackets ar
e
flexible and can be adjusted slightly if needed.
Staples which are too tight can cut or pinch wires. Cut
or pinched wires can cause the STB System to stop
working. When using the insulated sta-
ples, make sure you fasten them only as tightly as
needed to hold the wire snugly.
FIG. 3-7
Attachments
at STB.
FIG. 3-9 Check lens height.
top edge of lens between 5”
- 6” abo
ve floor.
FIG. 3-6
Splitting and
stripping.
FIG. 3-8 (Stealth)
Attachments at
power head.
19
STB
SELF-DIAGNOSTIC TROUBLESHOOTING
ON
ON
NORMAL OPERATION
NONE REQUIRED
OFF
OFF
1.POWER HEAD NOT POWERED
2.WIRING FROM POWER HEAD BAD
1.CHECK BREAKERS, FUSES, PLUGS
2.CHECK WIRING FOR OBVIOUS SHORTS
OFF
ON
1.WIRING TO SOURCE MISSING OR BAD
2.POWER HAS BEEN INTERRUPTED
1.CHECK WIRING
2.REMOVE POWER AND REAPPLY
2 BLINKS, PA
USE (REPEAT)
ON
1.BEAM NOT ALIGNED 2. BEAM OBSTRUCTED
3.SENSOR DEFECTIVE
1.CHECK ALIGNMENT 2. CHECK FOR OBSTRUCTION
3.CALL CUSTOMER SERVICE
1.WIRE TO SENSOR MISSING OR BAD
2.SENSOR DEFECTIVE
1.CHECK WIRING
2.CALL CUSTOMER SERVICE
OFF
ON
1.SENSOR RECEIVING INTERFERENCE
1.
ATTEMPT TO DETERMINE SOURCE OF INTERFERENCE
2.CALL CUSTOMER SERVICE
ON
1.SOURCE NOT SENDING PULSES
2.SOURCE DEFECTIVE
1.CALL CUSTOMER SERVICE
2.CALL CUSTOMER SERVICE
NOTE: IF OPERATING PROBLEM EXISTS, THE DOOR CAN BE CLOSED IF YOU: 1. DISCONNECT THE STB SYSTEM FROM THE OPERATOR AND 2. HOLD WALL CONTROL BUTTON DOWN UNTIL DOOR IS CLOSED.
(
REMOTE CONTROL & WIRELESS KEYPAD WILL NOT WORK WITHOUT STB
)
SOURCE
(
RED LED
)
SENSOR
(
GREEN LED
)
INDICATED CONDITION
REQUIRED ACTION
2 BLINKS, PAUSE (REPEAT)
3 BLINKS, PAUSE (REPEAT)
4 BLINKS, PAUSE (REPEAT)
CUSTOMER SERVICE: 1-800-929-3667 or www.overheaddoor.com
Safe-T-Beam
®
Alignment Check
After turning the electrical power on, if the
STB’s are not in proper alignment, the red
LED (Source) will blink continuously.
To correct the problem – the brackets are
flexible and can be adjusted slightly to bring
the system into alignment.
When the STB’s are in alignment the red LED
will stop blinking and stay on.
• Make wire attachments at STB’s.
– Splitting and stripping wire ends to be
c
onnected as shown (Fig. 3-6).
– Loosen terminal screws.
– Insert wire under flat plate and tighten screw. It
do
es not matter which wire, white or striped,
goes on which terminal (Fig. 3-7).
• Make wire attachments at power head.
– For ProMax. STB’s are connected to terminals
#2 and #3 on p
ower head (Fig. 3-8).
– For Stealth. STB’s are connected to
t
erminals #3 and #4 on power head (Fig. 3-8).
4. Check the following.
• Insure that no part of door or its hardware is in
path between lenses of source and sensor.
• Insure tha
t tops of lenses are between 5”-6”
above the floor (Fig. 3-9). The brackets are
flexible and can be adjusted sligh
tly if needed.
NOTE: STB alignment check must be performed
following connection to electrical power (see page 21).
DO NOT PLUG IN YET!
 Loading...