25
Extension unit
(unit number 4)
Connection cable
(provided with extension unit)
Require a space of 1 unit
Extension unit
(unit number 5)
Extension unit
(unit number 1)
Extension unit
(unit number 3)
Require a space of 1 unit
(44 mm {1.73''})
Require a space of 1 unit
Require a space of 1 unit
Require a space of 1 unit
Extension unit
(unit number 2)
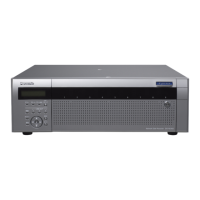
Network Disk
Recorder
■ Position in the rack
When connecting extension units (WJ-HDE400) to the recorder, install the recorder in the center of the rack.
Connect the recorder and the extension unit using the connection cable (1 m {39.4"}) provided with the extension unit. (Page 32)
Note:
• Installtherecorderinthecenteroftherack.Whentherecorderisinstalledatthetoporthebottomoftherack,itmayhavediffi-
culties in connecting the extension units since the cable length is not long enough.
• Wheninstallingtherecorderintherack,leaveaspaceof1U(44mm{1.73"})aboveandbelowtherecorderforventilation.
• Fixtheconnectioncablefirmlyusingthecableclampprovidedwiththeextensionunit.
When the cable is not connected firmly or when it is disconnected, the system may become unstable or recording may fail.
• Donotleavetheconnectedcablesunnecessarilylongandloose.Ifthewiringrouteisunnecessarilydetouredorthedistance
between devices is too far, it may cause malfunction. Do not wind the cable in a coil.
• Refertothesetupinstructions(PDF)forinformationonhowtochecktheunitnumbersoftheconnectedextensionunits.
 Loading...