19
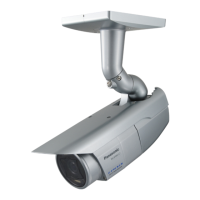
Secure the camera to the camera mount bracket
Thetiltangleislockeddownwardatshipment.
1Loosenthetiltinglockscrewapprox.1rotationandadjustthetiltangleofthecameratothe
horizontalposition.
2Tightenthetiltinglockscrewagainaftertiltangleadjustment.
Note:
• Useahexagonalwrenchwithwidthacrossflatsof4mm(locallyprocured)toloosenortighten
thetiltinglockscrew.
3Passeachcableandthesafetywirethroughthecameramountbracket,andsecurethecam-
eratothecameramountbracketwiththecamerafixingscrewsx3(accessories).
Pass the network cable first through the camera mount bracket before passing throughthe
othercables.
IMPORTANT:
• Ensurethatthecamerafixingscrewsarefirmlysecured.
Recommendedtighteningtorque:0.78N·m{0.58lbf·ft}
Camera main body
Safety wire
Network cable
Mounting boss for safety wire
Cable clamp
Drain slit
Camera mount bracket
(accessory)
Camera fixing screw x3 (M4 x 10)
(accessories)
Installations/Connections
Tilting lock screw
Camera main body
Horizontal
Approx. 90 °
Camera mount bracket
(accessory)
 Loading...