/'\.
5
~
....--...
~
prog
I
---
~
v
I a
AlB
/C
D
5~
0 3 5
Ib
A/ B/ C
5~
- 3 5
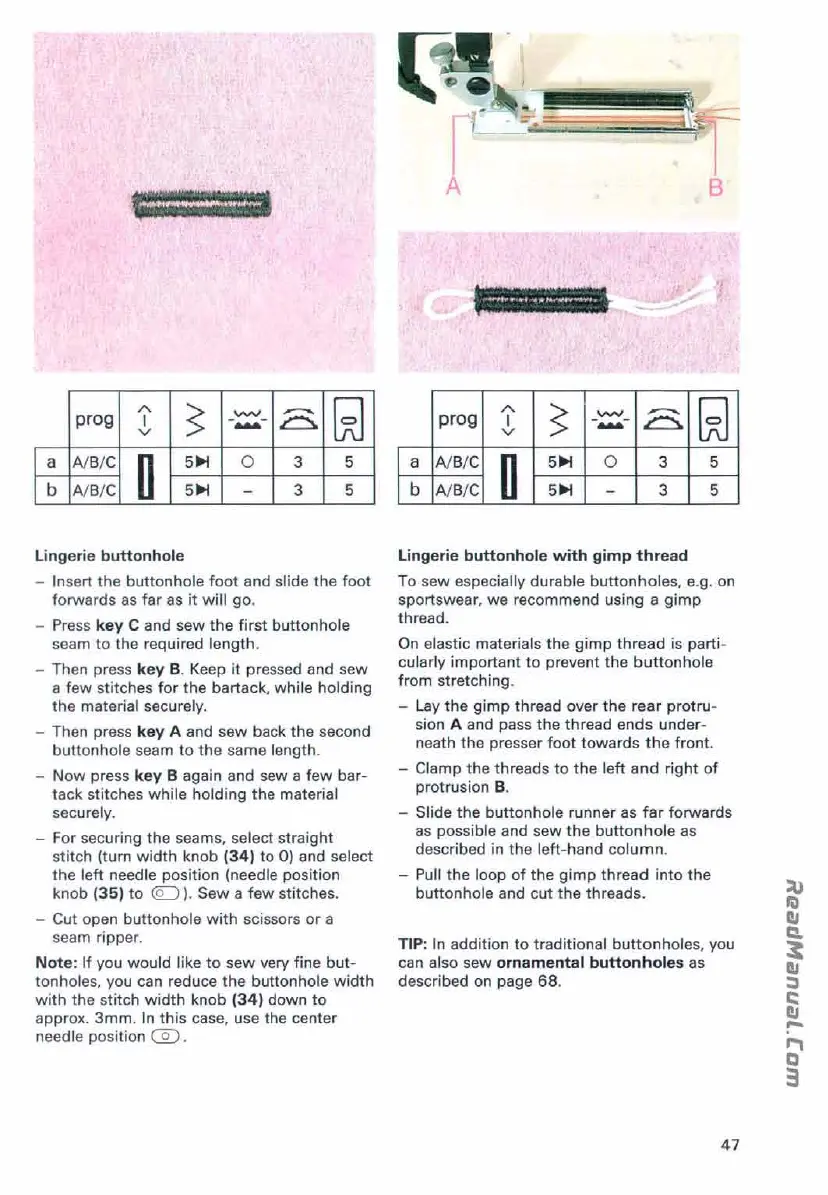
Lingerie
buttonhole
- Insert
the
buttonhole
foot
and slide
the
foot
forwards
as
far
as it
will
go
.
- Press
key
C and sew
the
first
buttonhole
seam
to
the required length.
- Then press
key
B. Keep it pressed and sew
a
few
stitches
for
the
bartack,
wh
i
le
holding
the
material securely.
- Then press
key
A and sew back
the
second
buttonhole seam
to
the
same length.
-
Now
press
key
B again and sew a
few
bar-
tack stitches
while holding the material
securely.
- For securing
the
seams, select straight
stitch (turn
width
knob
(34)
to 0) and select
the
left need le position (needle position
knob (35)
to
<Q:J
).
Sew
a
few
stitches.
- Cut open buttonhole
with
scissors or a
seam ripper.
Note:
If you would like
to
sew
very fine
but-
tonholes, you can reduce
the
buttonhole
width
with
the stitch
width
knob
(34)
down
to
approx.
3mm.
In
this
case, use the center
needle position
@.
B
,·.f<'t .............
~"'~_.
/'\.
5
~
....--...
~
prog
I
---
Lj
v
I a
A/ B/ C
D
5~
0 3 5
Ib
A/ B/ C
5~
- 3 5
Lingerie
buttonhole
with
gimp
thread
To sew especially durable buttonholes, e.g.
on
sportswear, we recommend using a
gimp
thread.
On
elastic materials
the
gimp
thread
is
parti-
cularly important
to
prevent
the
buttonho
le
from
stretching.
- Lay
the
gi
mp
thread over
the
rear
protru-
sion A and pass
the
thread ends under-
neath
the
presser
foot
towards
the
front.
-
Clamp
the
threads
to
the
left
and
right
of
protrusion
B.
- Slide
the
buttonhole runner
as
far
forwards
as
possible and sew
the
buttonhole
as
described
in
the left-hand
column.
-
Pu
ll
the
loop
of
the
gimp
thread
into the
buttonhole and
cut
the
threads.
TIP:
In
addition
to
traditional buttonholes, you
can also sew
ornamental
buttonholes
as
described
on
page 68.
47
 Loading...