A
~
v..v
..--...
~
prog
I
-..,.-
~
v
Ja
G
0.
35
-1
2 0
2-3
Fringe
Ib
G
0.35-1
2 -
2-3
foot
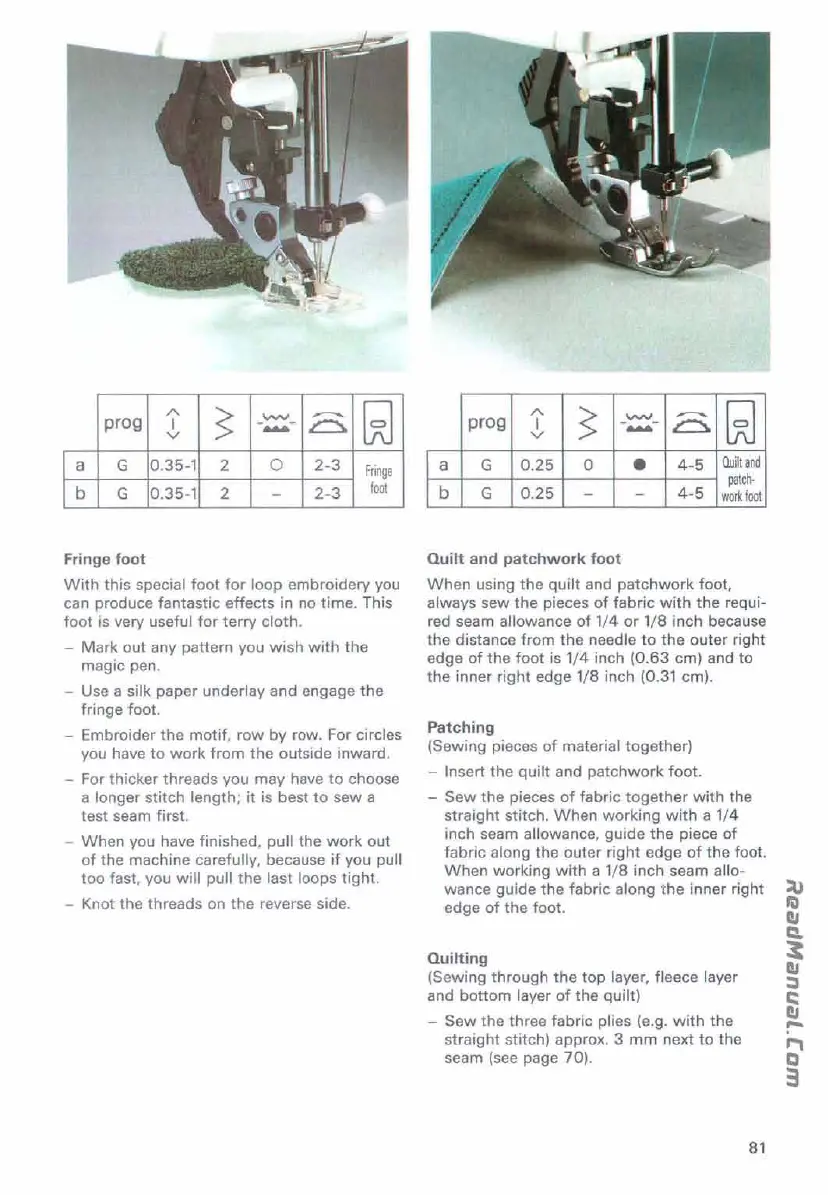
Fringe foot
With
this special
foot
for
loop embroidery you
can produce fantastic effects in
no
time.
This
foot
is
very useful
for
terry
cloth.
-
Mark
out
any pattern you
wish
with
the
magic pen.
- Use a
silk paper underlay and engage
the
fringe foot.
- Embroider
the
motif,
row
by
row. For circles
you have
to
work
from
the
outside inward.
- For thicker threads you
may
have
to
choose
a
longer stitch length;
it
is best
to
sew a
test
sea
m fi rst.
-
When
you have finished, pull the
work
out
of
the machine carefully, because
if
you pull
too
fast, you
will
pull
the
last loops
tight
.
- Knot the threads on
the
reverse side.
A
~
v..v
..--...
~
prog
I
-..,.-
~
v
la
G
0.
25
0
•
4-5
Quilt
and
Jb
G
patch-
0.25
-
-
4-5
work
foot
Quilt and patchwork foot
When
using the
quilt
and
patchwork
foot,
always sew
the
pieces
of
fabric
with
the
requi-
red seam
allowance
of
1/4
or
1
/8
inch because
the
distance
from
the
needle
to
the
outer
right
edge
of
the
foot
is 1
/4
inch
(0.63
cm) and
to
the
inner
right
edge 1/8 inch (0
.31
cm).
Patching
(Sewing pieces
of
material together)
-
Insert
the
quilt
and
patchwork
foot.
-
Sew
the
pieces
of
fabric
together
with
the
straight
stitch.
When
working
with
a
1/4
inch seam allowance,
guide
the
piece
of
fabric
along the outer
right
edge
of
the
foot.
When
working
with
a 1/8 inch seam allo-
wance
guide
the fabric along
the
inner right
edge
of
the
foot.
Quilting
(Sewing
through
the top
layer, fleece layer
and
bottom
layer
of
the quilt)
-
Sew
the three fabric plies (e.g.
with
the
straight
stitch) approx. 3
mm
next
to
the
seam (see page
70).
81
 Loading...