Do you have a question about the PG Drives Technology S200A and is the answer not in the manual?
Overview of the S-Drive controller's operation and manual content.
Guidance on proper handling, transport, and operating conditions for the controller.
Description of the various controls like On/Off switch, status indicator, and throttle.
Details on wig-wag, single-ended, unipolar throttles and the reverse switch.
Steps to prepare the scooter for driving, including checking controls and power-up.
Advice on how to use the controller effectively during driving.
Warnings and precautions regarding hazards, EMI, and system malfunction.
Risks associated with operation, system malfunction, and EMI.
Periodic checks to ensure the controller and scooter are functioning safely.
Explanation of how status indicators (LEDs, gauges) show the controller's state.
Interpreting steady and flashing indicators for normal operation and errors.
Understanding TruCharge gauge readings for battery status and charging.
Specific TruCharge indicator states: Stepping Up, blinking, and flashing rapidly.
Actions to take based on flashing bar counts to resolve common issues.
Diagnosing causes for reduced scooter speed, like speed limiting or faults.
How the battery gauge works and provides charge status.
Instructions for reading Single Bulb/LED and TruCharge battery gauges.
Procedure and precautions for manually moving the scooter.
Overview of programming methods and safety considerations.
Details on warranty coverage and conditions that void the warranty.
Procedures and precautions for controller servicing and repairs.
Ensuring operation information is supplied with the scooter.
Reference to Chapter 1 for operation details and compliance requirements.
Physical dimensions for S45A, S70A, and S90A controllers.
Physical dimensions for S120A and S140A controllers.
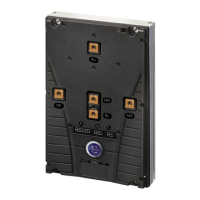
Physical dimensions for the S200A controller.
Requirements for preset settings, stopping distance, and stability testing.
Ensuring stopping distance compliance when Soft-Stop is enabled.
Diagram of user controls and specification of voltage/temperature ranges.
Methods for preventing unauthorized use and charger interlock requirements.
General information about controller connections.
Data sheet reference, wiring recommendations, and connector suitability.
Diagram and details for wiring S45A, S70A, and S90A controllers.
Diagram and details for wiring S120A and S140A controllers.
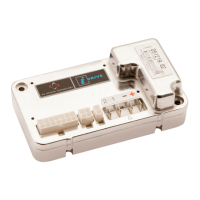
Diagram and details for wiring the S200A controller.
Details on motor, battery, and Molex connector kits for S-Drive models.
Connection types for motor and battery on S45A, S70A, S90A controllers.
Connection types for motor and battery on S120A, S140A controllers.
Connection methods for motor and battery on S200A controllers.
Information on the Molex ‘Mini-Fit Jr’ brake connector.
Details on the Molex ‘Mini-Fit Jr’ tiller interface connector.
Details on the Molex ‘Mini-Fit Jr’ charger/programming connector.
Importance of quality crimping and recommended tools for reliable connections.
Recommended wire sizes and types for controller connections.
Requirements for battery connection, short circuit protection, and circuit breakers.
Ensuring safe motor connection with circuit breakers and auxiliary switches.
Specifications and connection for the 24V solenoid brake.
Overview of tiller interface connections.
Detailed pin assignments for the 14-way Molex tiller interface connector.
Configuring throttle types (wig-wag, single-ended, unipolar) and potentiometer values.
Connecting and configuring speed limiting potentiometers in series or parallel.
ISO-Test resistor requirements for compliance with ISO7176-14.
Connecting the on/off switch to controller pin 5 and related considerations.
Connecting and configuring TruCharge or LED/Lamp status indicators.
Programming the 'Diagnostic Flash Sequence' for status indicators.
Using pin 7 for 24V supply, current rating, and fuse requirements.
Using pin 4 for selecting slow/fast speeds and acceleration/deceleration.
Using pin 12 for reverse switch input with single-ended/unipolar throttles.
Connecting and programming the 24V sounder for alarms.
Configuring pin 3 as a brake light indicator using a relay.
Using pin 13 for 0V connection and its current rating/fuse requirements.
Using pin 6 as an inhibit input for speed limiting or stopping.
Programming the mode for Inhibit 2 activation.
Setting the maximum speed when Inhibit 2 is active.
Configuring Inhibit 2 as Latched or Non-Latched.
Using pin 14 as an inhibit input for charger detection.
Programming the mode for Inhibit 3 activation.
Setting the maximum speed when Inhibit 3 is active.
Configuring Inhibit 3 as Latched or Non-Latched.
Using pin 11 to program an auxiliary output for external relays.
Overview of drive motors and their compensation.
Matching the controller to motor impedance for optimal performance and control.
Minimizing roll-back/forward on inclines using motor compensation parameters.
Methods for providing a freewheel function and safety precautions.
Overview of charger and programming connections.
Using the 4-way connector for inhibit functions, primarily charger detection.
Programming the mode for Inhibit 1 activation.
Setting the maximum speed when Inhibit 1 is active.
Configuring Inhibit 1 as Latched or Non-Latched for charger inhibit.
Controller designed for 24V lead-acid batteries (wet or gel).
General information on mounting the S-Drive controller.
Visual guide for mounting S45A, S70A, and S90A controllers.
Visual guide for mounting S120A and S140A controllers.
Visual guide for mounting the S200A controller.
Recommended orientation with connectors lowermost for IPX5 rating.
Selecting a mounting position to avoid water, dust, shock, and vibration.
Routing cables to prevent damage and minimize moisture flow into connectors.
Procedure for applying the S-cover system to the controller.
Procedure for applying the S-cover to S45, S70A, S90A models.
Procedure for applying the S-cover to S120A, S140A models.
Procedure for applying the S-cover to the S200A model.
Recommended orientation for S-cover with connectors uppermost.
Selecting a mounting position for the S-cover to avoid hazards.
Routing and securing cables with the S-cover installed.
Tests to perform on each scooter before dispatch.
Ensuring the controller is securely mounted.
Checking cables and connectors for damage and secure mating.
Verifying correct program settings for the scooter.
Testing controller functions and status indicators after power-up.
Driving the scooter to verify correct operation of user controls.
Testing the soft-stop function for smooth deceleration.
Guidelines to ensure scooter installation meets EMC requirements.
Recommendations to minimize radio frequency emissions from the installation.
Using capacitors to suppress radio frequency emissions from motors.
Minimizing loop area and optimizing routing for EMC performance.
Ensuring immunity to electromagnetic radiation through proper installation.
Protecting the system from ESD damage via tiller and enclosure design.
How to read the battery gauge and programming for accuracy.
Overview of programming parameters using SP1a or PC programmers.
Using the SP1a programmer for dealer and therapist adjustments.
Using PC software for controller programming (PCPa/PCPb).
Categorization of programmable parameters for easy reference.
Listing of parameters by section: Speeds, Operation, Throttle, Battery, Inhibit, General.
Limits programmed by PGDT to prevent unsafe parameter settings.
Configuration options for speed-related parameters.
Adjusting forward acceleration (slow/fast) and its effect on tip risk.
Adjusting forward deceleration (braking) and stopping distance compliance.
Adjusting reverse acceleration (slow/fast) and risk of tipping.
Adjusting reverse deceleration (braking) and stopping distance compliance.
Setting maximum forward speed based on slow/fast switch and output percentage.
Setting minimum forward speed using speed limiting potentiometer.
Setting maximum reverse speed based on slow/fast switch.
Setting minimum reverse speed using speed limiting potentiometer.
Enabling detection of a parallel speed limiting potentiometer.
Configuration options for operational parameters.
Setting throttle polarity for wig-wag or reverse switch.
Setting the time before the controller enters sleep mode.
Configuration options for throttle-related parameters.
Selecting between single-ended, wig-wag, and unipolar throttle types.
Setting throttle movement before brake disengagement.
Amplifying throttle signal for mechanisms not using full angle.
Configuring controller response when throttle is deflected on power-up.
Disabling throttle checks for voltage source input.
Setting ISO-Test resistor parameter (On/Off) for compliance.
Configuration options for battery-related parameters.
Setting the threshold for low battery warnings on the gauge.
Setting cable resistance for accurate battery gauge readings.
Fine-tuning battery gauge calibration (factory set).
Enabling audible low battery alarm.
Setting the tone for the low battery alarm.
Setting the charge level to reset the TruCharge display.
Configuration options for inhibit parameters.
Details for Inhibit 1 mode, speed, and latch settings.
Details for Inhibit 2 mode, speed, and latch settings.
Details for Inhibit 3 mode, speed, and latch settings.
Programming modes for the auxiliary output on pin 11.
Configuration options for general controller parameters.
Enabling/disabling soft-stop and ensuring stopping distance compliance.
Setting time between zero speed and solenoid brake application.
Setting motor voltage for constant top speed regardless of battery level.
Selecting output type for TruCharge, Sink, or Analogue indicators.
Setting the diagnostic flash sequence for indicators.
Enabling/disabling the reverse alarm.
Setting the tone for the reverse alarm.
Using an output for an audible reversing alarm.
Enabling/disabling the diagnostic alarm.
Setting the tone for the diagnostic alarm.
Enabling/disabling alarm for brake circuit breaks.
Setting the tone for the brake disconnected alarm.
Enabling detection of faults in electrical brakes or connections.
Configuring pin 3 as a brake light indicator.
Setting threshold for automatic braking when rotating too fast.
Setting timeout for retesting motor speed during freewheeling.
Using Inhibit 3 as a Freewheel Enable input.
Enabling Inhibit 2 input to activate an alarm or drive a horn.
Setting the tone for the Inhibit 2 horn input.
Configuration options for motor-related parameters.
Setting minimum and maximum current limits for the S-Drive.
Configuring current boost for increased motor power.
Setting parameters to protect motor from overheating via current reduction.
Setting temperature threshold for reducing maximum current capability.
Matching controller to motor resistance for optimal performance.
Setting timeout to protect motor from undue stress during stall conditions.
Setting the braking current for the S-Drive.
Setting maximum braking current in Timed Foldback mode.
Limiting speed in Timed Foldback for safe stopping distance.
Fine-tuning gradient performance with Up/Down compensation and gain.
Functions for accessing and managing controller memory.
Viewing the diagnostic log of the last eight detected system problems.
Clearing the S-Drive's diagnostic log.
Reading the timer that records scooter usage hours.
Resetting the S-Drive's usage timer.
Overview of Tiller Module functionality and connection to S-Drive.
Details of the surface mount variant, its components, and IPX5 rating.
Details of the inset mount variant and its IP ingress rating.
Physical dimensions of the tiller module variants.
Physical dimensions for the surface mount tiller module.
Physical dimensions for the inset mount tiller module.
General information on mounting the tiller module.
Precautions for handling electronic components sensitive to static electricity.
Instructions for fitting the surface mount tiller module to the scooter.
Using adhesive gasket for sealing the surface mount tiller module.
Instructions for fitting the inset mount tiller module using adhesive pad or screws.
Sealing the module with waterproof overlay for ingress protection.
Overview of tiller module wiring.
Minimum recommended wire size for tiller module connections.
Details of the Molex ‘Mini-fit jr’ 4-way connector for surface mount variant.
Details of the 3-way AMP CT series connector for inset variant.
Mapping tiller module connectors to S-Drive interface pins.
Table mapping TruCharge Module Connector to TruCharge Interface pins.
Mapping TruCharge Module Connector pins to TruCharge Interface for inset variant.
Optional ESD connection using Molex connector point 4.
Optional ESD connection using solder hole or ring terminal.
Guidelines for tiller module EMC compliance.
Reference to controller manual for EMC details.
Protecting tiller module from ESD through enclosure and connection design.
Tests to perform on the tiller module before scooter dispatch.
Ensuring the tiller module is securely mounted and sealing is pressed.
Checking tiller module cables and connections for damage.
Testing tiller module functions and TruCharge display.
Summary of important warnings throughout the manual.
Summarizes critical warnings for safe operation and reliability.
Ensuring safe scooter driving techniques.
Risks from malfunction, EMI, and operating erratically.
Warning regarding safety checks conducted in open space with restraint.
Warning about operating with a nearly discharged battery.
Warning about operating with a nearly discharged battery.
Hazards of freewheeling at dangerous speeds.
Warning about incorrect programming leading to unsafe setups.
Conditions that void the S-Drive warranty.
Warning against unauthorized servicing and potential damage.
Safety warnings for programming and altering drive/stability characteristics.
Responsibility for preventing use while charging.
Warnings on connector suitability, mating, and workmanship quality.
Safety regarding mating Fastons and high current crimp connections.
Warning that defective crimps can affect warranty and reliability.
Responsibility for ensuring wire gauges are suitable for application.
Warning about circuit breakers for short circuit protection and fire hazards.
Warning on mandatory ISO-Test resistor fitting in series configurations.
Warnings about fuse protection, current limits, and capacitance on 24V pin.
Warnings about current limits on 0V pin and potential fire hazards.
Warning that Inhibit Speed > 0 prevents inhibit state.
Warning that Inhibit Speed > 0 prevents inhibit state.
Warnings on motor matching, replacement compatibility, and controller interchange.
Warning about freewheeling at excessive speeds and adequate precautions.
Warnings on charging current limits, connectors, and fuse protection.
Warning that Inhibit Speed > 0 prevents inhibit state.
Warning about hot controller case surfaces and user contact.
Warning about conducting production tests in open space with restraint.
Safety warnings for programming and altering drive/stability characteristics.
Safety warning on programming control systems for wheelchairs.
Warning about manufacturer not specifying appropriate safety fence values.
Warning that high forward acceleration can cause tipping.
Ensuring stopping distance compliance with forward deceleration.
Warning that high reverse deceleration can cause tipping.
Ensuring stability at programmed maximum forward speed.
Recommendation to set Speed Limit Pot. Enabled to Yes for parallel pots.
Warning that setting Drive for throttle at power-up contravenes safety legislation.
Ensuring stopping distance compliance when Soft-Stop is enabled.
Warning: Brake Fault Detect should be Off only if no electrical brakes are fitted.
Precautions against hazards of freewheeling at excessive speeds.
Warnings on matching controller to motor resistance and replacement motors.
Detailed electrical specifications for S-Drive models.
Table detailing supply voltage, current, connections, temperature, and EMC specs.
Review of S-Drive range conformity with ISO 7176-14:2008.
Summary of PGDT's assessment of S-Drive conformity with ISO 7176-14.
Considerations for slope stopping distance criteria changes in ISO 7176-14:2008.
S-Drive products designed for single-fault safety.
S-Drive products meet open-circuit and short-circuit requirements.
Meeting leakage requirements by addressing throttle circuitry and deadband.
S-Drive products meet output device failure requirements.
S-Drive products meet loss of power requirements.
S-Drive products require manufacturer-provided on/off switch.
S-Drive's low off-state current meets requirements.
Requirement met if 'throttle operated at power up' is set appropriately.
S-Drive products meet safe operation requirements as battery depletes.
S-Drive provides indicators; manufacturer must provide appropriate visual/auditory indicators.
S-Drive products meet over-voltage protection requirements.
Requirement met if 'soft stop' setting is appropriately set.
S-Drive meets requirements for measuring devices.
S-Drive provides inhibit input; manufacturer must provide charger connections.
Path resistance dominated by manufacturer wiring; voltage drop requirement relevant if charger not specified.
S-Drive supports solenoid brake activation; manufacturer must assess entire path.
S-Drive supports safety by stopping motor when throttle is released.
Contact PGDT for guidance on connecting other equipment to the battery set.
S-Drive products meet isolation requirements.
Correctly installed S-Drive products do not give access to non-insulated components.
Compliance depends on manufacturer's battery wiring protection and charging current.
S-Drive meets stall test; manufacturer should conduct extended stall test.
Warning about installing within occupant reach space without guards.
S-Drive has metal enclosure; flame retardancy of connectors noted.
S-Drive supports on/off indication if manufacturer provides indicator.
S-Drive connectors are not intended for occupant or assistant use.
S-Drive does not contribute to overall noise produced by the scooter.
Requirement applies to throttles fitted by manufacturer for use with S-Drive.
Requirement applies to switches fitted by manufacturer for use with S-Drive.
Smaller S-Drive products have interchangeable motor/battery connectors.
Requirement applies to the way S-Drive products are installed.
S-Drive products meet IPX4; exceed ISO 7176-9 regarding liquid ingress.
S-Drive meets leakage requirements; risk from capacitors is negligible.
S-Drive meets ISO 7176-21:2003; manufacturer must confirm vehicle EMC requirements.
S-Drive products meet reversed battery polarity requirements.
S-Drive products should not be installed where risk of impact with static structures.
PGDT provides relevant information for safe use and installation.
Sub-clause does not apply; no user-serviceable circuit protection components.
PGDT provides relevant information for safe operation.
PGDT provides battery gauge interpretation and EMI guidance.
PGDT provides information on residual risks, primarily sudden stopping.
Summary of wiring suitability and connector flame retardancy.
Meeting command signal leakage requirements of ISO 7176-14:2008.
Using normal input configurations; avoiding series potentiometers and ISO-test resistors.
Specifications for wig-wag/unipolar and single-ended throttle potentiometers.
Initial track resistance specification for parallel speed-limiting potentiometers.
Minimum deadband settings for wigwag/unipolar and single-ended throttles.
Setting ISO-test resistor to OFF when not used.
Methods to prevent leakage between conductors, focusing on throttle circuitry.
Recommended PCB techniques for managing leakage.
Recommendation to use S-covers for tiller interface connector protection.
Following manual guidance for controller orientation and cable routing.
Protecting tiller circuitry and S-Drive from moisture exposure.
Managing connections to prevent throttle wiper leakage and avoid cable damage.
Step-by-step procedure for setting up the vehicle and controller.
Matching S-Drive to motor impedance for optimal performance and control.
Programming appropriate values for speed, acceleration, and deceleration.
Setting brake time for smooth stopping and minimizing roll-back/forward.
Adjusting parameters for optimal performance on inclines.
Tuning performance when stopping on a hill after driving down.
Tuning performance when stopping on a hill after driving up.
Fine-tuning Up Gain to adjust roll-back after stopping on incline.
| Model | S200A |
|---|---|
| Category | Controller |
| Input Voltage | 24VDC |
| Weight | 1.2 kg |
| Protection Features | Overcurrent, overtemperature, undervoltage, short circuit |
| Humidity | 95% non-condensing |
| Storage Temperature | -40°C to +85°C |