6 Getting Started
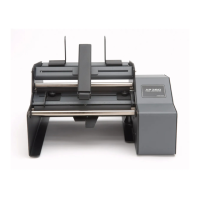
Rear Panel
The rear panel includes
A Centronics-type parallel connector (36-pin)
An RS-232 serial connector (9-pin)
A Power Slide Switch
A Power Switch and Power Connector
An External Label Feed Slot with Cover
D. APPLYING POWER
1. Make sure that the Voltage Selector Switch is in the correct
position for your local power (120 VAC or 220VAC).
2. Leave the Power Switch in the off (O) position.
3. Connect the Power Cord to the printer and the other end to
your AC power source.
E. CONNECTING THE PRINTER TO YOUR COMPUTER
The printer is designed to be used with nearly any Windows-
based PC. Operating systems supported are Windows
95/98/Me and Windows NT/2000. The printer is equipped
with a standard 8-bit Centronics-type parallel port. This port is
used to receive data from your computer. To connect the
printer, obtain a shielded, bi-directional parallel cable. An
IEEE1194-compliant cable, not longer than 5 feet (1.5m) is
highly recommended. Then, follow these steps:
 Loading...