Assembly
Models PT-45/70T-KFA only
Tools required: Medium phillips screw driver.
Assembling Handle
1.
2.
Assembling Cordwrap
1.
2.
Models PT 125T/175T/215T-KFA Only
Tools required: Medium phillips screw driver, 5/16” open
end or adjustable wrench, needle nose pliers.
Assembling Frame and Wheels
1.
2.
3.
4.
5.
6.
Note: The front handle is longer than the rear handle.
Assembling Cordwrap
1.
2.
Pinnacle Products International, Inc. Kerosene Owners Manual Page 7
Kerosene
Forced Air Heaters
Figure 9. Handle mounting, Models PT 45/70T-KFA
Figure 10. Cordwrap mounting, Models PT 45/70T-KFA
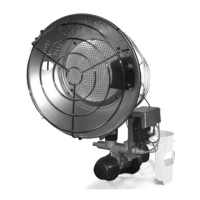
Handle
Hot Air
Outlet
Air Inlet
Cord wrap
Thermostat
Knob
Fuel Tank
Flange
Wheel
Support Frame
Nut
Axle
Wheel (pneumatic)
Flat Washer (B)
Wheel Cap
Cotter Pin
Figure 1
1.
Assembly of Models PT
125T/175T/215T-KFA
Never leave heater
unattended while burning,
or while connected to a
power source
Slide wheels on to each axle, being sure that the valve
stem (if pneumatic) is to the outside (see Figure 11.).
Slide flat washers onto axle. past the small hole.
Insert cotter pin in axle hole and bent legs of pin with
needle nose plies to secure.
Snap the wheel caps onto the large washers.
Place heater on the assembled frame, making sure that
the air inlet end is by the wheels, and the mounting
holes on the tank flange of the heater align with holes
in frame.
Take the front handle and align the mounting holes with
the corresponding holes in the tank flange/wheel frame.
Slide a screw through the holes and loosely attach a
nut. Repeat for the other 3 holes, then fully tighten all 4
screws and nuts.
Repeat this process with the rear handle.
Align the holes in the upper housing with the 2 holes in
the handle as shown in Figure 9.
Insert and tighten screws securely with screw driver.
Align holes in cordwrap with corresponding holes in
front handle. Insert screws through holes, attach nuts
and tighten (see
Figure 1
1.
).
Repeat this process with the rear handle.
Insert tabs in cordwrap into slots in shell support, lining
up the holes on the cordwrap with those on the side
cover as shown in Figure 10.
Insert and tighten screws securely with screw driver.