ENGLISH
Installing the battery
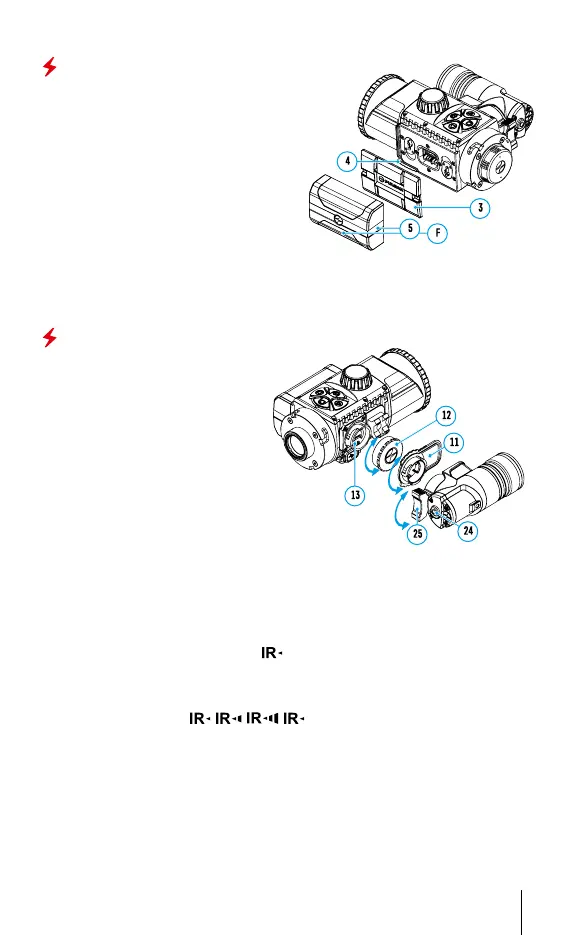
• Lower the lever (4).
• Remove the protective cover of the
battery compartment (3).
• Remove the protective cover from the
battery (5).
• Fit the battery (5) into the slot intended
for it on the body of the digital module
so that the contact (F) is pointing
downwards.
• Lock the battery in place by raising the
lever (4).
Attention! External power may be supplied from an external source, such as a
5V Power Bank. Connect an external power source to the device by plugging the
USB cable into the device’s microUSB port (14).
IR Illuminator
• Remove the cap (12) from the
connector to attach the IR
illuminator (13).
• Remove the cover (11) from the
IR illuminator.
• Mount the IR illuminator on the
device. The lever (25) should be
in the up position.
• Lock the IR illuminator by
pressing the lever (25) down
• Make sure that the IR
illuminator is mounted and
connected to the device.
• Turn on the device using the ON button (9) to activate the IR illuminator.
• The status bar will display a disabled illuminator icon if the IR illuminator
is not connected. This icon is not displayed when the IR illuminator is
connected.
• Briey press the IR button (24) at the end of the illuminator. The power level
when switching on is minimum
.
• The IR illuminator icon will be displayed on the status bar with the relevant
power level.
• Successive brief presses of the IR button (24) will toggle the brightness level
of the illuminator (
).
• The IR illuminator is turned off by a long press of the IR button.
• The IR icon will disappear from the screen.
4