12
3. Recheck the blade depth by moving
the cutting head front to back
through the full motion of a typical
cut along the control arm.
NOTE: If the stop plate becomes
loose, it can interfere with raising
and lowering the cutting head. The
stop plate must be tightened in
horizontal position as shown in
Fig. 16.
QUICK-CAM LOCKING LEVER
ADJUSTMENT (FIG. 17)
1. Press down the quick-cam locking
lever (1) to lock the miter table into
place.
2. If the table moves with the locking
lever down, use a 13 mm wrench
to turn the stop nut (2) to the right
until it rmly contacts the miter table
base (3).
3. Raise and lower the locking lever to
verify that the table locks in place
with the lever down.
NOTE: With the locking lever in
the down position, there must be
sufcient space between the lock
nut (4) and the stop plate (5) to
allow the mechanism to unlock. To
increase the space, turn the lock
nut (4) to the right.
TURNING THE LASER GUIDE ON
(FIG. 18)
1. To turn laser on, press ON/OFF
rocker switch (1) to ‘‘ON” position.
2. To turn off laser, press ON/OFF
rocker switch (1) to ‘‘OFF’’ position.
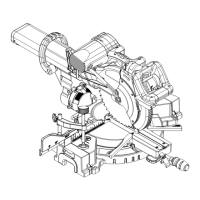
ADJUSTING CUTTING DEPTH
(FIG. 16)
The maximum depth travel of the
cutting head was set at the factory.
Setting the maximum width travel of
the cutting head, follow the below
steps:
1. Turn the stop knob (1)
counterclockwise until the stop knob
is not protruded out of the stop
block (2) bottom while moving the
cutting head upward.
2. Rotate the stop plate (3) clockwise.
3. Recheck the blade depth by moving
the cutting head front to back
through the full motion of a typical
cut along the control arm.
Setting the maximum height travel
of the cutting head, follow the below
steps:
1. Turn the stop knob (1)
counterclockwise until the stop knob
is not protruded out of the stop
block (2) bottom while moving the
cutting head upward.
2. Rotate the stop plate (3)
counterclockwise to touch the stop
seat (4).
3. Make sure the stop block (2)
touches the stop plate (3)
completely.
Setting the cutting depth:
The depth of cut can be preset for even
and repetitive shallow cuts.
1. Adjust the cutting head down until
the teeth of the blade are at the
desired depth.
2. While holding the upper arm in that
position, turn the stop knob (1) until
it touches the stop plate (3).
 Loading...