Editing Sounds
27
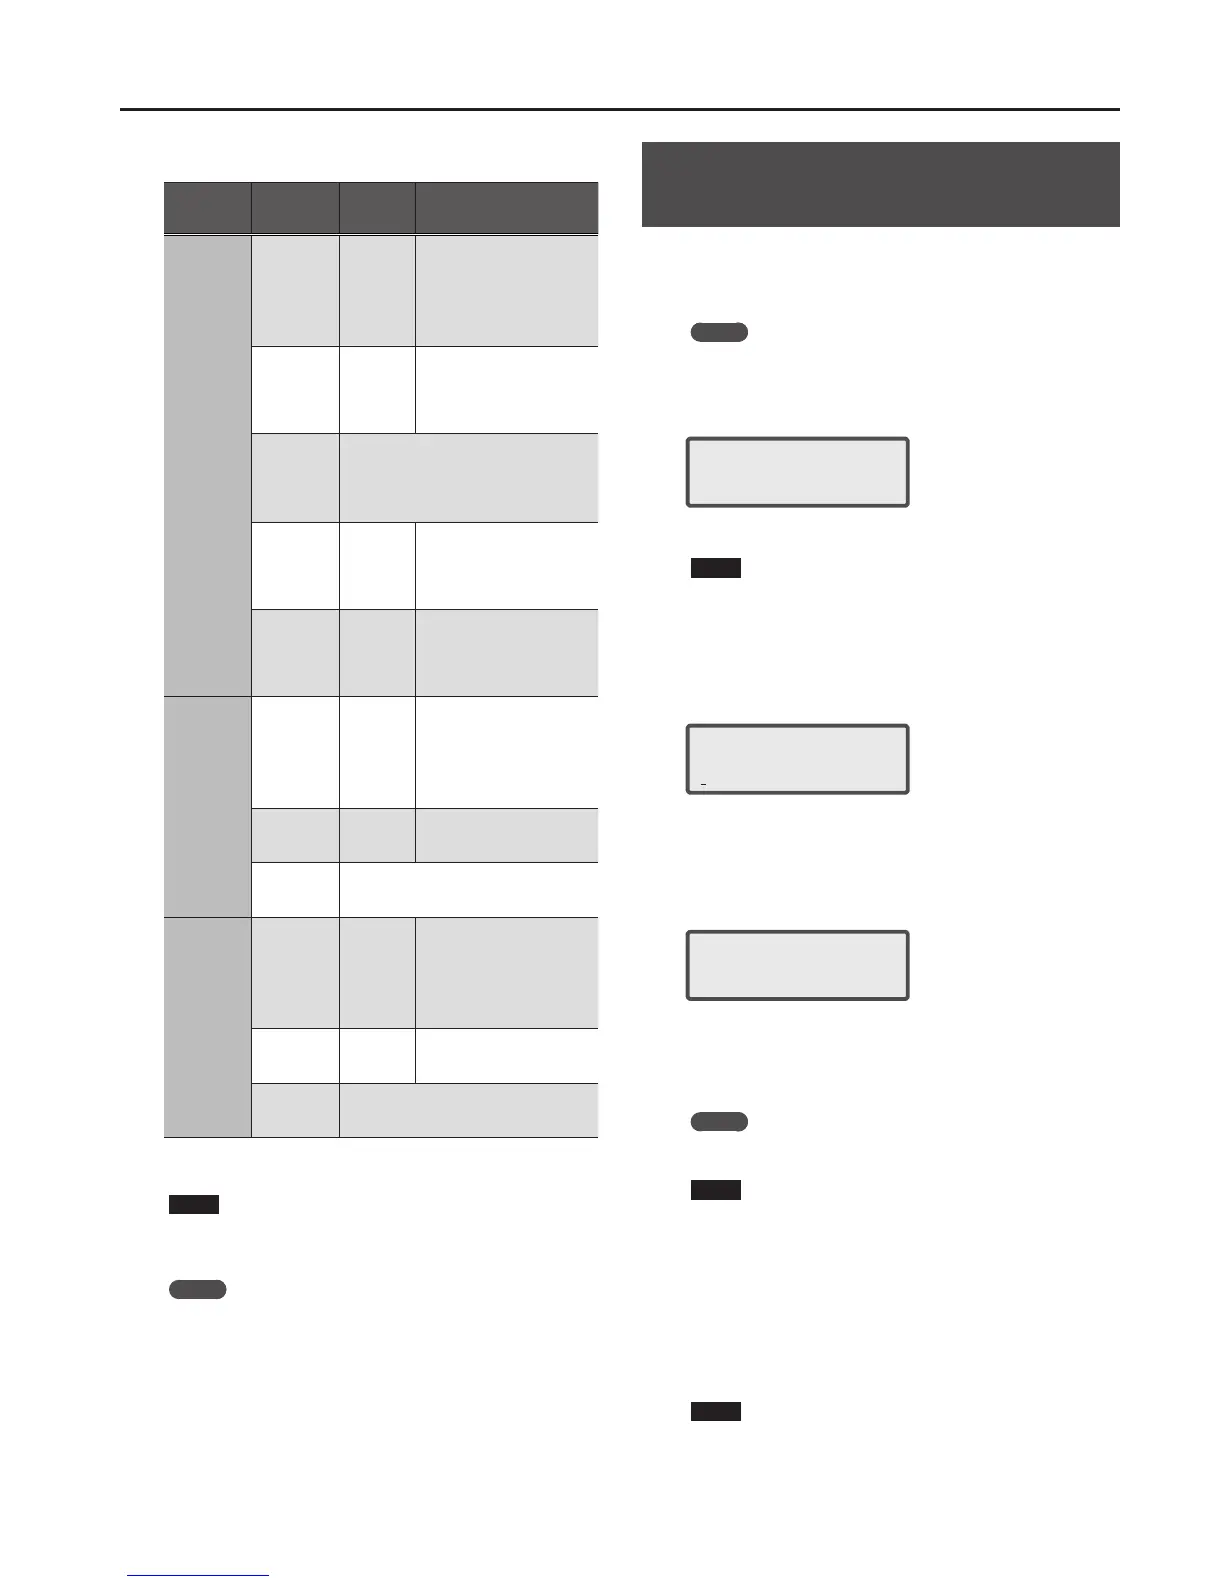
Eect parameter
Eect
[SHIFT] +
CURSOR [
K
] [
J
]
Parameter
CURSOR [
K
] [
J
]
Value
VALUE [-] [+]
Explanation
MFX1, MFX2,
MFX3
SWITCH (MFX
1–3 switch)
OFF, ON
Species whether MFX 1–3 will
be used (ON) or not used (OFF).
* This setting is common to
the entire XPS-10.
* This setting cannot be
saved.
00: THRU–78:
(MFX Type)
00–78
Selects the types of
multi-eects that MFX1–3 will
use.
Choose “00: THRU” if you don’t
want to apply a multi-eect.
Items for each
MFX type
The editable items for the selected MFX type
will be displayed.
Refer to p. 39 for a list of multi-eect types.
Refer to “Parameter Guide” (PDF) for details
on the parameters.
MFX CHO LVL 0–127
Adjusts the amount of chorus
for the sound that passes
through multi-eects.
If you don’t want to add the
chorus eect, set it to “0.”
MFX REV LVL 0–127
Adjusts the amount of reverb
for the sound that passes
through multi-eects.
If you don’t want to add the
reverb eect, set it to “0.”
CHORUS
SWITCH
(Chorus
switch)
OFF, ON
Species whether chorus will
be used (ON) or not used (OFF).
* This setting is common to
the entire XPS-10.
* This setting cannot be
saved.
00: OFF–03:
GM2 CHORUS
(Chorus Type)
00–03
Selects the types of chorus.
Choose “00: OFF” if you don’t
want to apply a chorus.
Items for each
chorus type
Edit the parameters for the selected chorus
type.
Refer to “Parameter Guide” (PDF).
REVERB
SWITCH
(Reverb
switch)
OFF, ON
Species whether reverb will
be used (ON) or not used (OFF).
* This setting is common to
the entire XPS-10.
* This setting cannot be
saved.
00: OFF–05:
GM2 REVERB
(Reverb Type)
00–05
Selects the types of reverb.
Choose “00: OFF” if you don’t
want to apply a reverb.
Items for each
reverb type
Edit the parameters for the selected reverb
type.
Refer to “Parameter Guide” (PDF).
3. Press the [EXIT] button to exit the edit screen.
NOTE
The changes you make are temporary; they will be discarded when you
turn o the power or select a dierent tone. If you want to keep the
changes you make, you must write them into memory.
MEMO
. MFX1 uses the settings of the patch used by part 1.
. MFX2 uses the settings of the patch used by part 2.
. MFX3, chorus, and reverb settings are saved within each individual
performance.
Saving Patch or Performance Settings
(WRITE)
1. Hold down the [SHIFT] button and press the [MENU]
(WRITE) button.
The WRITE screen appears.
MEMO
This screen is not shown in Patch mode.
2. Use the CURSOR [
K
] [
J
] buttons to select “PATCH (Part
1–16)” or “PERFORM.”
<WRITE> [ENT]
PERFORM * J
If the selected performance has been edited, an “*” symbol is shown. This
symbol disappears when you save the settings.
NOTE
If an “*” symbol is shown for both PATCH (Part 1–16) and PERFORM, rst
save the patch and then save the performance.
Be aware that if you save the performance rst, the edited patch data is
lost.
3. Press the [ENTER] button.
The name input screen appears.
Name: [ENT]
Init Perform
4. Use the CURSOR [
K
] [
J
] buttons to move the cursor, and
use the VALUE [-] [+] buttons to select characters.
5. When you’ve specied the name, press the [ENTER]
button.
To:501
[ ]
6. Use the VALUE [-] [+] buttons to select the save-
destination.
Settings you save are stored in user memory, starting with number 501.
Drum kits are numbered starting with 801.
MEMO
If you specify a number in which data is already saved, the patch name
(performance name) is shown in the lower line.
NOTE
When you save settings, the data that was previously in that location
will be overwritten.
7. Specify the save-destination number and press the
[ENTER] button.
A conrmation message appears.
8. Press the [ENTER] button.
A screen indicating Complete ! appears, and the data is saved.
If you decide to cancel, press the [EXIT] button.
NOTE
NEVER turn the power o while you are saving settings.
 Loading...