4 x Commissioning
35
FA ROTEX Solaris - 08/2007
4Start-up
All the following tasks must be carried out in the specified sequence.
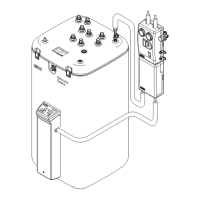
4.1 Operating Solaris systems without a FlowSensor
1. Filling the storage container:
• Fill the heat exchanger for domestic water.
• Fill the storage container via the filling & draining cock on the RPS3 until water comes out of the safety overflow.
• Close the filling & draining cock.
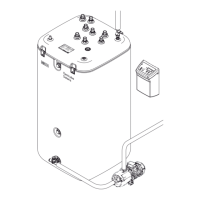
2. Switch on the Solaris R3 control unit (initialising phase starts).
3. When the initialising phase is finished (temperature display), you can vent the system by simultaneously pressing both arrow
keys (starts the manual operating mode).
Both pumps are now running at full capacity and the system is subjected to the max. possible working pressure. The system is
filled with water and the air escapes through the inflow pipe into the air space of the storage container. A bypass in the
FlowGuard regulating valve ensures that the system is vented automatically, even if the valve is fully closed.
4. Close the regulating valve completely. The system is now subjected to the maximum possible operating pressure.
5. Check the entire system for leaking joints (in the building and on the roof). Leaks must be repaired by a qualified technician.
6. Adjust the flow in accordance with the number of solar panels. For reference valve settings, see Table 4-3.
7. Switch off the Solaris control unit.
8. Check the filling level in the Solaris Sanicube.
9. Only if the water in the Solaris Sanicube does not reach the approximate previous filling level:
• Switch on the Solaris R3 control unit again (initialising phase starts).
• When the initialising phase is complete (temperature display), you can start the manual operating mode by simultaneously
pressing both arrow keys.
• Note the time it takes for the system to be filled completely. The max. filling level is reached, when no sound of escaping
air can be heard, and a stable flow value is indicated (use the arrow keys to select the measuring point "Flow").
• Set the evaluated filling time, plus 20 seconds, as parameter "Time P2" (see Section 5.3.6).
10. Switch the Solaris R3 control unit back to automatic operation either by simultaneously pressing both arrow keys or by
switching the unit off/on. The system is now ready for operation.
WARNING!
The Solaris installation may only be commissioned after all the hydraulic and electrical connections have been
made.
Incorrect commissioning can impair the system's function and can damage the entire system. Therefore,
installation and commissioning should only be carried out by heating technicians trained and authorised by
ROTEX.
As both pumps are running in the manual operating mode during commissioning, the basic setting should be at
the upper limit values.
Within a few minutes, the level indicator in the Solaris Sanicube must show a level that is slightly lower than
before. The reason for this is the presence of a small amount of water remaining in the lower pipes of the solar
panels. This amount of water represents no risk at subzero temperatures, as the empty solar panels provide
sufficient volume for expansion.