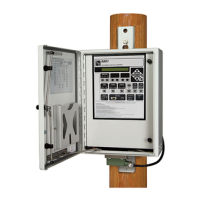
Installing the Capacitor Control
Follow these steps to attach the control to the pole with either lag bolts for a wood pole
or metal straps for a concrete or metal pole. See Figure 13 on page 14. Then, connect the
cable as described below:
For a Metal or Concrete Pole
STEP 1. Pass a stainless steel strap or clamp through the two upper mounting slots in
the bracket. Pass a second strap through the two lower mounting slots. See
Figure 14 on page 16.
STEP 2. Lift the control into position on the pole. Then support the control while you
tighten the upper and lower straps around the pole. Then, go to Step 5 of the
“For a Wood Pole” section.
For a Wood Pole
STEP 1. Use two ½-inch through-bolts or lag screws, and at washers, if necessary.
Drill a hole for the top bolt, or start the top lag screw.
STEP 2. Support the control and install the top bolt to hold the control on the pole, or
hang the control on the top lag screw.
STEP 3. Vertically align the control on the pole and drill the bottom hole. Install the
bottom bolt or lag screw.
STEP 4. Tighten the two bolts or lag screws.
STEP 5. Conrm the cable from the switch and power source is wired correctly for the
connector on your control.
The wiring options for the connector are shown in Figures 15 through 18
on page 17. The configuration used in this control is also shown on a label
inside the enclosure. The bracket mounted control has additional sensor cable
connector(s) mounted on the bottom of the enclosure. See Figure 11 on page 12.
STEP 6. Connect ground lug on the bottom of the control.
Use the ground lug on the bottom of the control enclosure to ground the
enclosure. See Figure 11 on 12 and Figure 12 on page 13. The ground lug will
accommodate up to #2 copper or aluminum, solid or stranded, wire.
WARNING
The control must be properly grounded. You must read and understand all
applicable grounding codes and requirements for your service area
before installing this device.
STEP 7. Connect the cable from the junction box to the connector on the bottom of the
IntelliCap 2000 control.
When an energized cable is connected to the control, all faceplate LEDs
light momentarily. After a few seconds, the LCD screen will show **Unit OK**
Make sure the OPERATION MODE MANUAL and SCADA CONTROL
LOCAL LEDs are lit. If not, press the applicable CHANGE button.
WARNING
The control must be set to Manual and Local mode to avoid unexpected
operation of the capacitor bank during installation or setup operations.
Note that if the control uses dial-up software, it may still be operated
remotely.
STEP 8. Go to the “Harness Wiring” section on page 17.
Bracket Mounting
S&C Instruction Sheet 1024-510 15

 Loading...