16 Operating Instructions BioPAT
®
Xgas
Installation
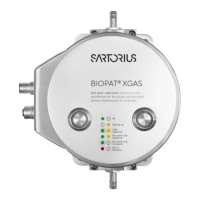
t Insert the thicker filters into the recesses
might be necessary to push them gently into
place (fig. 4h).
t Now place the 4 TORX screws M4x16 (fig. 4b:
E) in the bores of the BioPAT
®
Xgas without
screwing. This will make it easier to place the
BioPAT
®
Xgas on the right spot on the flow
adapter (fig. 4i).
t Place the BioPAT
®
Xgas on the flow adapter.
Tighten the 4 screws with the screw driver
TORX.
t Put the wall mounting plate on the flow
adapter and use the two flat head screws
M4x6 (fig. 4b: E) to fix the base plate to the
sensor (fig. 4k).
Fig. 4g: Insert second filter
Fig. 4h: Fit in filter
Fig. 4i: Put screws in
Fig. 4j: Tighten screws
Fig. 4k: Fit base plate
 Loading...