www.scheppach.com / service@scheppach.com / +(49)-08223-4002-99 / +(49)-08223-4002-58
30
|
GB
7. Remaining hazards
The machine has been built using modern technolo-
•
saw band due to improper handling of the work
piece.
•
to improper handling, such as working without the
push stick.
•
wood chips. Wear personal protective cloth such
•
check saw band for such defects.
•
saw band. Wear proper gloves.
•
switching on the machine.
• The use of incorrect or damaged mains cables can
•
•
still be present.
• -
„Proper Use“ and in the entire operating manual.
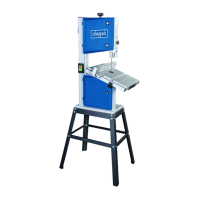
8. Attachment and operation
Before starting the equipment
a workbench or solid base. There are two holes for
this purpose in the machine foot.
•
•
•
• When working with wood that has been processed
before, watch out for foreign bodies such as nails
or screws etc.
•
• -
8.1 Mounting the saw on a work bench (Fig. 3)
• A workbench made from solid wood is better than
• -
bling the saw on a workbench are not supplied
with the saw. However, use equipment of at least
the following size:
1
2 Foam rubber base.
3 Work bench
4 Flat seal
5 Washer (7 mm)
6 Hexagonal nut (6 mm)
7 Lock nut (6 mm)
8 Hexagon head screws (6 mm)
• First of all, drill holes into the seating surface and
then insert the screws.
• A foam rubber base for reduction of noise is not
supplied with the saw either. However, we express-
vibration and noise to a minimum. Ideal size 400
x 240 mm.
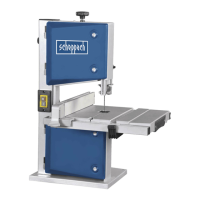
8.2 Assembling the work table (Fig. 4 - 6)
•
table intended for this (7) (Fig. 4). (To replace, dis-
assemble the work table in reverse order.)
• Place the band saw blade through the slot on the
machine table. Place the machine table on the ta-
the bracket (c). (Fig. 4.1+4.2)
• Screw the machine table tight with the quick re-
lease lever and a washer (E) (Fig. 4+5).
•
does not touch the table.
• Fit the bolt M6x40 with two washers and the nut to
the table. (Fig. 5.1)
• Using the adjustment screw (F) to adjust the table
to a right-angle. – Use a set square –
•
quick release lever (E).
• Set the scale pointer (G) to 0.
8.3 Fitting the table width enlargement (Fig.
7+7.1+7.2+7.3+7.4)
• Remove the two bolts and washers (d) from the
table width enlargement (6). (Fig. 7)
• Slide the table width enlargement (6) onto the table
mounted on the machine. Ensure that the clamping
lever (8) is open (Fig. 7.1+7.2).
• -
sides. The two bolts are used to limit the extension
of the table width enlargement.
8.4 Fitting the parallel stop (Fig. 8)
•
-
wards.

 Loading...