www.scheppach.com
GB
|
33
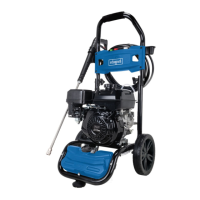
11.1.1 Cold start (Fig. 13)
1. Set the choke lever (20) to the “Choke” position.
2.
3. Open the fuel valve (19).
4. Start the engine with the pull starter (18). Pull the
If the engine does not
start, pull the handle again.
5. After starting the engine, let the machine run for
a few seconds and then set the choke lever (20)
to “Run”.
11.1.2 Warm start (Fig. 13)
1. Set the choke lever (20) to the “Run” position.
2.
3. Start the engine with the pull starter (18). Pull the
11.1.3 After starting the engine (Fig.1)
1.
(23).
2.
pull the trigger (25).
of air and impurities.
11.2 Switch o the engine (Fig. 13)
1. Allow the device to run for a short time without
“cool down”.
2.
3. Close the fuel valve (19).
11.2.1 After shutting o the engine
1.
2. Pull the trigger (25) until the device is depressur-
ised.
11.3 Setting the working pressure and ow rate
11.4 Changing the nozzle (Fig. 7)
m DANGER
1.
and pull the trigger (25) until the device is depres-
surised.
11.4.1 Using the spray nozzles (Fig. 7)
Proceed as follows to change the nozzles (3):
1. Pull back the ring of the quick-release connector
2. Select the required nozzle (3):
-
-
- Cleaning agent: black
2. Connect the vacuum hose to the device and en-
3.
hose.
4. If water does not come out after 1 minute, switch
Once
-
start work.
It is important that the hose and couplers are of good
-
damaged and inserted straight.
can hinder suction.
11. Operation
Check the device to make sure that all of the following
steps have been performed:
1. Before commissioning the device, read and un-
2.
3. Check that oil has been poured into the oil inlet/
4.
(9).
5.
6. Check that the high-pressure hose (2) has no
kinks, cracks or other damage.
7.
8. Ensure the device is level.
9.
ATTENTION
•
connected or switched on.
• Select the required nozzle (3) and insert it in the
11.1 Starting the engine
ATTENTION
• At initial start-up, oil level (SAE10W30) and fuel (un-
1. Check fuel level and engine oil, top up if neces-
2.
3. Make sure that the spark plug / spark plug con-
nector (31) is secured.
m CAUTION
•
the hand can occur due to sudden kick-back.
 Loading...