7
GETTING STARTED
I
I
I
I
I
I
I
I
SCROLL DISPLAY
INFORMATION
TRAY SELECT
ty
@2
P
CA
SPECIAL MODES
MARGIN SHIFT
CHANGE
START
TRANSPARENCY
INSERTS
DUAL PAGE COPY
INTERRUPT
CLEAR ALL
PROGRAM
4
78
9
0 / C /
AUDIT
CLEAR
12
3
5
6
CLEAR/STOP
COPIES SELECTED COPIES MADE
ERASE
COVERS INSERTS
@4
@6
@5
@7
@8
@9 #0
#1
ui
o!0!1
!2
@3
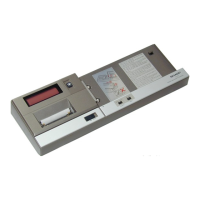
@6 CLEAR/STOP key
Press to clear the COPIES SELECTED and
COPIES MADE displays, or press during a
copy run to terminate copying. The copy in
progress will be finished before the copier
stops.
@7 START key and indicator
Press to start copying.
@8 ERASE key and indicator (p.22)
Press to select the centre erase or edge erase
modes.
@9 CHANGE key (p.24)
Press to change the amount and direction of
margin shift or change the erase mode (edge,
centre, or edge + centre).
#0 COVERS/INSERTS key and indicator (p.25,
27)
Press to select the covers and inserts modes.
#1 TRANSPARENCY INSERTS key and indica-
tor (p.43)
Press to select the transparency inserts mode.
Initial settings
●
Copy ratio: 100%
●
Automatic exposure
●
COPIES SELECTED: 0
●
All special copier modes are set to off.
●
Tray select: At power on, the previously selected
tray will again be selected. Tray 1 will be selected
when the CA key is pressed or approximately one
minute after a copying cycle has finished.
The copier assumes the initial settings when it is
turned on, the CA key is pressed, and approx-
imately 1 minute after the last copy is made in
any mode.
★ KEY OPERATOR Initial settings can be pro-
grammed as desired. The auto clear time can also
be changed. See pages 17 and 15 of the KEY OP-
ERATOR’S GUIDE.
PART LOCATIONS AND FUNCTIONS
!6 EXPOSURE keys (p.20)
LIGHT key: Used to adjust the exposure level in
the MANUAL or PHOTO mode to give lighter
copies.
AUTO/MANUAL/PHOTO key: Press to select
the exposure mode: AUTO, MANUAL, or
PHOTO.
DARK key: Used to adjust the exposure level in
the MANUAL or PHOTO mode to give darker
copies.
!7 COPY RATIO display
Displays the copy ratios for reductions or en-
largements.
!8 EXPOSURE display
Indicates the selected exposure mode.
!9 Original size display
The original paper size is displayed.
@0 Paper size display
The sizes of loaded paper are displayed and the
selected paper feed location is highlighted.
indicates the amount of copy paper in the pa-
per tray.
@1 AUTO PAPER SELECT display
Paper size matching the original or copy ratio
will be automatically selected when this display
appears.
@2 TRAY SELECT key
Press to select the desired paper tray.
@3 INTERRUPT key and indicator (p.47)
Interrupts a copy run.
@4 10-key pad
Used to set the copy quantity and to make pro-
gram selections as indicated by messages.
@5 0/AUDIT CLEAR key
Inputs 0 when specifying the copy quantity.
Clears audit account information.
AUTO SELECT
2.
3. 11x17
1.
8 / x11
1
2
8 / x11R
1
2
8 / x11
1
2
@0 @1!9
Inch system
Part locations and functions
Downloaded from: http://www.usersmanualguide.com/