- Press the Escape key to exit.
7.2 Selecting monitor display format
This function may be used to change the screen format to suit the monitor used.
- access the service environment and, turning the unit, position it to encoder position notch 169;
- while still at this notch, press and hold ENTER (with the cursor on the “spin counter” icon) for approximately 5 seconds. A window with the
following message is displayed on the monitor:
“Video 4:3” (default setting)
- Press ENTER again to cycle through the following modes:
16:10
16:9
- select the desired screen format, then press ESCAPE to confirm and exit.
IMPORTANT: some configurations may be performed as follows:
• Select the “Utility programmes” icon.
• Press and hold the STOP button for at least 10 seconds. A window opens on the screen with the letters “CFG X” where X is the number of the
configuration on the board;
• Use the arrow buttons or enter key to change the type of machine configuration.
• Press the ESC key to exit.
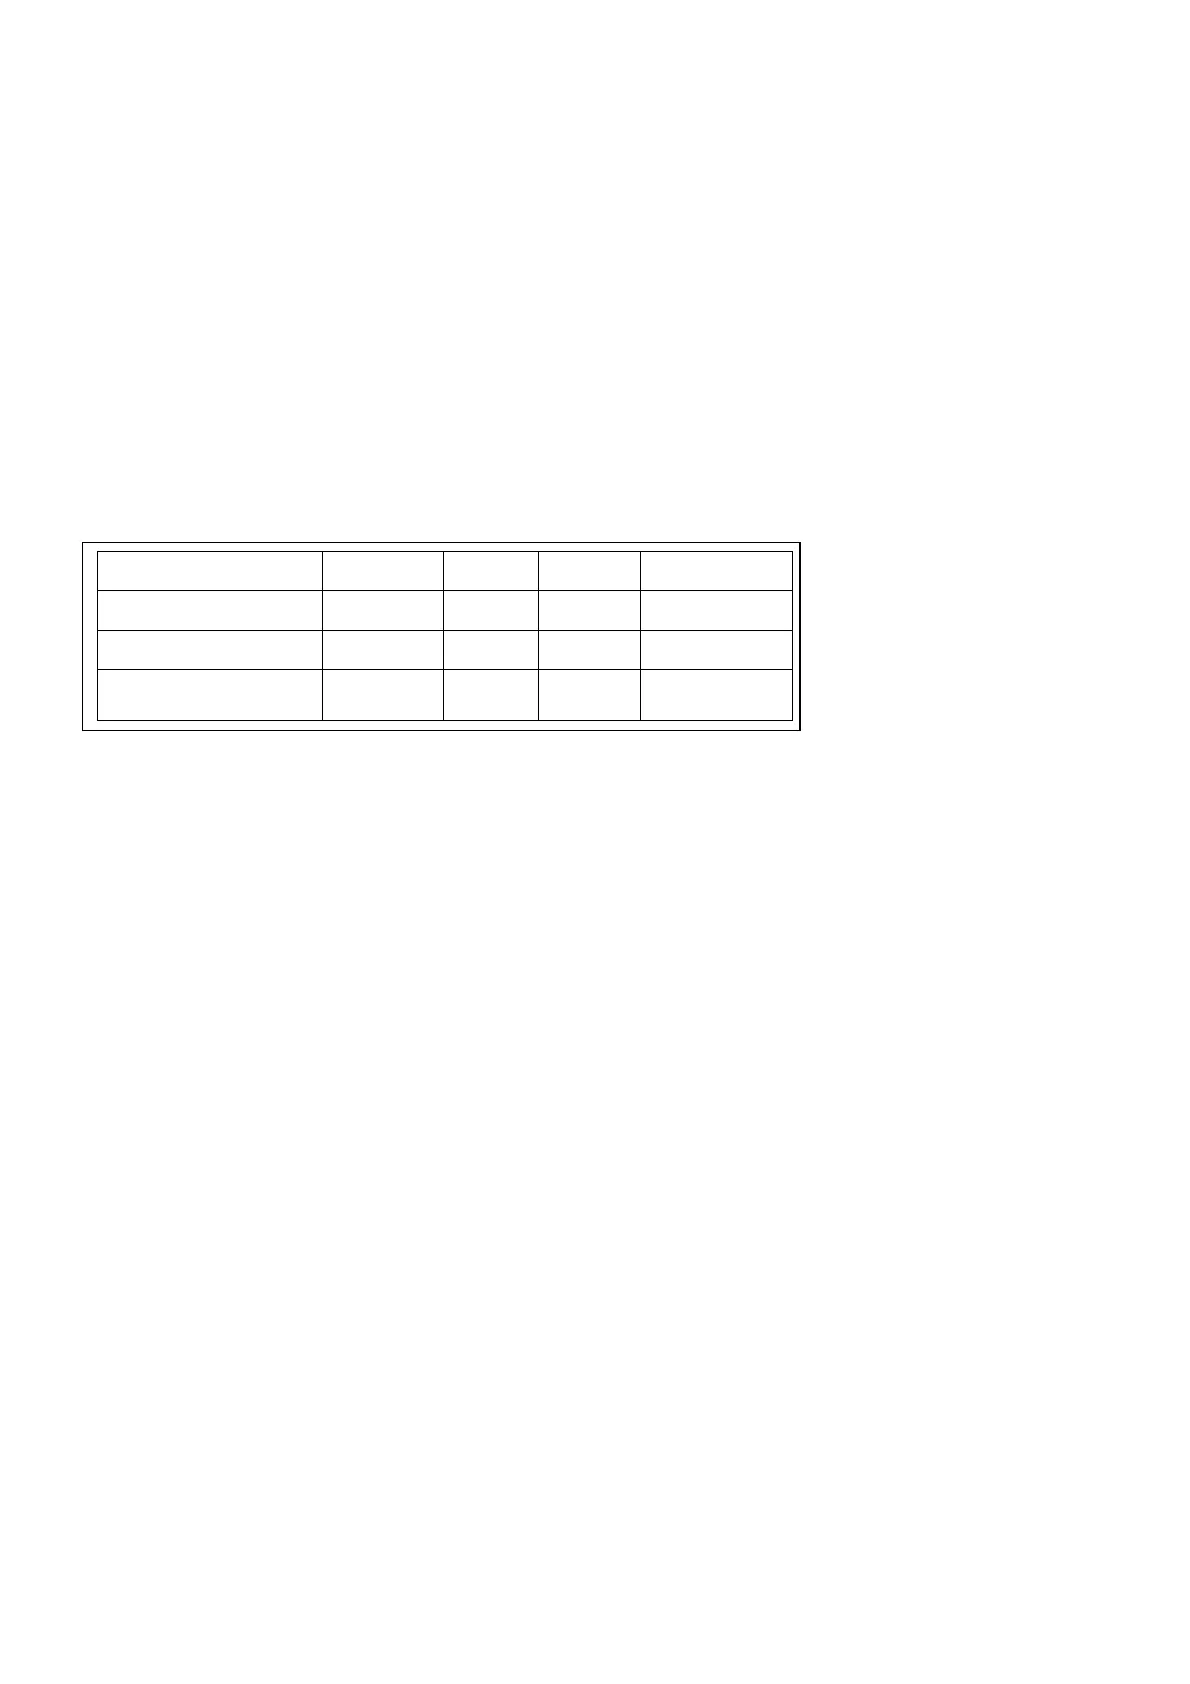
• The table below shows the different selectable configurations:
IMPORTANT:
after configuring the machine as described above and after pressing the Escape key to confirm/exit, turn the machine off and on
with the main switch located at the back.
7.3 Setting imbalance threshold for market
- enter the service environment and, turning the unit, position to
notch 131
;
- Remaining on this notch, hold down the Enter button (with the cursor on the “spin counter” icon) for approx. 5 seconds. A window with the
message “SEL EUr” (factory setting) is displayed on the monitor;
- Press ENTER to change the market (refer to the working zone), the message “USA” or “JAP” (Japan) will appear on the monitor;
- Press the ESCAPE key to exit and confirm the selection that was made.
7.4 Enabling wheel spin simulation
This programme makes it possible to perform subsequent wheel spins in automatic mode by setting a fixed time (seconds). This setting may be
used to check over time if there are any mechanical or electronic machine anomalies.
- access the service environment and, turning the unit, position it to
notch 244
;
- Remaining on this notch, hold down the Enter button (with the cursor on the “spin counter” icon) for approx. 5 seconds. A window with the
message “Delay= 10” appears on the monitor.
- Press the arrow keys to change the pause time between one spin and the next one. It is possible to change this time from a minimum of 5
seconds to a maximum of 180 seconds.
- Press ENTER to start the wheel spin simulation cycle.
- Press the ESCAPE key to stop the cycle and exit.
7.5 Enabling Neutral Logo setting
- access the service environment and, turning the unit, position it to
encoder position notch 55
;
- Remaining on this notch, hold down the Enter button (with the cursor on the “spin counter” icon) for approx. 5 seconds. A window with the
message “Logo XXX” will appear on the monitor, where XXX is the machine setting;
- Press the Enter button to change the machine logo setting. The following settings will appear on the monitor:
Logo STD
→
manufacturer logo displayed
Logo OFF
→
manufacturer logo NOT displayed, or specific logo enabled if applicable.
Logo 2
→
manufacturer logo NOT displayed
Logo 3
→
manufacturer logo NOT displayed
- Press the ESCAPE key to exit.
8. E2PROM MEMORY RESET PROGRAMME
Proceed as follows to perform the E2PROM calibration parameter zero-setting test t5:
UNBALANCE UNIT OF
MEASURE: GRAMS/OUNCES