Fig.9b
• Press "Enter" to calibrate the distance;
• Return the sensor to the rest position.
Exit the sensor calibration programme by pressing the “Escape” key.
If the calibration has been performed successfully, an acoustic consent signal is emitted. If the message A 20 is displayed, this indicates that the
position of the sensor during the calibration phase is incorrect. Position it correctly, as already described, and repeat the procedure.
If this message remains displayed, check in the service environment the correct reading of the distance, the diameter and the zero-setting in the
rest position as reported in the “Service Programmes” paragraph.
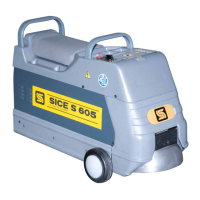
Adjustment of the laser line on the lever of the internal probe
If it is necessary to adjust the laser line on the lever of the internal probe, proceed as follows:
- fit on the machine a wheel preferably made of iron;
- remove the internal sensor and then press the power button (A, Fig.9c) of the laser;
- loosen the laser fixing screw (B, Fig.9c) in its housing;
- turn the laser itself so that the line is visible along the entire rim of the rim (Fig.9d);
- tighten the previously loosened fixing nut.
Fig.9c