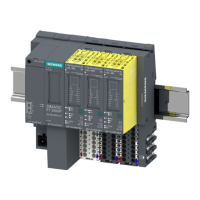
⑩ X5051:
Connection for external braking resis‐
tor
MRES Service button LED
⑪ Supply for power unit PN PROFINET status display LEDs
⑫ 2-port switch CHx Input/output LEDs
⑬ Service button PWR Supply voltage LEDs
⑭ X4050:
Rotational speed acquisition (Hall sen‐
sor, incremental encoder)
⑮ microSD memory card
Figure3-2 Circuit diagram of PDC600
3.3 Connecting the supply voltages
Introduction
You connect the 24 V DC supply voltage for the PDC logic unit and the inputs/outputs to terminal
connectors X5060 (1L+ and 1M) and X4060 (2L+ and 2M).
Pins 3/4 (2L+) and Pins 1/2 (2M) of interface X4060 are electrically connected to one another. If
you connect the supply voltage to Pin 3 (2L+) and Pin 1 (2M), you can use terminals 4 (2L+) and
2 (2M) to loop through the potential to Pins3 (1L+) and 1 (1M) of interface X5060.
You connect the 24VDC to 48VDC supply voltage for the power unit to connector X5050
(4L+ and 4M).
Requirements
• Only wire the connection plug when the supply voltage is turned o.
• Observe the rules and regulations on operation described in the System Manual SIMATIC
MICRO-DRIVE Drive controller PDC (https://support.industry.siemens.com/cs/ww/en/view/
109774126).
• Observe the rules and regulations described in section Product overview (Page11).
Required tool
Screwdriver (recommended):
• For double-level terminal connector, size 0.4x2.5mm
• For single-level terminal connector, size 0.6 x 3.5mm
Connection of supply voltages for the PDC logic unit and the inputs/outputs (24VDC)
• Pin assignment: Interface X4060 for supply voltage of inputs/outputs
Connecting
3.3Connecting the supply voltages
PDC600(F)
24 Equipment Manual, 12/2023, A5E50502703-AB