12
echochange
12
Echochange - Manual / echochange
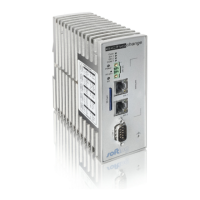
LEDs
The 5 LEDs have the following meanings:
echo device correctly connected to the power supply
Indicates that a configured connection has been established
IPv4 address configured for TP1
IPv4 address configured for TP2
2.5 Getting Started
Before working with the device, you need to carry out the following steps:
1. Mounting
2. Connection to the AC adapter
3. Connection to the Ethernet network
4. Installation of the NetCon configuration software
5. Connection of PC and device
6. Basic configuration
Mounting
Install or remove the device only when it is switched off
Horizontal mounting
Keep the device away from heat and electrical interference
Do not cover the cooling slots on the top and bottom
Leave enough space for ventilation
The echo device can be mounted on a top hat rail. Additional accessories are not required for top hat
rail mounting. The device is provided with a snap lock for easy mounting on a top hat rail (DIN rail).
Do the following:
1. Hang the rear panel of the device on the DIN rail.
2. Swivel the device down in the direction of the DIN rail. Make sure that the device properly snaps
into place and is securely fastened to the rail.
Connection to the AC adapter
Connect the AC adapter with the device and then plug the adapter into the AC mains power supply.
The device has no ON/OFF switch. It switches on automatically when the AC adapter is
plugged into the mains power supply.
Wait until only the green Power LED is on.
This means that the device is ready for operation.