Paramount MX User Guide
47 | Page
firmly grasp the Versa-Plate with your left hand to prevent sudden rotation
of this axis from an unbalanced payload.
• Before rotating the RA Axis Three Position Switch with your right hand,
firmly grasp the Counterweight Shaft with your left hand to prevent sudden
rotation of this axis from an unbalanced payload.
When the switch is rotated to, or passes through the Balance Position, the axis will
rotate freely. Unexpected rotation of either axis due to an unbalanced payload can
cause serious damage to the mount or personal injury!
Always use extreme caution and, please, always use BOTH HANDS!
Track Position: Rotate the arrow on the switch fully counterclockwise to engage
the worm with the gear. This position is used during normal mount operation.
Balance Position: Rotate the arrow on the switch to the center position to
disengage the worm from the gear so that the axis rotates freely.
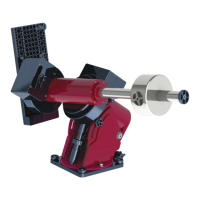
Balancing either the right ascension or declination axis of the
Paramount MX is always a two-
carefully read the document shown in Figure 10 for details
about where to grasp each axis before placing the Three
Position Switch in the Balance Position.
This position is for balancing the payload and is the recommended position to
place the switch after the mount has been placed inside the shipping container
box and while the mount is being transported. If the mount is subjected to a
severe impact during shipping, both axes will rotate freely. Unrestricted motion
in each axis can help minimize damage to the worms and gears.
The Paramount MX must always be homed after balancing
either axis! Otherwise, the mount will be “lost in space” and
potentially slew beyond the software slew limits.
Lock Position: Rotate the switch fully clockwise to separate the worm from the
gear and lock the axis in place. Always lock both axes before lifting the mount.
An axis can be locked to any position, at 5 degree increments. Note that
physically rotating the switch to the Lock Position inserts an internal locking shaft
into one of 72 locking holes that are machined into the internal gear. You will
usually need to wiggle the axis a few degrees back and forth in order to align the
locking shaft with one of the locking holes. When the shaft enters the hole, the
entire Three Position Switch will drop slightly into worm gear cover. Once locked,
the axis can no longer rotate.