2) Insert USB flash drive with update program into the DONGLE port on
the bottom of the inverter. Turn on DC switch or connect the PV connector.
48
49
4) After the upgrade is completed, please pull off the U-disk.
If the upgrade fails, please repeat the above operation.
WARNING!
ARM
DSP
Cancel
OK
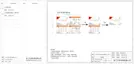
Update(ARM)
Updating----25%
Update(ARM)
>323101023800... ...
ARM
DSP
Update(DSP)
Updating----25%
Update(DSP)
>323101023700 ... ...
3) Short press up and down key to select the one that you want to update
and long press down key to confirm.
>
>
>
5.6 Run the Inverter
Start inverter after checking all below steps:
Ø
Ø
a) Check that device is fixed well on the wall.
b) Make sure the DC breaker and AC breaker are disconnected.
c) AC cable is connected to grid correctly.
d) The DC cable is properly and reliably connected;
e) The ground cable is properly and reliably connected;
f) The communication cable is properly and reliably connected.
g) All PV panels are connected to inverter correctly.
h) No foreign items, such as tools, are left on the top of the machine or in
the junction box (if there is).
I)Turn on the external DC and then AC connectors.
j) Turn on the DC switch to the "ON" position.
Start the inverter
a) Inverter will start automatically when PV panels generate enough
energy.
b) Check the status of LED indication and LCD screen, the LED indication
should be blue and the LCD screen should display the main interface.
c) If the LED indication is not blue, please check the following conditions:
Ø
- All the connections are correct.
- All the external disconnect switches are closed.
- The DC switch of the inverter is in the “ON” position.
The following is the three status when operating, which means inverter
starting up successfully.
Inverter is waiting to check when DC input voltage from panels
is greater than 40 V (start-up voltage) but less than
50 V (lowest operating voltage). When the inverter with
auxiliary power supply lacks PV, the screen also shows
“waiting”.
Inverter will check DC input environment automatically when
DC input voltage from the PV panels exceeds 50 V and PV
panels have enough energy to start inverter.
Inverter begins to operate normally when the blue light is
constantly on.
Meanwhile feedback energy to grid (if condition permits), LCD
displays present output power.
NOTE!
The format of U-disk system shall be FAT32.

 Loading...